
Add network validation
Validate that network requests were executed as expected
The network validation step allows you to validate your network requests. It is a predefined validation step that receives an array (networkRequests) of objects (see table below). This step enables you to run JavaScript code on the networkRequests array.
This is a pro feature
This feature is only open to projects on our professional plan. To learn more about our professional plan, click here.
This step can run only in ‘extension’ run mode with either Chrome or Edge Chromium.
Network Validation
The following objects (in the networkRequests array) are available to validate:
Request/Response Body
It is also possible to capture the request and response body, see ?? for more details.
| Object | Property |
|---|---|
| url | The request URL. |
| source | The page that generated the URL. |
| method | The request method. (e.g. GET, POST, PUT, etc.) |
| startTime | The Unix time (ms) when the request started loading. |
| endTime | The Unix time (ms) when the request finished loading. |
| tabNumber | The tab that was the source of the request. |
| statusCode | The response status code of the request. |
| statusText | The response status text, corresponding to the status code. |
| isBlocked | Indicates if the request was blocked. true = blocked false = not blocked |
| blockReason | The reason the request was blocked, if any. (e.g. ad blocker, request failure, origin, CORS, etc.) |
| isDone | Indicates if the request might still be pending. true = done false = pending |
| type | The type of data the response contains. (e.g. XHR, document, Image etc.) (from Chrome) |
| responseSize | The total size of the response (encoded, including the headers) in bytes. |
| protocol | The network protocol. (e.g. h2, http/1.1) (from Chrome) |
To add an Add network validation step:
- Hover over the (arrow symbol) where you want to add the step.

The action options are displayed.

- Click on the “M” (Testim predefined steps).
The Predefined steps menu opens.

- Click on Validations.
The Validations menu expands.

- Scroll down through the menu and select Add network validation.
Alternatively, you can use the search box at the top of the menu to search for Add network validation.
The Add Step window is shown.

- In the Name the new step field, enter a (meaningful) name for this step.
- If this is a shared step to be made available to reuse in this or other tests, keep the box next to Shared step selected (default), and choose a folder from the Select shared step folder list where you want this step stored. Otherwise, deselect the checkbox.
For more information about shared steps, see Groups. - Click Create Step.
The function editor opens, and the Properties panel opens on the right-hand side.

- In the Properties panel, in the Description field, optionally edit the description of this step. The default description is “Run network validation”.
- Define the parameters you will need for your step as follows:
a. In the Properties panel, click the + PARAMS button.
b. JS parameter: If you would like to add a JavaScript parameter, select JS from the dropdown list and type in the JavaScript parameter.
c. HTML parameter: If you would like to define an HTML element as a parameter, select HTML from the dropdown list. The browser opens, displaying the relevant webpage for this step. Do the following:- In the AUT window, hover your mouse on the relevant element and then click on it to select it. The selected element is shown in the Target Element box in the Properties pane. If you would like to view, replace or adjust the settings for the selected element, use the procedures described in Editing Target Element Properties.
d. The selected element is automatically named “param” or “element” (depending on whether you chose a JS parameter or HTML element). To assign a relevant name to the parameter/element, click on the edit icon and enter the desired name.

- Optionally fill in the following Properties:
- When this step fails – Specify what to do if this step fails.
- When to run step – Specify conditions for when to run the step. For more information, see Conditions.
- Override timeout – Allows you to override the default time lapse setting which causes Testim to register a fail for a test step, and specify a different time lapse value (in milliseconds).
- In the function text box, type in the desired JavaScript code. If you have defined parameters, you can refer to those parameters in your JavaScript code.
If you are using DOM selectors other than HTML parameters (e.g. jQuery), then empty arrays are truthy, so you need to use
$(<query>).lengthinstead of$(<query>).
- Click the back arrow to return to the main Editor window.

If you opened your AUT to define an HTML element as a parameter, click on the Toggle Breakpoint button to remove the breakpoint.
The step is created.

Network Validation Examples
Validate all the image requests

Example Code:
function validateRequestStatuscode(req){
  //Get status code
 const statusCode = req.statusCode.toString();
  //Check if we got an error
 const badReq = statusCode.startsWith('4')  || statusCode.startsWith('5');
  //If we got an error fail the step
  if(badReq){
    throw new Error(`assert failed for request "${req.url}" method: "${req.method}". Statusc code was ${req.statusCode}`);
  }
}

console.table(networkRequests)
const imageCalls = networkRequests.filter(call => call.type == "Image");
imageCalls.forEach(validateRequestStatuscode)
Validate a single request

Example Code:
if(networkRequests.length == 0){
 throw new Error('No requests were made during the time of the test')
}

function validateRequestStatuscode(req){
  //Get status code
 const statusCode = req.statusCode.toString();
  //Check if we got an error
 const badReq = statusCode.startsWith('4')  || statusCode.startsWith('5');
  //If we got an error fail the step
  if(badReq){
    throw new Error(`assert failed for request "${req.url}" method: "${req.method}". Statusc code was ${req.statusCode}`);
  }
  return true
}

//Filter the source of the request
function filterReqestsBySource(source,req){
  const reqSource = req.source
  if(source === reqSource) return true
  return false
}

//find a single request by it's url and check if they are all valid

const singleReq = networkRequests.find(item => item.url == 'http://demo.testim.io/bundle.css')

if(!singleReq){
 throw new Error('Request was not found')
}

return validateRequestStatuscode(singleReq)
Validate all requests have passed

Example Code:
function validateRequestStatuscode(req){
  //Get status code
 const statusCode = req.statusCode.toString();
  //Check if we got an error
 const badReq = statusCode.startsWith('4')  || statusCode.startsWith('5');
  //If we got an error fail the step
  if(badReq){
    throw new Error(`assert failed for request "${req.url}" method: "${req.method}". Statusc code was ${req.statusCode}`);
  }
}


//Check all the requests and see if they are all valid
networkRequests.forEach(validateRequestStatuscode)
return true
Validate max time of call

Example Code:
const callDur = networkRequests.map(call => call.endTime - call.startTime)

const isOverMax = callDur.some(time => time > maxTimeInMS)

if(isOverMax) throw new Error(`Some calls were over ${maxTimeInMS}MS`)
Example Parameter:
| Name | Type | Value |
|---|---|---|
| maxTimeInMS | JavaScript | {the maximum number of milliseconds allowed for the network call before the step fails} |
Capturing Request and Response Body
Feature flag
To enable this feature, please contact support.
As part of the network validation, in addition to the array of objects captured in the request/response, as described above, it is also possible to capture the request and/or response body and then use the add network validation step to perform validations on the body content. The body content itself will not be shown in the network logs, but will be added to the networkRequests array.
Enabling this option may affect the performance of your test.
To enable the capture of the request and response body:
-
In the Setup Step, click Show Properties.
-
Under Network Capture Options, select the Capture request body and/or Capture response body options.
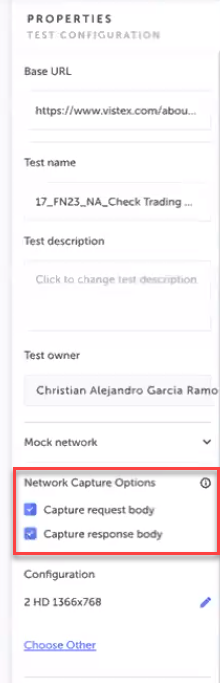
-
Click Save to save the test.
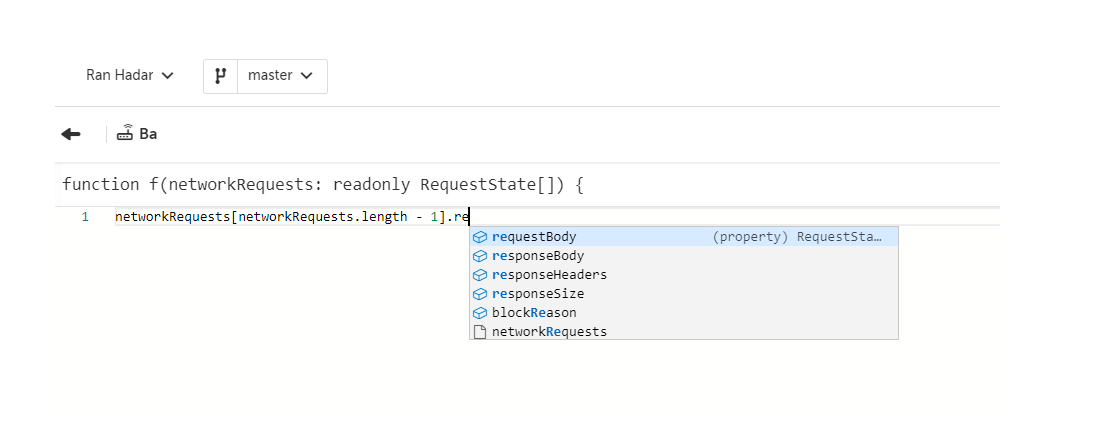
Adding the request/response body to the add network validation step
After enabling the Network Capture Options (Capturing Request/Response Body), in the
Add network validation step, the parameter networkRequests will be available and will hold all of
the requests that were made. Each request object has the following properties: method, statusCode, resposeHeaders, requestBody (this is the new property), responseBody (this is the new property), headers, and more. When adding the Add network validation step, it is possible to add the requestBody and/or responseBody properties, as shown below.
Only fetch and XHR network request/response body will be captured.
Test example
The following test example features the Request/Response Body in a network validation step:
https://app.testim.io/#/project/GYXR2qZC/branch/master/test/8PsdGWbxJx7NsZji and prints the
body payload to the console.
Updated about 1 month ago