
Running Tests Overview
Learn how to run tests
There are multiple ways to run tests on Testim:
Local runs
- Test Editor (Web & Mobile)
- Test List (Web only)
- Suite List (Web only)
- Plans List (Web only)
- CLI (Web & Mobile)
Remote Runs
- Test Editor (Web &Mobile)
- Scheduler (Web only)
- CLI (Web & Mobile)
How are test runs counted towards your subscription
Your subscription comes with a maximal number of test runs. Local editor runs are exempt from this count, while other run types are included, as described in the table below.
| Run type | Illustration | Run location | Counted towards run quota | Notes |
|---|---|---|---|---|
| Local editor runs |  | Local | No | This includes the two types of local editor runs: ‘run locally’ and ‘run locally without debug’ |
| Local test execution | 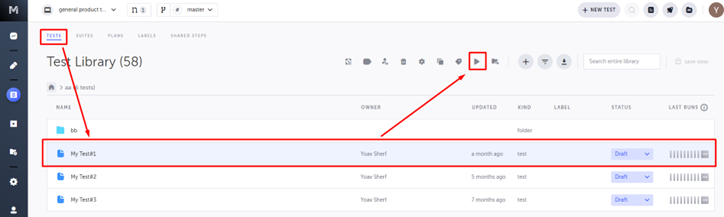 | Local | Yes | It is recommended to run stable tests via grid. |
| Local suite execution |  | Local | Yes | It is recommended to run stable tests via grid. |
| Local test plan execution |  | Local | Yes | It is recommended to run stable tests via grid. |
| Local CI run | 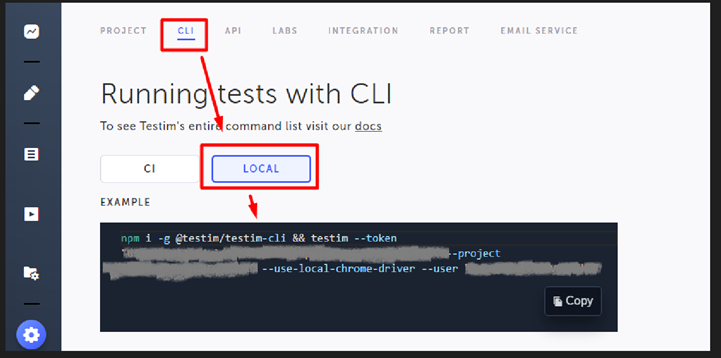 | Local | Yes | Need to run the CLI command via CI tool /local terminal/Shell |
| Run test on grid | 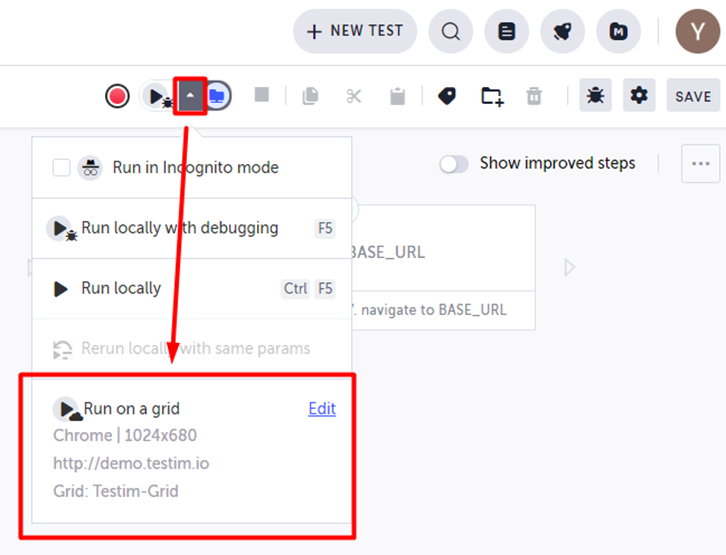 | Remote | Yes | |
| Scheduler (automatic) | 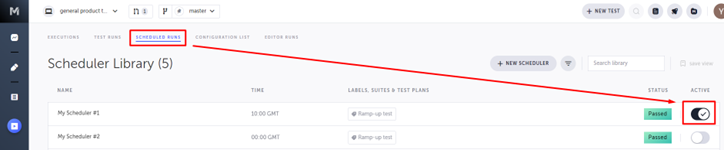 | Remote | Yes | Once scheduler is created and active, the relevant tests will run automatically at the configured time. |
| Scheduler (manual) |  | Remote | Yes | Will run immediately, regardless of the scheduler active status |
| Remote CI run | 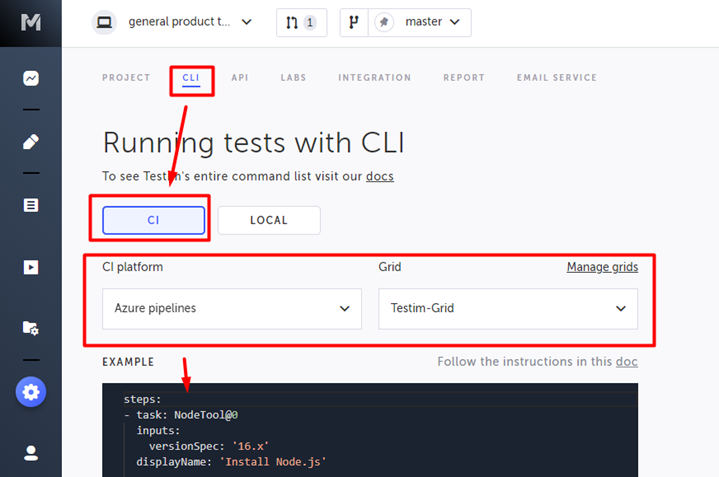 | Remote | Yes | - Need to run the CLI command - Can be run from your terminal/shell - Azure pipeline is one of several CI options |
Running a single test through the test screen on Testim Automate UI (web & mobile)
You can run a single test locally or remotely on the Grid using the Testim Automate UI. You can also run the test locally or remotely in Incognito mode.
Running a local web test
To run a web test locally:
In the Editor screen, click the Run test button.

Running a local mobile test
To run a mobile test locally:
- Click the Run button in the action menu.
.png")
If a Target device setting for the test is not present (e.g., when you run the test from Test Library), you will be asked to select a device. Select the relevant physical or virtual device and then click Done. The selected device will be saved as the Target Device for the current session.
The device viewer window opens and runs the test actions. When the test is completed, a pop-up window indicates whether the test was successful.
.png")
Running a remote web test
You can run a single test remotely on a grid using the test editor.
To run a web test remotely:
- In the Editor screen, click the drop-down menu next to the Run test button.
- Click the Run on a grid.

If you want to change the grid settings, click Edit.
For more information on grid management, see Grid management.
Running a remote mobile test
Running a mobile test remotely requires a grid connection and Mobile Configuration. The mobile configuration will determine specific mobile devices to use in the run, however if a mobile configuration is not provided, Testim will use the first available mobile device from the selected grid. You can run a single test remotely on a grid using the test editor. For more information on grid management, see Grid management.
To run a mobile test remotely:
- In the Editor screen, click the drop-down menu next to the Run test button.
- Click on the Run on a grid option to run the test with the default grid and configuration.
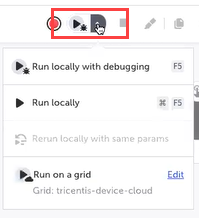
- Click the Edit link to select a grid to run on and a different device and mobile app that will override the original test settings.
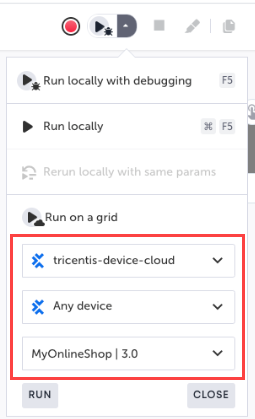
- Click the Run button to run the test remotely.

Running a single or multiple tests through the Test List on Testim UI (web only)
You can run one or more tests from Testim’s Test List. Tests run in this way will only run locally.
To run a test from the Test List:
- On the Test List screen select the test or tests you wish to run. Select multiple tests by holding the Ctrl (windows) or Command (mac) key while left-clicking on the tests.

The selected tests are highlighted.
- Click the Play button.

A confirmation window is shown.

- Select the appropriate check boxes and click OK.
A browser opens and runs the test/s. You can view the run status during the run. When the run is completed, the Runs screen is shown with information about the run. For more information, see Execution Runs Screen.

Running tests through Scheduler on Testim UI (web only)
You can schedule tests to run on a predefined schedule. In order to schedule a test run, the test must have a Label or be part of a Test Suite.
Tests run in this way will only run remotely on the grid. For more information, see Scheduler.
Running tests through the Suites screen on Testim UI (web only)
Using the Test Suites feature, you have the flexibility to group your tests and manage the order in which they will run. Tests run in this way will only run locally. For more information, see Test suites.
Running tests through the Plans screen on Testim UI (web only)
Using the Test Plans feature, you can run multiple tests, while configuring the environment on which they will run. Tests in the test plans can run locally and/or remotely through the CLI. For more information, see Test plans.
Running Tests through the CLI (web & mobile)
You can run your tests through the command line interface and integrate with your CI platform. Testim offers a CLI command generator that creates the basic command based on the selected configuration. The command can be then copied to the CLI and additional flags can be then added. For more information, see Command line interface (CLI).
Running web tests through the CLI
You can run the test locally or remotely through a Grid.
Running web tests remotely through the CLI
If you want to run it through a Grid, you will have to configure the grid in advance by following the instruction in Grid management.
The following grids are available for web testing:
- Testim cloud grid - Testim can set up a grid with the required number of browsers and browser type. If you don't already have it, contact us to find out which option fits you.
- Local grids - If you have a selenium grid, we can integrate with it.
- Third party grids - Testim can integrate with third party grids like Saucelabs and Browserstack.
To run a remote web test through the CLI:
- If you want to run through a Grid, you will have to configure the grid in advance by following the instruction Grid Management.
- Go to Settings > CLI tab.
- Make sure the CI option is selected (default).
- Under Grid, select the desired grid on which to run the test.
The basic CLI command is displayed at the bottom under Example.
The basic command includes the following elements:
--token: the authentication token
--project: the project ID
--grid: the name of the grid to run the tests on. - Copy the CLI command, edit and add parameters according to your needs.
Running web tests locally through the CLI
To run a local web test through the CLI:
- Go to Settings > CLI tab.
- Click Local.
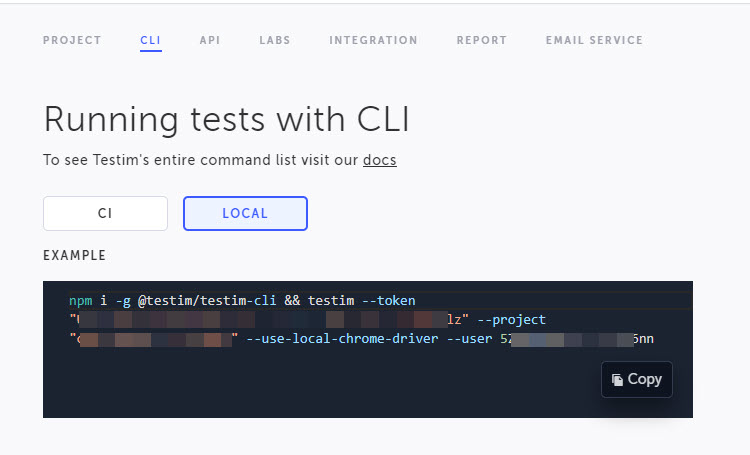
The basic CLI command is displayed at the bottom under Example.
The basic command includes the following elements:
--token: the authentication token
--project: the project ID
--use-local-chrome-driver: - runs the test on a local, clean, extension-free Chrome browser.
--user - your user ID. The user ID is generated automatically by the system. Specifying this User ID will trigger the execution under your user. If this tag is not included in the CLI command, the execution will run under a general CI user.
- Copy the CLI command, edit and add parameters according to your needs.
Running mobile tests through the CLI
You can run the test locally or remotely through a third party Grid.
Running mobile tests remotely through the CLI
To run a mobile test remotely through the CLI:
- If you want to run the through a Grid, you will have to configure the grid in advance by following the instruction in Grid management.
- Go to Settings > CLI tab.
- Make sure the CI option is selected (default).
- Under Grid, select the desired grid on which to run the test.
The basic CLI command is displayed at the bottom under Example.
The basic command includes the following elements:
--token: the authentication token
--project: the project ID
--grid: the name of the grid to run the tests on.
--mode: For mobile testing,appiumgrids will be displayed. - Copy the CLI, edit and add parameters according to your needs.
You can run a specific test, label, configuration, and other labels, as explained in Command line interface (CLI).
Running mobile tests locally through the CLI
The locally run mobile tests can be executed on a single device only (no parallel executions). It is possible to run serially with one device, which is connected locally or a virtual device.
To run a mobile test locally through the CLI:
- Go to Settings > CLI tab.
- Click Local.
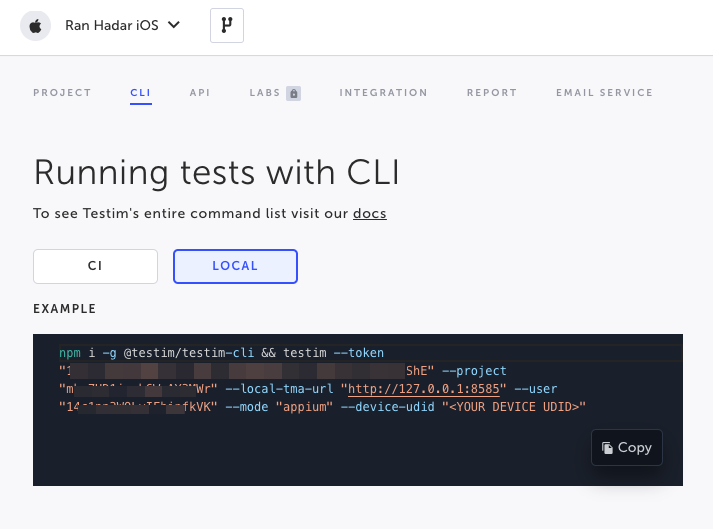
The basic CLI command is displayed at the bottom under Example.
The basic command includes the following elements:
--token: the authentication token
--project: the project ID
local-tma-url: the URL of the local TMA (Tricentis Mobile Agent) on your machine. This URL can be obtained by opening TMA and copying the URL from the address bar.
--user: your user ID. The user ID is generated automatically by the system. Specifying this User ID will trigger the execution under your user. If this tag is not included in the CLI command, the execution will run under a general CI user.
--mode: the mode of the run. For mobile tests, the mode is always appium.
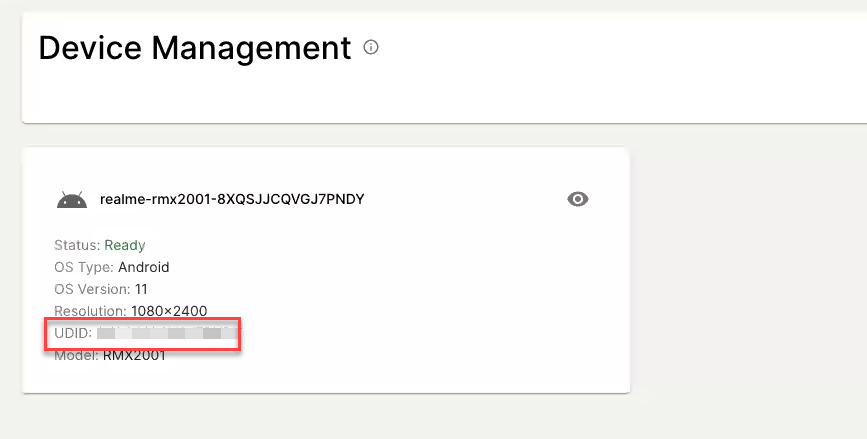
--device-udid: (mandatory) enter the local device UDID. This can be a physical device that is connected to the computer or a virtual device that is provided by Xcode or Android Studio. This ID can be obtained by opening TMA > Device Management, clicking Device Management on the top menu, and copying the UDID of the device.
It is possible to select only a single UDID for the execution (no parallel executions).
- Copy the CLI command, edit and add parameters according to your needs.
You can run a specific test, label, configuration, and other labels, as explained in Command line interface (CLI).
Tests' Timeouts
By default, all tests will timeout after 10 minutes. However in the following cases, you can set a different timeout setting:
- When using the Scheduler - as part of the scheduler Advanced Options configuration, it is possible to set the Test timeout (seconds) setting. In any case, the maximal test timeout period is 3 hours. For more information, see Scheduler
- When running through the CLI - when running the test through the CLI, it is possible to add a
--timeoutflag that defines a timeout period in milliseconds to abort the test run if a timeout has elapsed. For more information, see Command line interface (CLI). - When running web test remotely via the test editor - when running the test remotely on grid through the test editor, it is possible to set test timeout in seconds to abort the test run if a timeout has elapsed. For more information, see Running a remote web test
Updated 6 months ago