
Recording a Mobile Test Using VMG
The Virtual Mobile Grid can be used to record tests as well as to run them across a wide variety of iOS simulators and Android emulators. It is connected to your Mobile Apps Library. This means that if the test that you are running uses a mobile app, this app needs to be added to the Mobile Apps Library before running the test on the Virtual Mobile Grid.
The Virtual Mobile Grid does not require any special integration. It is included in the license for paying customers. However, Community license users can to enroll in a free trial as a Company Owner or Project Owner. Once the free trial is started, the Virtual Mobile Grid is immediately available under Device Management. During the free trial period, a variety of virtual devices (Android and iOS) will be available for you to use.
Before we begin
Before we begin, make sure you have the following:
- A mobile testing project - mobile testing requires a mobile testing project that is separate from the web testing project. If you do not have an existing mobile project, contact Tricentis support.
Note:
Each project is assigned to a single mobile operating system. A separate project is required to create/run tests on different operating systems. For example, you cannot create a test for an iOS device if the project was created for Android.
- Virtual Mobile Grid - The Virtual Mobile Grid does not require any special integration. It is included in the license for paying customers. However, Community license users, it is possible to enroll in a free trial as a Company Owner or Project Owner. During the free trial period, a variety of virtual devices (Android and iOS) will be available for you to use. For more information, see Virtual Mobile Grid.
- Native Application - in the current version only native apps are supported. For Android devices - Java or Kotlin apps. For iOS devices - Objective C or Swift.
Recording a Mobile Test
You can record a test on a mobile device to be run manually or automatically at a later time. During the test you can record only a single application from one device. However, when playing back the test, you will be able to run the same test on another device than the device used during the recording.
iOS virtual/physical recording
For iOS, tests that were recorded on a virtual device, such as the virtual devices provided on the Virtual Mobile Grid, can be run on virtual devices only. And tests that were recorded on physical devices can be run on a physical device only.
To record a mobile test:
-
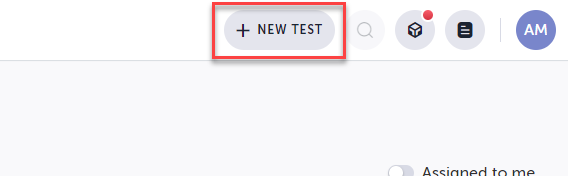
From the Dashboard screen click the New Test button.
-
To begin recording your test, click the Record button in the action menu.
-
In the Select a device dialog, select Virtual Mobile Grid and then select the desired Device and OS version from the drop-down menus.
-
Select an Application to be tested. In this tutorial we will test one of the applications from the Virtual Library. Do one of the following:
- To use an app from the library - click From Library and then navigate and select the desired application. Click Done to finish.
- To upload an app - click Upload App and then from the .apk file to the designated area or click to open a file explorer to find the file.
App compilation compatibility (iOS only)
If you want to record a test using a virtual device, make sure that that the app was compiled for virtual devices (.app). And vice versa, if you want to record using a physical device, make sure that the app was compiled to work on physical devices (.ipa). See How to Prepare a .ipa for Mobile Testing for more information.
When running the test on Virtual Mobile Grid it may take about 30 seconds up to a minute to initiate the test because the test is run on a clean device (with a cleared cache and without any apps).

Note:
Each test can only interact with a single application.
- An AUT Mirroring Viewer is displayed with the opened application under test. The viewer allows you to view the device and interact with the application under test, while Testim records the actions. See Supported Mobile Actions
Note:
Test steps are only recorded by taking actions on the AUT Mirroring Viewer. Taking actions directly on the device will not record test steps.

Important Notice
When recording a test, try to choose text elements and avoid outer frames, images and icons for better stability.
.png")
- To stop recording, click the Stop Recording button or close the Viewer window.
.png")
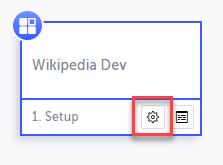
-
Click the Show Properties button on the Setup step.
-
In the Properties Pane, configure the following settings:
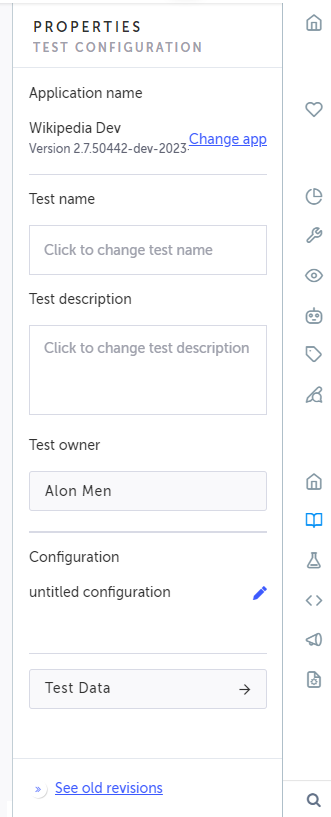
- Test name - enter the name for the test. By default the test name is "untitled test"
- Description - optionally enter a description for the test.
- Configuration - by default the configuration is set to use any device with any OS version that is available on VMG. If you would like to use a different configuration, see Setting the Test Configuration.
- Test Data - allows you to configure data-driven tests by defining a Data Set in JavaScript or multiple ordered Data Sets with a JS Array literal of objects. See Configuring a Data-driven Test From The Visual Editor.
- Click Save to save the test.
- If you want to configure additional test configuration settings, see Setting the Test Configuration.
Supported Mobile Actions
The following actions are currently supported when using the AUT Viewer during the recording of the test:
- Tap - simulates a user tapping an element on the mobile device screen. To create this step, click the mouse on the AUT Viewer screen during recording.
- Swipe Vertical - simulates a user pressing and dragging their finger across the screen vertically. To create this step, click the mouse, drag the cursor in a vertical direction, and release the mouse button.
- Swipe Horizonal - simulates a user pressing and dragging their finger across the screen horizontally. To create this step, click the mouse, drag the cursor in a horizontal direction, and release the mouse button.
- Set Custom Text - simulates a user entering text into a text field in the app. When hovering your mouse on a text element, the element is highlighted in red. Clicking the text element open a Set Custom Text window. Enter the desired text in the field and click the Send button.
Adding additional steps and edit the properties
During the recording or after the test is saved, you can add additional predefined steps and edit the some or all of the steps' properties.
To learn more about common step properties, see - Editing a Step’s Properties
Supported Predefined Mobile Actions
The following actions are currently supported when adding steps manually during or after the recording of the test:
- Validate email - Testim offers a built-in email service which provides permanent and temporary email addresses. The Validate email step can be used with these email addresses to test your app sign-up or login flows.
- Validate element visible - The element visible validation allows you to check whether your element exists and is visible on the page. If your element contains a variable image or text, validation will still work. This validation verifies that the element exists and is visible, but does not check its specific content.
- Validate element text - An Element Text validation is similar to an Element Visible validation in that it makes the step dependent on the existence of a specific element. However, for the Element Text validation, you also specify a particular text value that must appear in the specified element.
- Wait for element visible - Use wait for element visible to wait for your element to be visible on the page.
- Wait for element text - Use wait for element text to make sure a specific text appears before continuing with the test.
- Sleep - Enable waiting for a period of time between steps. - Add extract value step - Lets you copy values directly from your application to be used in later steps.
- Add set text step - adds a specified text to the selected target element.
- Code verification - sends key strokes to the device. This is typically used to fill code verification elements, such as a one-time password code element. It is possible to add delays between characters.
- Generate email address - generate a new random email address to be used every time you run a test, for example to test a sign-up flow multiple times with a new user each time.
- Add CLI action - executes custom Node.js scripts in your CLI environment.
- Add API action - used when you want to get data that is returned from an API call. You can use this data just to check that it is returned.
Before running custom code using Add CLI action and/or Add API action steps, you will need to run Testim CLI.
- Generate random value - generates random values for dynamic data testing.
- Generate date - generates a date according to predefined properties.
- Reset app - In Android this step closes the application, clears the cache and then starts the app again. In iOS this step closes and starts the application (does not clear its cache). The step is typically used to reset the app and clear its cache before the next run.
- Back - sends a back command to the device. Supported in Android only.
- Scroll to element text - dynamically scrolls to the selected text element.
- Execute Driver Script Step (mobile) - The Execute Driver Script step allows you to run a script using Appium 2.0 or higher for extended capabilities and validations in your tests.
Updated 5 months ago