
Merging Branches
Merging two branches will mix steps or add entire tests from the selected branch into the currently displayed branch, which can be the master branch or any other branch. After the merge the source branch will still exist until you specifically delete it. In the case of a conflict, you will be able to review the conflicted steps and decide which of the conflicting steps to take.
To merge two branches:
- Open the target branch to which you want to merge. For example, if you want to merge to Master, select it from the Branches drop-down menu.
- Click the Branches drop-down menu and hover your mouse over the source branch.
- Click the Merge icon.

The Merge Branch dialog displays a summary of all the changes that will be merged. At this point you should review the changes, see Reviewing Changes section below.
Reviewing changes
Before merging branches, a pop-up will be displayed detailing the changes that are about to take place during the merge.
The changes are divided into 3 categories:
- Tests
- Shared Steps (groups, custom actions, etc.)
- Suites
- Folders
At the top level, you will be able to see what changed in each category - how many new items were created, updated, or deleted. Expanding each item will display more details about the individual changes along with the ability to view the source branch and the target branch, and in case of conflicts compare between the two, while selecting the preferred change to merge, as explained in detail in the Resolving Conflicts section.
Merge cherry-pick
You can cherry-pick which tests and suites (i.e. merge items) you would like to include in the merge. By default, all items are selected. Unchecked items will not be included in merge, however, unless the source branch is deleted, they will be available for merging if you merge again.
To cherry-pick merge items:
- Click the summary drop-down to view the individual items.

The list includes details of the differences between the source and the target branches (e.g. number of new steps, number of changed steps, or deleted steps.

- If you don't want to include a test or a suite in the merge, unselect it and this will remove it from the merge.
- When finished, click Merge.
All the steps from the selected branch will be merged into the currently displayed branch, which can be the master branch or any other branch.
If the Pull Requests feature is enabled, cherry-picking will only become available once the PR is approved.
Note
If you are unsure about selecting/deselecting an item, you can view the item in the source/target by expanding the changes summary and clicking View Source/View Target.
Resolving Conflicts
When merging two branches there can be conflicts between specific steps of a test and between shared steps. For example, a step that was changed in the source, but meanwhile was deleted in the target. You will not be able to proceed with the merge process before resolving all the conflicts.
As part of the Reviewing Merge Changes process, if there are conflicts, the number of conflicts will be indicated at the top of the Merge Branch screen and by the specific item that has the conflicts.

Resolving conflicts between shared steps
Groups and shared steps (e.g. CLI Action, API Action, etc.) are merged separately not in a specific test, because these items can be used by several tests.
- In shared groups all the properties, except parameter values and group context, are shared between tests, and therefore if conflicts arise, they should be resolved at the Shared Step level, which is a separate list of conflicts for shared steps.
- In _CLI/API Action _all the properties, except parameter values, are shared between tests, and therefore if conflicts arise, they should be resolved at the Shared Step level.
To resolve the conflict between shared steps, click Compare next to the shared step that includes conflicts:

The Compare shared steps screen is displayed:

The part of the shared step that has the conflict is highlighted.
The Compare Shared Step screen features three columns:
- Source (right) – the shared step in the Source branch. If the shared step is a group, the group properties are displayed followed by all the steps within this group.
- Target (left) – the shared step in the Target branch. If the shared step is a group, the group properties are displayed followed by all the steps within this group.
- Merge (center) – the shared step in the final merged branch.
At the top of the list are the shared step properties. If it is a group, a conflicted step (in the Source or Target) within the group includes the following elements:
- Step object – the same object that appears in the test.
- Conflict reason – the action that was performed on this step for which the conflict was created. For example, in the source this step was deleted and in the target this step was edited.
- Recommended version indicator – indicates that this action was performed later than the opposite version.
A CLI/API Action shared step compare screen will look like this:

To resolve the shared step conflict:
Note
If you do not want to manually select which version to merge for this test, you can click the Resolve all button at the top and then click Confirm. To learn more, see Resolving all conflicts automatically
- Place the chosen version in the Merge (center) column by clicking the relevant arrow (left/right).
- If the Jump to the next conflict is selected (default), the next conflict will be highlighted. If it is not selected, click the Next conflict button.
- When done resolving all the conflicts in the test, click Confirm.
- Repeat steps 1-4 for each shared step that includes conflicts.
- Do one of the following:
- If there are no conflicts at the test level, when done resolving all the remaining conflicts on all the shared steps, click Merge. All the shared steps from the selected branch will be merged into the currently displayed branch, which can be the master branch or any other branch.
- If there are conflicts at the test level, resolve these conflicts by following the instructions in the next section.
Resolving conflicts between tests
To resolve the conflicts between tests, click Compare next to the test that includes conflicts.

The Compare screen is displayed:

The Compare screen features three columns:
- Source (right) – the test in the Source branch.
- Target (left) – the test in the Target branch.
- Merge (center) – the test final merged branch.
The first step contains the test properties which are revisioned:
- Test data
- Base URL
- Recorded HAR when applicable
- Test status
- Capture request/response body configuration when applicable
- Test owner
You will need to decide whether to use the properties from the source or the target (by default the latest is selected)
Each step that includes a conflict is highlighted. The conflicted step (in the Source or Target) includes the following elements:
- Step object – the same object that appears in the test.
- Conflict reason – the action that was performed on this step for which the conflict was created. For example, in the source this step was deleted and in the target this step was edited.
- Recommended version indicator – indicates that this action was performed later than the opposite version.
A test can include a shared step, such as a shared group, that has conflicts that relate to parameter values and/or group context, which should be resolved in the specific test context. For this reason the shared group may appear in the test conflict resolution screen, while displaying the specific reason for the conflict (e.g. the specific parameter value that was changed).

To resolve the conflict:
Note
Note: if you do not want to manually select which version to merge for this test, you can click the Resolve all button at the top and then click Confirm.
- Place the chosen version in the Merge (center) column by clicking the relevant arrow (left/right).

Note
If you are not sure which of the two versions to select, you can view each of the versions in context, by clicking View in Editor, which is located at the top of the column. The branch will open on the specific test in a new tab.
Note
In some cases the Recommended version indicator will indicate that this action was performed later than the opposite version. This may help in deciding which version to choose.
- If the Jump to the next conflict is selected (default), the next conflict will be highlighted. If it is not selected, click the Next conflict button.
- When done resolving all the conflicts in the test click Confirm.
- Repeat steps 1-4 for each test that includes conflicts.
- When done solving all the remaining conflicts on all the tests, click Merge.
All the steps from the selected branch will be merged into the currently displayed branch, which can be the master branch or any other branch.
Tip
The merging process will not begin until you have resolved all the conflicts in all tests. However, if you want to resolve conflicts in some tests and leave the other conflicts for a later time, you can deselect the tests that you want to leave them for a later time, see Merge Cherry-pick section above. The deselected tests will not be part of the merge process at this time.
Resolving all conflicts automatically without comparing
There is an option to resolve all conflicts at once without comparing specific conflicts and without selecting a specific version manually. In this case, Testim will automatically select the version that was changed later in time.
To resolve all conflicts automatically:
- From the Merge Branch screen, click Resolve all .

The following message appears confirming that all conflicts were resolved.

- Click Merge.
All the steps from the selected branch will be merged into the currently displayed branch, which can be the master branch or any other branch.
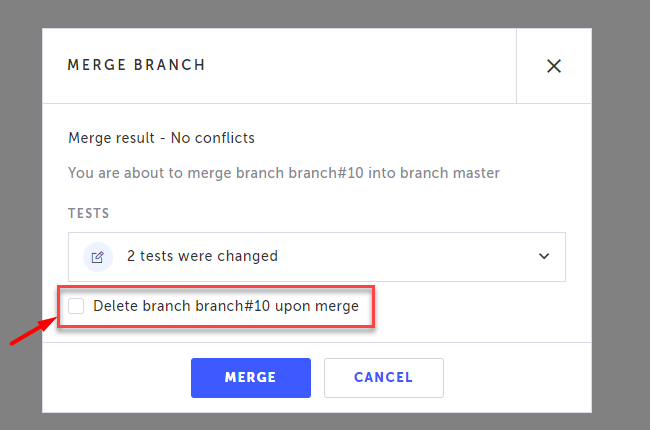
Deleting the source branch when merging
When merging the branches it is possible to automatically delete the source branch after the merge occurs. This can be done when merging following a pull request and also without a pull request.
To automatically delete the source branch:
- On the Merge Branch or Pull Request screen, select the "Delete branch x upon merge".

Updated 10 months ago