
Recording a Mobile Test Using a Local Device
Record and run mobile tests locally
Mobile tests can be recorded and run locally on both physical and virtual iOS and Android devices. The recording itself can be performed on Windows, Macs or Linux computers using a web browser. When you record a mobile test, Testim converts each action into a test step which is shown on the Testim Visual Editor screen. However, you can always manually add additional steps to the test by Editing Tests. The tests are added to the Test Library and can be run at any time.
Multi-screen devices (e.g., Foldable/Flip phones) are currently not supported.
Before you begin
Before you begin, make sure you have the following:
- A mobile testing project - mobile testing requires a mobile testing project that is separate from the web testing project. If you do not have an existing mobile project, contact Tricentis support.
Each project is assigned to a single mobile operating system. A separate project is required to create/run tests on different operating systems. For example, you cannot create a test for an iOS device if the project was created for Android.
- Tricentis Mobile Agent - in order to create and run mobile tests on Testim, you need to install the Tricentis Mobile Agent (TMA). This agent manages the physical devices connected to your workstation (e.g., phone or tablet) and simulators/emulators, running on your workstation. To install, connect the TMA to Testim, and configure your device, see - Configure Tricentis Mobile Agent
Each user that want to run local mobile tests needs to install and configure the Tricentis Mobile Agent on their computer.
- Application to test - for Android - Java, Kotlin; for iOS - Objective-C, Swift
Step 1 - Connect to TMA
As a first step you will need to connect the TMA to Testim. Follow the instructions in the following section - Connect the Tricentis Mobile Agent
Step 2 - Connect a Device
Connecting a physical Android device
To connect your Android device, you must meet the following requirements:
- Tricentis Mobile Agent is installed and running on your computer.
- Your device is in "Debug Mode" - see below.
- Complete all the steps described below.
To connect a new physical Android device:
- Connect a physical Android device to your local computer (e.g., connect a mobile phone using a USB cable).
For Android devices, the device needs to run in "Debug Mode" - Enable developer options and USB debugging. After enabling debug mode, go to Settings > Developer options and enable the USB debugging option. For more details, see the relevant section in the https://help.testim.io/docs/configure-tricentis-mobile-agent.
Once the Tricentis Mobile Agent recognizes the device, it will be listed:

Connecting a physical iOS device
To connect your iOS device, you must meet the following requirements:
- Tricentis Mobile Agent is installed and running on your computer.
- You have an active Apple Developer Account.
- Complete all the steps described below.
For more information about the process, see the following video tutorial - https://www.youtube.com/watch?v=eQqh_PFc6qc&ab_channel=TricentisAcademy
To connect a new physical iOS device:
- Connect a physical iOS device to your local computer (e.g., connect a mobile phone using a USB cable).
- On your iOS device, go to Settings and perform the following actions:
- Enable UI automation - go to Privacy & Security > Developer settings and enable Enable UI automation.
- Enable web inspector - go to Safari > Advanced and enable Web Inspector.
- On the computer, on Testim, click the Tricentis Mobile Agent icon and then click the Open TMA Console link.
.png")
- On the TMA Console, go to Device Management
- Click Upload iOS image.

- Select an iOS image with the appropriate iOS version for the device (you can download the iOS image from https://github.com/iGhibli/iOS-DeviceSupport/tree/master/DeviceSupport
- Click Upload.
- Get your Apple team ID from the Membership section of your Apple developer account. For information on how to get your Apple team ID, see https://developer.apple.com/support/.
- On TMA Console, go to iOS artifacts.
- In the Insert Apple team ID text field, enter your Apple team ID. If you clear the Apple team ID, this also removes the existing Certificate Signing Request (CSR), certificate, and provisioning profile.

- Under Certificate Signing Request (CSR), click Generate new CSR, and download the CSR file. The signed certificate has an expiry date. If the certificate expires, you need to create a new CSR or you can't run your tests. Generating a new CSR removes the previous CSR's signed certificate and provisioning profile.
- Under Certificate, click Upload. This certificate confirms the match between the Apple team ID and the CSR. The certificate is stored in a .p12 file that you must upload to Tricentis Mobile Agent. If you upload another certificate, this removes the existing provisioning profile.
- Under Provisioning profile, click Upload.
- Go Agent Settings.
- Make sure that Debugging mode is enabled (left toggle).

- If you are using a Windows computer, you must install iTunes. Make sure you download iTunes from the App store. After the installation of iTunes, restart your computer and reconnect your iOS device.
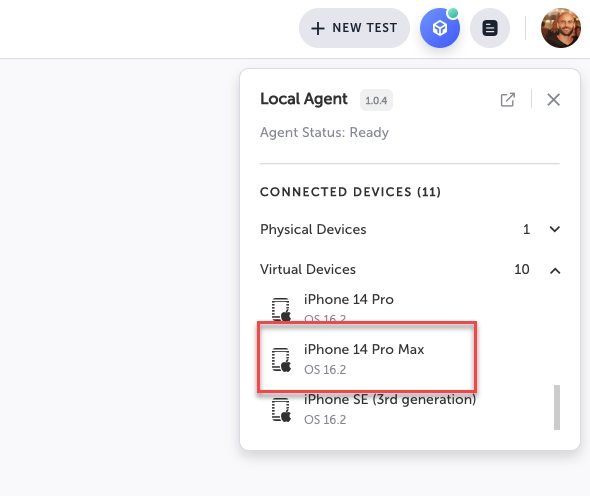
At this point you will see your iOS device connected under the physical devices list.
.png")
Connecting a virtual Android device
To connect your Android device, you must meet the following requirements:
- Tricentis Mobile Agent is installed and running on your computer.
- An Android Simulator/IDE, such as Android Studio.
- Complete all the steps described below.
The following procedure uses Android Studio, however other software can be used.
To connect a virtual Android device:
- In Android Studio, click the kebab menu (three vertical dots) and click Virtual Device Manager.

- Click Create Device.
- Select the desired device definition that meets the mobile platform system requirements.
- Click Next.

- To optionally improve the device performance, click Show Advanced Settings.

- Scroll down to the Memory and Storage parameters and increase the values in the RAM, VM heap, and Internal Storage parameters. Note that this may require more resources from the computer running it.

- Click Finish.
The configured device will be available in the Device Manager screen. - To run the device, click the Play icon.

The device will be automatically added to the Virtual Devices list in Testim.
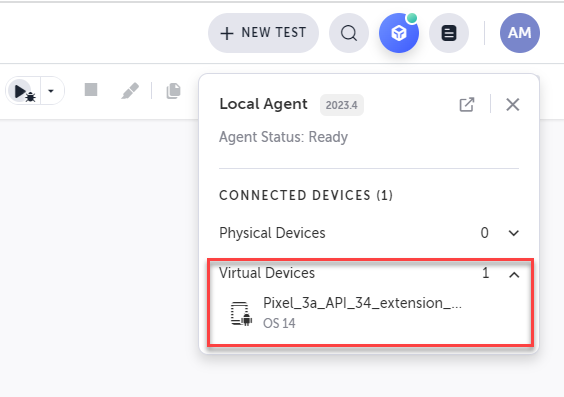
By default, virtual devices are pre-configured to be in Debug Mode.
Connecting a virtual iOS device
To connect an iOS device, you must meet the following requirements:
- Tricentis Mobile Agent is installed and running on your computer.
- An iOS Simulator/IDE, such as Xcode. Xcode is supported on Mac only.
- Complete all the steps described below.
The virtual iOS device option does not require an Apple developer account.
The following procedure uses Xcode, however other software can be used.
To connect a virtual iOS device:
- Make sure TMA has been installed and is currently running.
- Make sure Xcode is installed. If not, download it from the Mac App Store.
- In Xcode, from the main menu go to Xcode > Open developer tool > Simulator.
.png")
The Simulator software opens in the system tray.
- Right-click on the Simulator icon and select Device and then select the desired device from the list.
.png")
The device will be automatically added to the Virtual Devices list in Testim.
Step 3 - Prepare an application to be tested
When creating a test you will need to select which app the test will use. Each test can include one app only. Apps are available for testing in three ways:
- Local device apps - you can use one of the apps on your connected device (physical or virtual device). These apps will be available to the test when the device is connected to TMA.
- Mobile Apps Library - you can use an existing app in Mobile App Library. In this case other users can use a common app for testing without it having to be already installed on their local device. It is possible to add the app before recording the test, by following the instructions in the Add Mobile App from Local Computer section. For more information on how to manage apps in the Mobile Apps Library, see - Mobile Apps
- Uploading the app - as part of the test creation, you can upload the app.
App compilation compatibility (iOS only)If you want to record a test using a virtual device, make sure that that the app was compiled for virtual devices (.app). And vice versa, if you want to record using a physical device, make sure that the app was compiled to work on physical devices (.ipa). See How to Prepare a .ipa for Mobile Testing for more information.
Step 4 - Record the test
You can record a test on a mobile device to be run automatically at a later time. During the test you can record only a single application from one device. However, when playing back the test, you will be able to run the same test on another device than the device used during the recording.
To record a mobile test:
- Make sure a physical or virtual device is connected, by ensuring that the Tricentis Mobile Agent indicator is green.
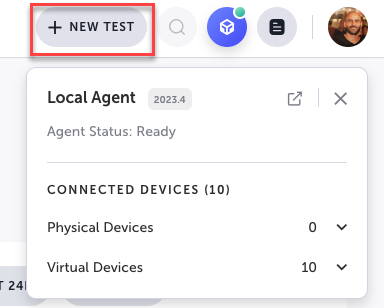
- From the Dashboard screen click the New Test button.
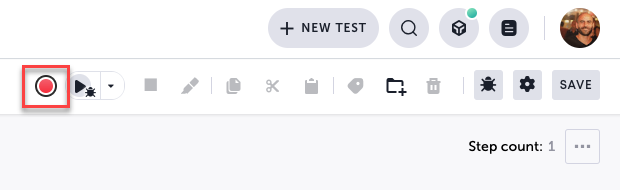
- To begin recording your test, click the Record button in the action menu.
-
Select Local Devices and then select one of the physical or virtual devices displayed in the list.
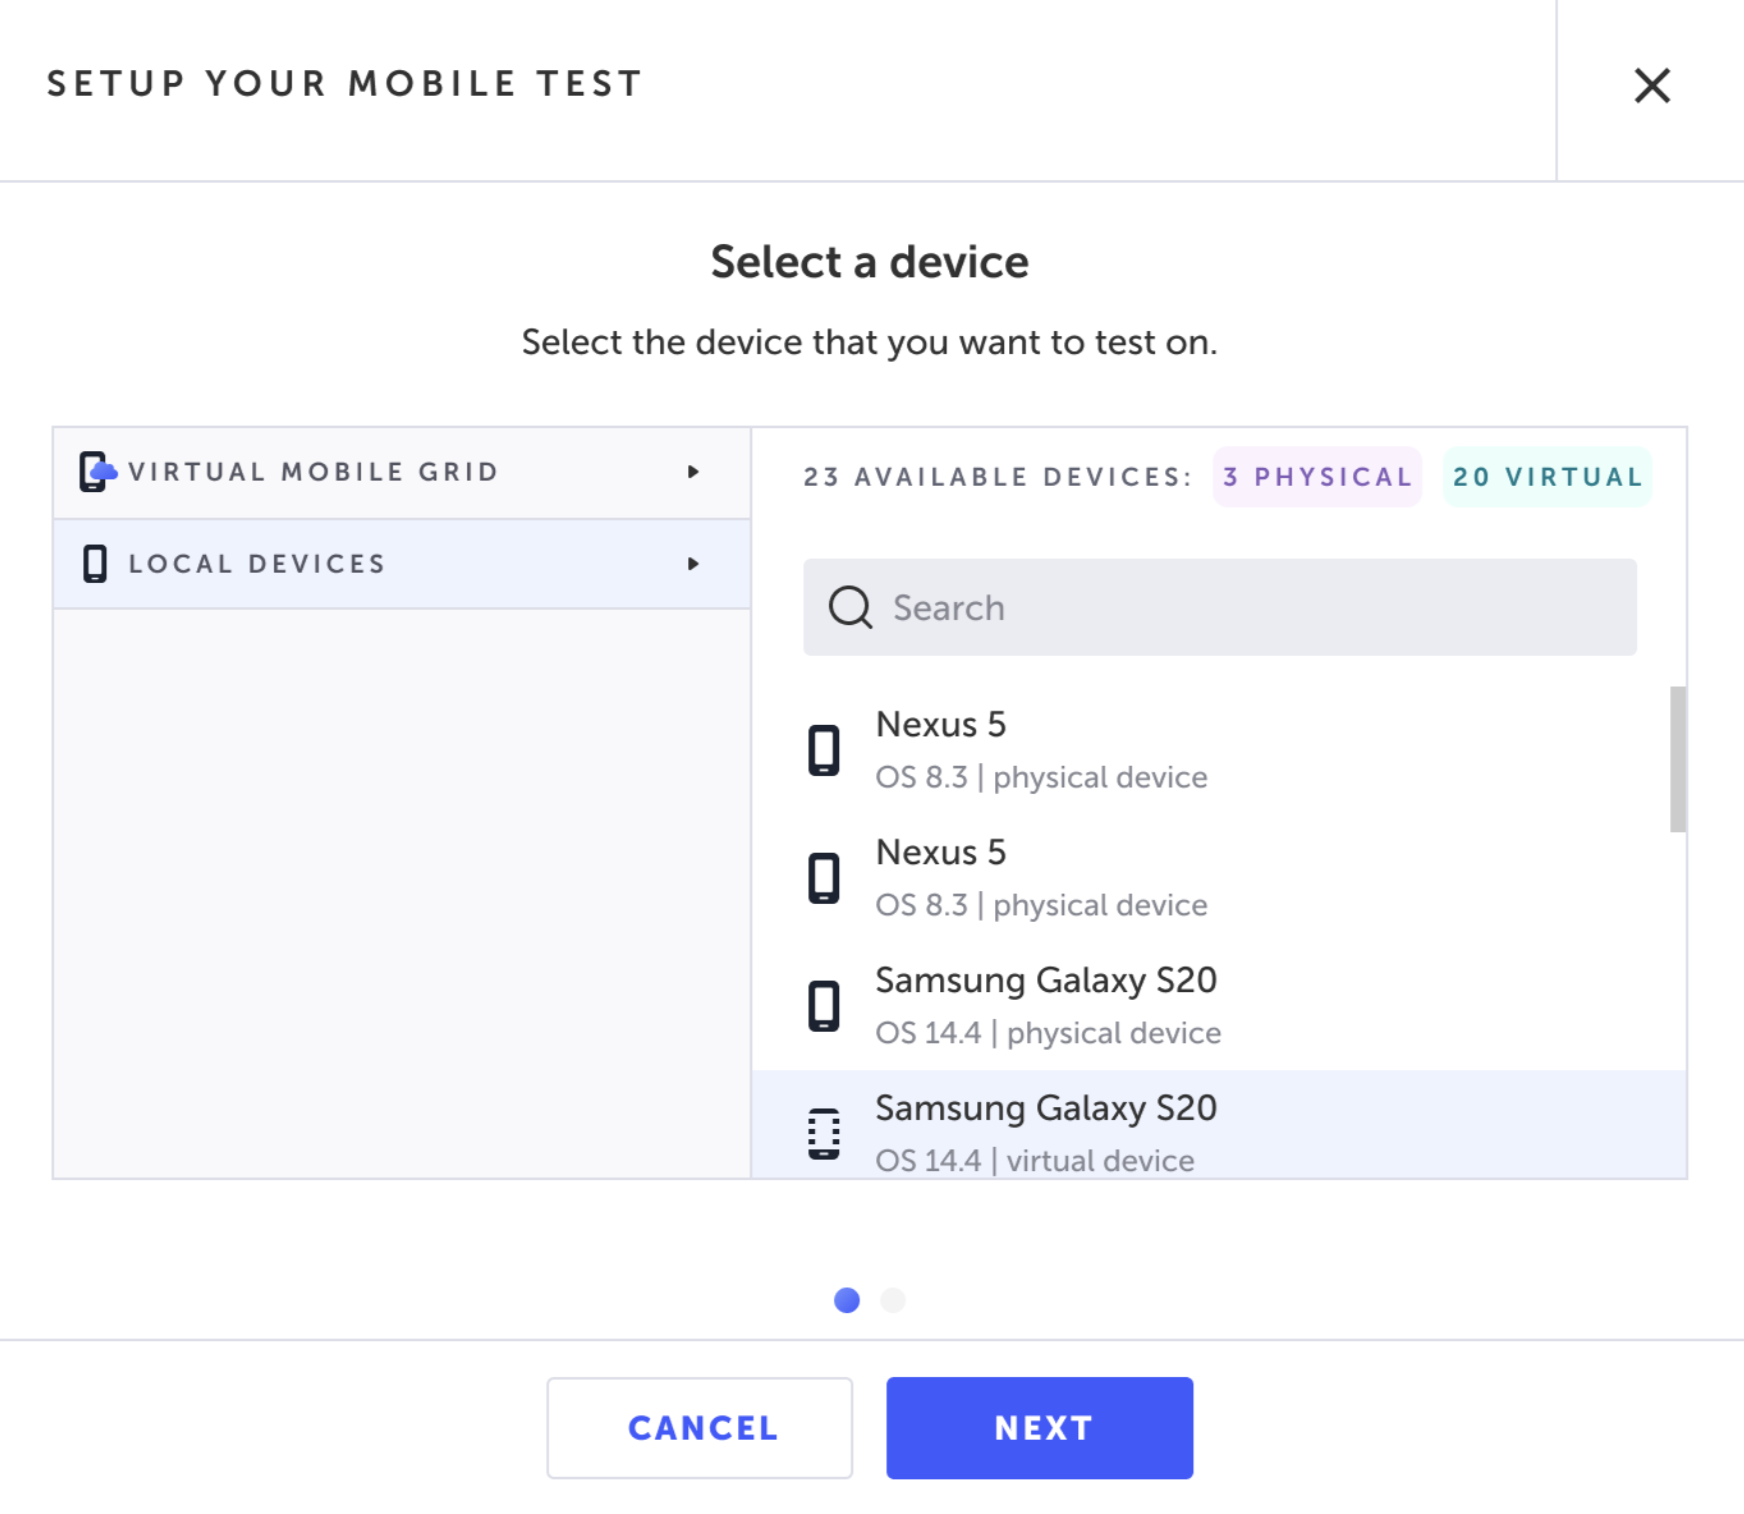
-
Click Next to continue.
-
Select an Application to be tested using the following options:
- From library - select this option to use one of the existing apps in the Mobile Apps Library and then select the relevant app from the list.
Each test can only interact with a single application. If you are recording a test on a device that does not have the selected app from the Mobile Apps Library installed, the app will be automatically installed on the local device.
- From device - select this option to use an existing app from your connected device and then select the relevant app from the list.
Changing device after recordingWhen changing a device after recording, the selected app must be installed on the device to perform additional recording or playback.
- Upload app - select this option to add a new app to the Mobile Apps Library from your local computer. Supported file types include for Android devices - .apk files based on Java or Kotlin frameworks; for iOS devices - .ipa files based Objective C or Swift frameworks. Upload is limited to 150 MB (to upload larger files, contact Tricentis support).
-
Click Done to finish
-
An AUT Mirroring Viewer is displayed with the opened application under test. The viewer allows you to view the device and interact with the application under test, while Testim records the actions. For more information about the supported actions, see Supported Mobile Actions section below.
Test steps are only recorded by taking actions on the AUT Mirroring Viewer. Taking actions directly on the device will not record test steps.

Important NoticeWhen recording a test try to choose text elements and avoid outer frames, images and icons for better stability
.png")
- To stop recording, click the Stop Recording button or close the Viewer window.
.png")
- In the Properties Pane, configure the following settings:
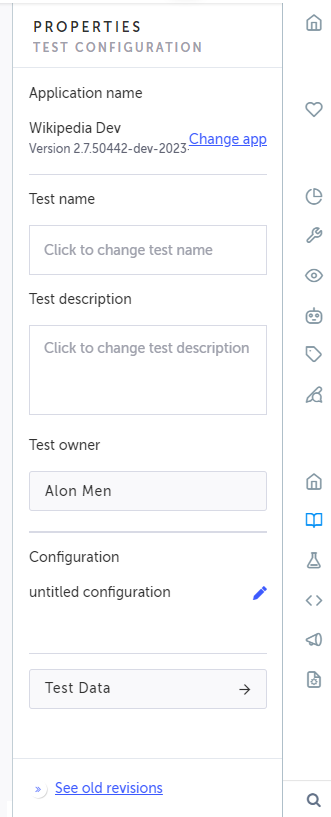
- Test name - enter the name for the test. By default the test name is "untitled test"
- Description - optionally enter a description for the test.
- Configuration - by default the configuration is set to use any device with any OS version that is available on VMG. If you would like to use a different configuration, see Setting the Test Configuration.
- Test Data - allows you to configure data-driven tests by defining a Data Set in JavaScript or multiple ordered Data Sets with a JS Array literal of objects. See Configuring a Data-driven Test From The Visual Editor.
- Click Save to save the test.
Auto Recovery
Whenever you create a new test or make changes to an existing test, make sure to save the test. But don't worry, if you close your browser before saving your test, it will be stored in your browser's cache and you should be able to resume your work. See Recovering a test that was not saved for more details.
- If you want to configure additional test configuration settings, see Setting the Test Configuration.
Supported Mobile Actions
The following actions are currently supported when using the AUT Viewer during the recording of the test:
- Tap - simulates a user tapping an element on the mobile device screen. To create this step, click the mouse on the AUT Viewer screen during recording.
- Swipe Vertical - simulates a user pressing and dragging their finger across the screen vertically. To create this step, click the mouse, drag the cursor in a vertical direction, and release the mouse button.
- Swipe Horizonal - simulates a user pressing and dragging their finger across the screen horizontally. To create this step, click the mouse, drag the cursor in a horizontal direction, and release the mouse button.
- Set Custom Text - simulates a user entering text into a text field in the app. When hovering your mouse on a text element, the element is highlighted in red. Clicking the text element open a Set Custom Text Window. Enter the desired text in the field and click the Send button.
.png")
Step 6 - Add additional steps and edit the properties
During the recording or after the test is saved, you can add additional predefined steps and edit the some or all of the steps' properties.
To learn more about common step properties, see - Editing a Step’s Properties
Supported Predefined Mobile Actions
The following actions are currently supported when adding steps manually during or after the recording of the test:
- Validate email - Testim offers a built-in email service which provides permanent and temporary email addresses. The Validate email step can be used with these email addresses to test your app sign-up or login flows.
- Validate element visible - The element visible validation allows you to check whether your element exists and is visible on the page. If your element contains a variable image or text, validation will still work. This validation verifies that the element exists and is visible, but does not check its specific content.
- Validate element text - An Element Text validation is similar to an Element Visible validation in that it makes the step dependent on the existence of a specific element. However, for the Element Text validation, you also specify a particular text value that must appear in the specified element.
- Wait for element visible - Use wait for element visible to wait for your element to be visible on the page.
- Wait for element text - Use wait for element text to make sure a specific text appears before continuing with the test.
- Sleep - Enable waiting for a period of time between steps. - Add extract value step - Lets you copy values directly from your application to be used in later steps.
- Add set text step - adds a specified text to the selected target element.
- Code verification - sends key strokes to the device. This is typically used to fill code verification elements, such as a one-time password code element. It is possible to add delays between characters.
- Generate email address - generate a new random email address to be used every time you run a test, for example to test a sign-up flow multiple times with a new user each time.
- Add CLI action - executes custom Node.js scripts in your CLI environment.
- Add API action - used when you want to get data that is returned from an API call. You can use this data just to check that it is returned.
Before running custom code using Add CLI action and/or Add API action steps, you will need to run Testim CLI.
- Generate random value - generates random values for dynamic data testing.
- Generate date - generates a date according to predefined properties.
- Reset app - In Android this step closes the application, clears the cache and then starts the app again. In iOS this step closes and starts the application (does not clear its cache). The step is typically used to reset the app and clear its cache before the next run.
- Back - creates a Back button step, which sends a back command to the device. Supported in Android only.
- Home - create a Home Button step, which sends a home command to the device.
- Scroll to element text - dynamically scrolls to the selected text element.
- Execute Driver Script Step (mobile) - The Execute Driver Script step allows you to run a script using Appium 2.0 or higher for extended capabilities and validations in your tests.
Updated 6 months ago