
API testing
Easily call server APIs from your UI test for validation or data inquiry
API testing uses API calls (HTTP requests) within your tests. This functionality can be used to perform actions, for example, to retrieve data that can be used within the test in other steps. In addition, it can be used to perform validations, for example, to validate whether a value in the backend correlates with a value in the frontend. The API request is a full HTTP request that includes a header, including authorization parameters, and a body.
There are two types of API steps: Add API action and Validate API.
- Add API action – used when you want to get data that is returned from an API call. You can use this data just to check that it is returned.
- Validate API - should be used to validate data returned from an API call, usually validating data in the backend.
This is a pro featureThis feature is only open to projects on our professional plan. To learn more about our professional plan, click here.
Adding a Validate API Step
Use an API validation step to validate the response. It is possible to validate on the header, body, or status code response. Read more about validations here.
To add an “Add API validation” step:

- Hover over the (arrow symbol) (or + symbol after the final step) where you want to add the Add API validation step.
- Click the “M” (Testim predefined steps).
The Predefined steps menu opens. - Click on Validations.
The Validations menu expands - Scroll down through the menu and select Validate API:
Alternatively, you can use the search box at the top of the menu to search for Validate API.
The Add Step window is shown

- In the Name the new step field, enter a name for this step.
- If this is a shared step to be made available to reuse in this or other tests, keep the box next to Shared step selected (default), and choose a folder from the Select shared step folder list where you want this step stored. Otherwise, deselect the checkbox.
For more information about shared steps, see Groups - Click Create Step.
The Run Shared API Validation window opens.

- In the URL field, select the desired HTTP Request method and enter the root-endpoint and path. You can add parameters to the URL. For more information, see Using Parameters section below.
- In the Header section, enter the header Key-Value pairs that need to be sent with your API. Select the Key-Value (default) option to enter the header in separate key and value fields. Select the Raw option to enter the values in their raw format (e.g. when copying from the browser's devtools network panel).
You can test different requests using different headers. Select the checkboxes to the left of the headers you wish to test. Requests with checked headers are all performed, one after the other. To delete a header, select the X to the right of the header.

- Click the Authorization tab to configure the Authorization header. Select one of the following authorization options:
- None – select this option if you do not want to send authorization parameters or if you want to use an authorization type other than Basic or Bearer. In this case you will have to manually enter the Authorization parameters under the Header tab.
- Basic – select this option if the endpoint uses Basic Authorization. Enter the username and the password.
- Bearer - select this option if the endpoint uses Bearer Authorization. Enter the Token.
Authorization types entered under the Authorization tab (other than None) override authorizations manually entered in the Header tab

- In the Body section, in the drop-down menu, select the data format you want to send and enter the Body of your call in the box below. For example, use the Text option for entering free text (e.g. sending a key and a value). Options are: Text, JSON, JavaScript, XML, and HTML. You can add parameters to the Body. For more information, see Using Parameters section below.

In the Assertion section, you can optionally assert on the header, body, or status code response without manually entering code. The Assertion is run before the code in Run additional code on request results (see below). The response for the assertion can be Passed (TRUE) or Failed (FALSE). If the Assertion fails, the step and test will fail and the Run additional code on request results code won’t be executed.
Do the following:
- In the drop-down menu, select the element on which you will perform the assertion, options include Status code, Header, Body (JSON), or Body (Text).
- In the second field, select an operator.
- In the third field (value), enter the value you are checking. The value can be a parameter without curly brackets.
- Repeat the steps above to add additional assertions. To enable/disable the assertion select/deselect the checkbox.

- Select the Run additional code on request results switch if you want to run code that will perform additional validations that are not possible through the assertion or add additional functionality to the validation. For example, throwing an error message following a failed validation. You can add parameters to the code. For more information, see Using Parameters section below.

- Click Show step properties.

-
In the Properties panel, in the Send via web page checkbox:
-
Deselect the checkbox - if you want to send the API call outside the browser context so that browser-restrictions do not apply to it. For example, if your API doesn't support CORS.
-
Select the checkbox - if you need the API to also send browser information such as cookies. (They are sent automatically.)
-
-
In the Allow API request retry field:
- Select the checkbox - select this checkbox if you want to retry the sending of the request only if the request itself has failed (i.e., returned a failed status code).
- Deselect the checkbox - even if the status code is error, Testim will still run the step with its validations and the addition code (i.e., without trying to resend the request). For example, this is useful when the assertion is set as an error code, and so there is no need to retry sending the request.
-
In the Params field, add the relevant parameters, as described in Using Parameters section below.
If you're running via a webpage, and the page has not finished loading, this step can fail. If the previous step requires loading, add a wait for before the API step to verify that the page has finished loading.
Checking the request outside of the context of the AUT
If you want to check your request for a quick response outside of the context of the AUT (without running the test), in the URL field, click the Send button. Assertions and code in the Run additional code on request results window will not be executed. Only local parameters with static values, which are defined in the Properties panel will be sent. Non-static values will be sent as empty strings.
The available step parameters are listed below the URL field. You can click Edit to modify the parameter in the Properties panel.
.png")
This request will not be counted against your account quota.
The response is temporary, which means that upon exiting the step, the response will be cleared.
Adding an API Action Step
Use an API validation step to perform additional actions, while using the API response. For example, the returned data can be used for calculations, or to save it for later use in the test (export parameter). It is possible to use the data from the header, body, or _status _code response.
To add an “Add API action” step:

- Hover over the (arrow symbol) (or + symbol after the final step) where you want to add the Add API action step.
- Click the “M” (Testim predefined steps).
The Predefined steps menu opens. - Click on Actions.
The Actions menu expands. - Scroll down through the menu and select Add API action.
Alternatively, you can use the search box at the top of the menu to search for Add API action.
The Add Step window is shown.

- Follow steps 5-13 as described in the Adding a Validate API Step section above.
- Select the Run additional code on request results switch if you want to run code that will use the returned data from the API call for cases other than validation (e.g. to extract parameters, close DB connections, etc.). You can run any JavaScript code, and use the data returned from the API call, including the status code, response headers, and response body. If the response body content type is XML/JSON, the parameter type will be an Object, otherwise the parameter type is String.
.png")
- Follow steps 14-16 as described in the Adding a Validate API Step section above.
If you're running via a webpage, and the page has not finished loading, this step can fail. If the previous step requires loading, add a wait for before the API step to verify that the page has finished loading.
Including a File and/or Text field with an API Call Using Form Data
When adding an API Action or Validate API step to a test, you have the ability to include a file attachment with the API call and/or a text field that can hold a key:value pair.
To include a file attachment in an API call:
- Navigate to your test and add a Validate API or API Action step as described above.
- In the Body section of step, select the Form Data entry type.

- Select the File entry type.

Testim automatically updates the header Content-Type to “multipart/form-data.”

Note:Sending a file as part of an API call only works with the Post HTTP Request method.
- Enter the Key name for the filename.

- Click the Upload File button and attach a file from your computer.

Note:If you do not provide the Key name or file attachment for the file entry, the API call will exclude this entry when running the test.
Testim will save the file to the testing server and when the test runs, the test will automatically link to the file and upload the file as part of the test.
Note:Testim limits the file upload size to 25MB. If you try to upload a file larger than 25MB Testim will display a validation message and prevent you from attaching the file.
To include a text field in an API call:
- Navigate to your test and add a Validate API or API Action step as described above.
- In the Body section of step, select the Form Data entry type.
- Select the Text entry type.
- Enter the Key name for the text field.
- Enter the Value of the text field.

The key:value pair of the form is saved. When the test runs, the test will send the key:value pair along with the API call.
Cancel a File Upload in Progress
You have the ability to cancel a file upload while the upload is in progress.
To Cancel a file upload in progress:
- Click the “X” next to the entry with the file upload in progress.

Testim will cancel the file upload and allow you reupload a different file.

Replace a File Attachment
You have the ability to replace the file attachment for an existing entry.
To Replace the File Attachment of an existing file entry:
- Click the “X” next to the previously attached file entry.

- Click the Upload File button and attach a file from your computer to upload a new file.

Exclude or Delete an Entry from the Body Section
You have the ability to exclude or delete a Body entry from the API call.
To exclude an entry from the API call:
- Click the check box to the left of the entry you want to exclude from the test.

Testim will exclude this entry from the test, but the entry will not be deleted and can be included again at any time.
To delete an entry from the API call:
- Click the “X” to the right of the Body entry you want to delete.

Testim will remove this entry.
Using Parameters
You can use parameters in the API step as you would in any other step that uses code. You can use parameters in the sent HTTP request, in the HTTP response, and/or as part of the Assertion. Parameter can be either in-param, as dependency injection, or out-param via the exports/exportsGlobal. You can also access any other variables in the test's scope.
Read more about parameters options here.
Arrays are supported in the following format:
array.0.name
Complex expressions are NOT supported within the API step sections.
Using parameters in the sent HTTP request
Parameters can be used in the header, body, and URL. Since those sections are cumbersome to write in JS, we made it easy for you. In these sections you will need to add double\triple curly brackets around the parameters.
Adding parameters to the Body
You can use triple brackets if you do not want the parameters to be encoded. e.g, {{{param}}}.

Adding parameters to the URL
If you want to send the API call to an API that uses the same URL as the test's base URL, instead of writing the entire URL you can use the Base URL parameter, by writing {{{BASE_URL}}} in the URL field, followed by the rest of the URL. You can use triple brackets if you do not want the parameters to be encoded. e.g, {{{param}}}.
.png")
Adding parameters to the Header
You can use triple brackets if you do not want the parameters to be encoded. e.g, {{{param}}}.
.png")
Using parameters in the HTTP response
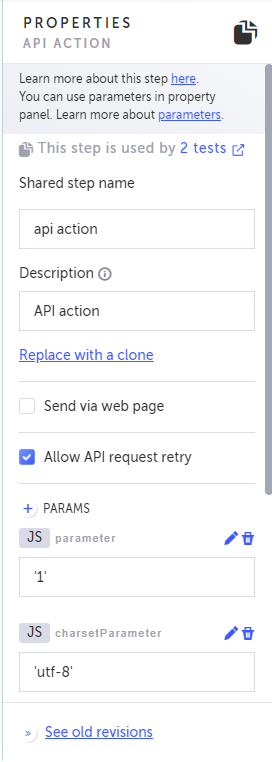
Parameters added in the Properties panel will be automatically added to the function's signature.
.png")
Using parameters in the Assertion
Parameters can be added to the assertion without the need to add curly brackets.
.png")

Viewing the result after the run
After running the step, you'll see the response returned from the API call in the Response tab, along with additional info, such as response status code, call duration, and the size of the binary files. You can also view the sent request and download the response info.
.png")
The following features are available in the Response tab:
- View Sent Request – When you click this button a window opens showing the full request that was sent. Parameters are converted to static values. From this window you can download a JSON file of the response or copy the information shown to your clipboard.
.png")
- Download the response info – When you click on the download button (arrow to the right of View Sent Request) a JSON file with the entire response is downloaded to your local device.
- Assertion response – if you have configured assertions, you will see the one of the following indications next to the assertion:
- Passed – this indicates that the assertion was TRUE.
- Failed – this indicates that the assertion was FALSE. In this case the step will fail, which in turn will fail the test.
.png")
Usage examples - click here
Troubleshooting - click here
Updated 6 months ago