
Related List Action
Salesforce StepThis is a Salesforce step.
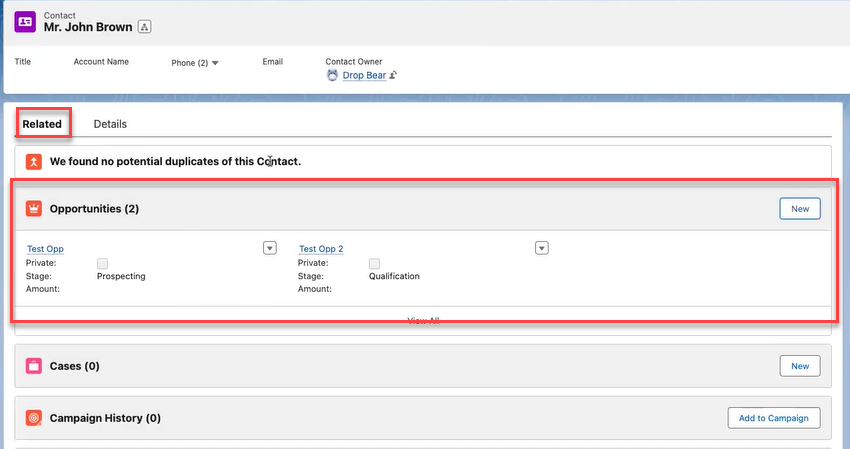
Some Salesforce objects, such as Contacts can display related objects under the Related tab, such as Opportunities, Cases, etc. (see example below).
The Related List Action step can be used to perform the following actions on a record (e.g., a contact record):
- Create a new related list object. For example, create a related Opportunity.
- Verify that an existing related object matches the expected values in the specified fields. The test step passes only if all the fields match exactly.
- View the details of the related object.
To help understand the various objects used in the configuration, we will use the objects displayed in the screenshot example above:
- The object for which you are adding a related list item is the Contact (Mr. John Brown)
- The related list item is the Opportunity (Test Opp and Test Opp 2)
Record display requirementThe step itself does not navigate to the record, so you will need the system to navigate to the specific record during the execution of a test, so that the designated step will be performed when the record is displayed on Salesforce. To learn more, see Find and display a specific Salesforce record during test execution.
Creating a new related list object (Create)
To create a new related list object to a record:
- In your test, add a step before the Related List Action step that will navigate to the desired record. To learn more, see Find and display a specific Salesforce record during test execution.
- Add a step by clicking the + button.
- Under the Salesforce steps tab, click Record Operations and select the Related List Actions step.
- Click the Select the Object drop-down menu and select the desired object type. The object type determines the type of object of the record for which you want to add a related list object (primary object). In the example above, this object would be the Contact.
- Under Select Related List, select the related object that you want to create. In the example above, this would be an Opportunity.
- If you have created a new tab (i.e., other than the default Related tab), in the Tab Name field, specify the tab name of the tab that you have created.
- In the Select Action field, select Create.
- Under Select Record Type, select the record type of the record for which you want to add a related list object. In the example above, the type would be either an External or Internal Contact.
The related list object's fields are displayed. Fields that are indicated with (*) are mandatory.
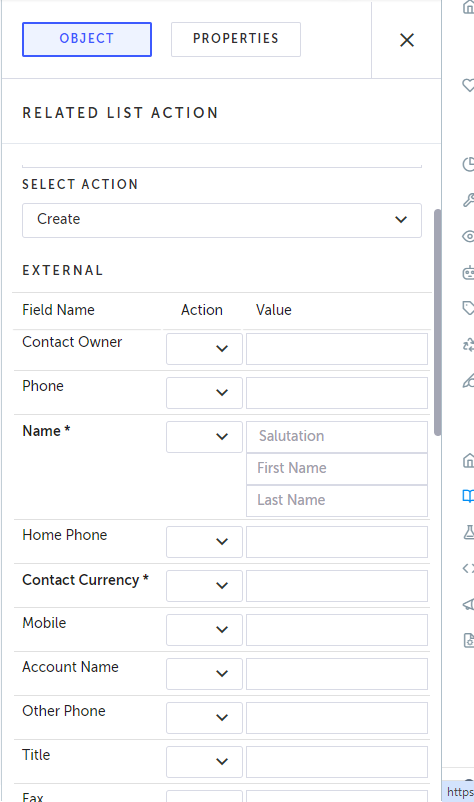
- For each field that you want to create, under Action select one of the following options:
- Input - inputs the specified value into the field. If the field is not editable, this action will not be listed. The action requires entering a value, as described below.
- Verify -this action verifies that the value in the field matches that in the record. The action requires entering a value, as described below. The action requires entering a value, as described below.
- Verify not visible - this action verifies that the field is not visible to the connected user. The action does not require entering a value.
- Store - this action stores the existing value in the record field into a specified Javascript variable. This action requires entering a name for the variable into the value field.
- Ignore - this action performs no action on the field. The action does not require entering a value.
- Reset - resets the value in the field to a "no entry" state. Note that if the field is empty, it will try to enter an empty string to the field, however if you select the Reset option, it will not try to enter an empty string.\
- Under Value, enter the value of the field. If the field is a "pick list" (drop down menu), select the relevant option.
The value field has two modes, to switch between the modes click the filed and the click the sign to alternate between T and {JS}:- T. Text mode. The value is treated as a literal string.
- {JS}. JavaScript mode. The value is evaluated as a JavaScipt expression. The field will evaluate JavaSrcipt variables and functions.
- When finished, click Save.
Verifying a related list object (Verify)
To verify a related list object:
-
In your test, add a step before the Related List Action step that will navigate to the desired record. To learn more, see Find and display a specific Salesforce record during test execution.
-
Add a step by clicking the + button.
-
Under the Salesforce steps tab, click Record Operations and select the Related List Actions step.
-
Click the Select the Object drop-down menu and select the desired object type. The object type determines the type of object of the record for which you want to add a related list object to (primary object). In the example above, this object would be the Contact.
-
Under Select Record Type, select the record type of the record for which you want to verify a related list object. In the example above, the type would be either an External or Internal Contact.
-
Under Select Related List, select the related object that you want to verify. In the example above, this would be an Opportunity.
-
If you have created a new tab (i.e., other than the default Related tab), in the Tab Name field, specify the tab name of the tab that you have created.
-
In the Select Action field, select Verify.
-
Under the Filter (Where) section, click Add to add a filter. The filter selects the rows in the related items list by matching the filter criteria. Specify the following:
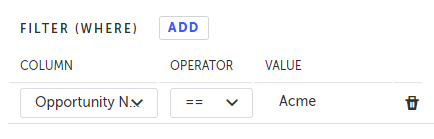
- Column - select the name of the column from the drop-down menu.
- Operator- select the operator that will apply on the condition. The following operators are available:
==- for the value to be equal to value in the Value field.!=- for the value to NOT be equal to value in the Value field.
- Value - the value in the filter.
- Click Add again to add another filter.
-
Under Select Record, select one of the following options:
- First - If the Filter yields more than one result, the system will verify the first related list item that meets the filter criteria defined in the Expect section below.
- Last - If the Filter yields more that one result, the system will verify the last related list item meets the filter criteria defined in the Expect section below.
- All - If the Filter yields more that one result, the system will verify all related list items meet the filter criteria defined in the Expect section below.
-
Under the Expect section, click Add to define the validation that you want to perform on the related list item as follows:
- Column - select the name of the column from the drop-down menu. The Count() option counts the number of related items. For example, if you set the Column to
Count (), the operator to==, and the value to2, it will verify that there are exactly two related items. - Operator - select one of the following operators:
==- for the value in the column to be equal to value in the Value field.!=- for the value in the column to NOT be equal to value in the Value field.- Contains - for the value in the Column to contain the value in the Value field.
- Value - the value in the validation. Parameters are NOT supported in this field.
- Click Add again to add another validation.
- Column - select the name of the column from the drop-down menu. The Count() option counts the number of related items. For example, if you set the Column to
-
When finished, click Save.
Viewing a related list object (View)
To view a related list object:
- In your test, add a step before the Related List Action step that will navigate to the desired record. To learn more, see Find and display a specific Salesforce record during test execution.
- Add a step by clicking the + button.
- Under the Salesforce steps tab, click Record Operations and select the Related List Actions step.
- Click the Select the Object drop-down menu and select the desired object type. The object type determines the type of object of the record for which you want to view a related list object (primary object). In the example above, this object would be the Contact.
- Under Select Record Type, select the record type of the record for which you want to verify a related list object. In the example above, the type would be either an External or Internal Contact.
- Under Select Related List, select the related object that you want to view. In the example above, this would be an Opportunity.
- If you have created a new tab (i.e., other than the default Related tab), in the Tab Name field, specify the tab name of the tab that you have created.
- In the Select Action field, select View Record.
- Under the Filter (Where) section, click Add to add a filter. The filter selects the rows in the related items list by matching the filter criteria. Specify the following:
- Column - select the name of the column from the drop-down menu.
- Operator- select the operator that will apply on the condition. The following operators are available:
==- for the value to be equal to value in the Value field.!=- for the value to NOT be equal to value in the Value field.- Contains- for the value to contain the value in the Value field.
- Value - the value in the filter. This can be also a parameter.
- Under Select Record, select one of the following options:
- First - If the Filter yields more than one result, the system will show the first record.
- Last - If the Filter yields more that one result, the system will show the last record.
- When finished, click Save.
Updated 6 months ago