
Validate email
Validate sign-up and login flows
Testim offers a built-in email service which provides permanent and temporary email addresses. The Validate email step can be used to validate that an email was sent to these email addresses. This step is typically used to test your app sign-up or login flows.
This is a pro featureThis is a pro feature only open to projects on our professional plan. To learn more about our professional plan, click here.
The Validate email step is a predefined validation step that receives your Testim inbox content of a specified Testim email address as an array of all of the messages within that mailbox, contained in a parameter named messages with the following fields:
| Field name | Return type |
|---|---|
| attachments | AttachmentCollection |
| from | EmailAddress |
| to | EmailAddressCollection |
| subject | string |
| date (time sent) | Date |
| received_date | Date |
| message_id | string |
| headers | InternetMessageHeaderCollection |
| html | |
| text | string |
| mail_from | EmailAddress |
| rcpt_to | EmailAddressCollection |
| size | number |
| projectId | string |
| string | |
| expire_at | string |
| created_at | string |
| updated_at | string |
The email validation can use one of two types of emails to receive the emails that will be validated:
- Permanent email - Testim offers a permanent email address that you can use for many purposes, including testing login flows and password reset flows. As part of the test, you will be able to validate that emails are sent to the email address, by adding this email address to the Validate Email step. This step will validate that the email was received in the permanent email address, for example, by fetching a link from the email and exporting it.
- Temporary email - There are times you may need to generate a new random email address every time you run a test, for example to test a sign-up flow multiple times with a new user each time. Using the Generate email address step, a new email address is generated with every run. You will configure the Generate email address step to save the temporary email address as a parameter. And then you will be able to validate that emails are sent to the temporary email address, by adding this parameter to the Validate Email step. The Validate Email step will validate that the email was received in the temporary email address, for example, by fetching a link from the email and exporting it.
As a preliminary step to validating emails, create a permanent email or use the Generate email address step to generate a temporary email address as follows.
Testim generates email addresses exclusively through its own email service and does not have the ability to utilize third-party email services for creating permanent or temporary email addresses.
Option A - Creating a permanent email address
The process assumes that you have an existing or new test that will include the Validate email step.
To create a permanent email:
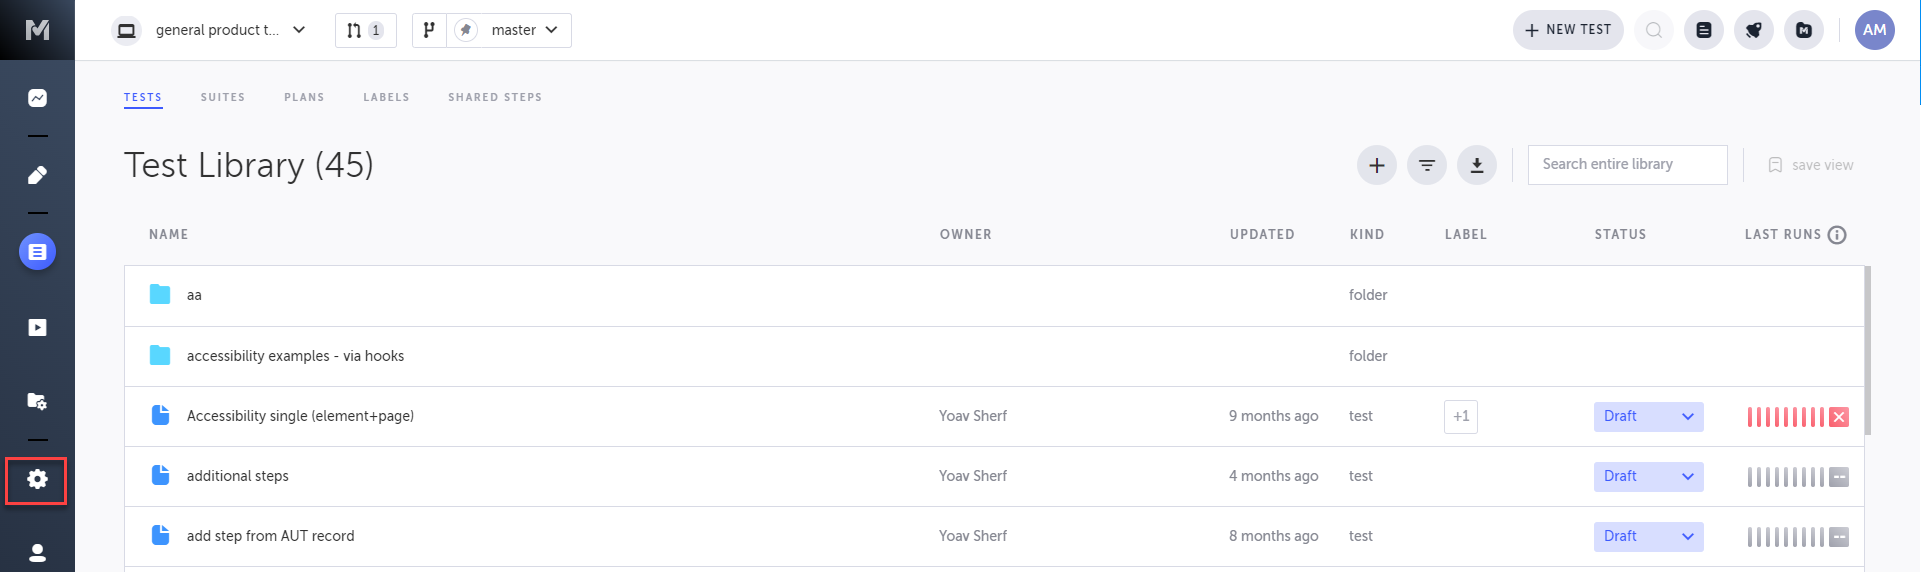
- On the left menu, click on the Settings icon.
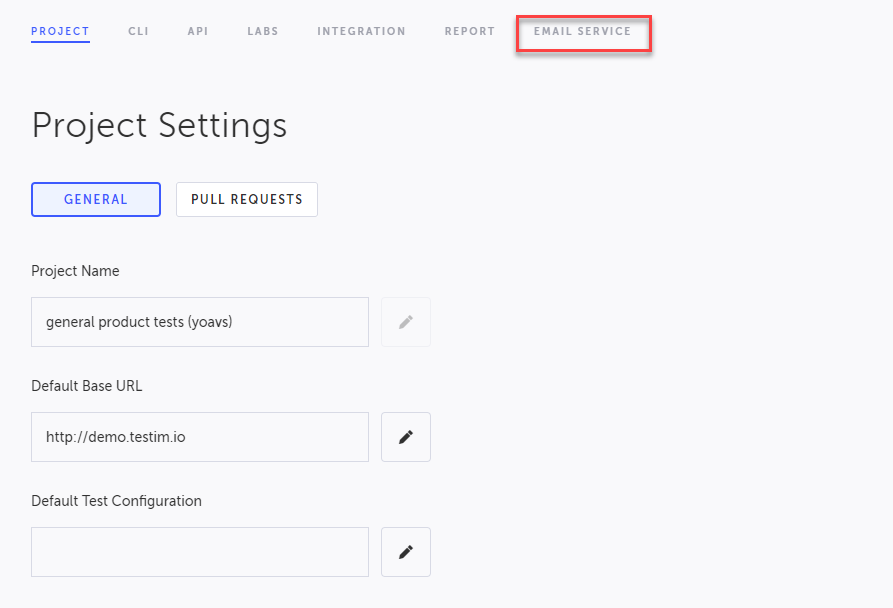
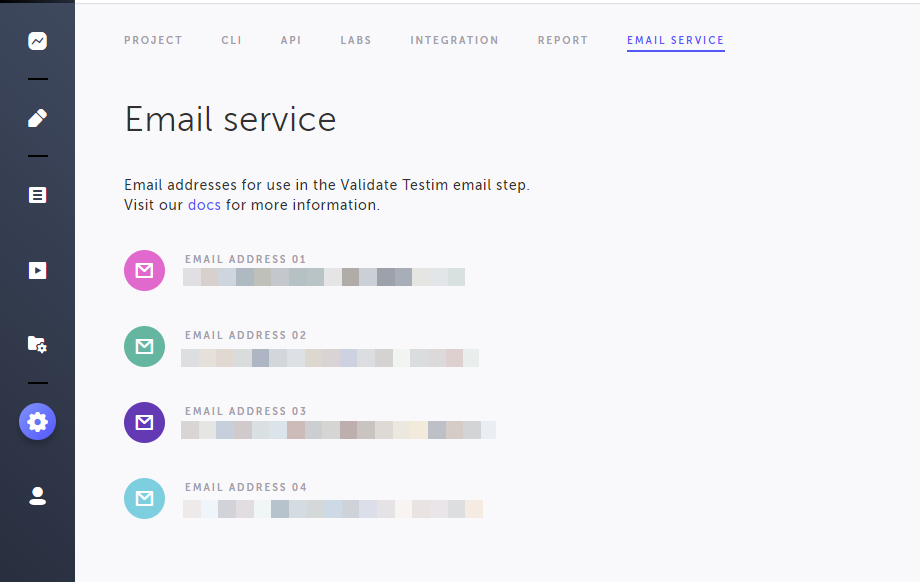
- Click the Email Service tab.
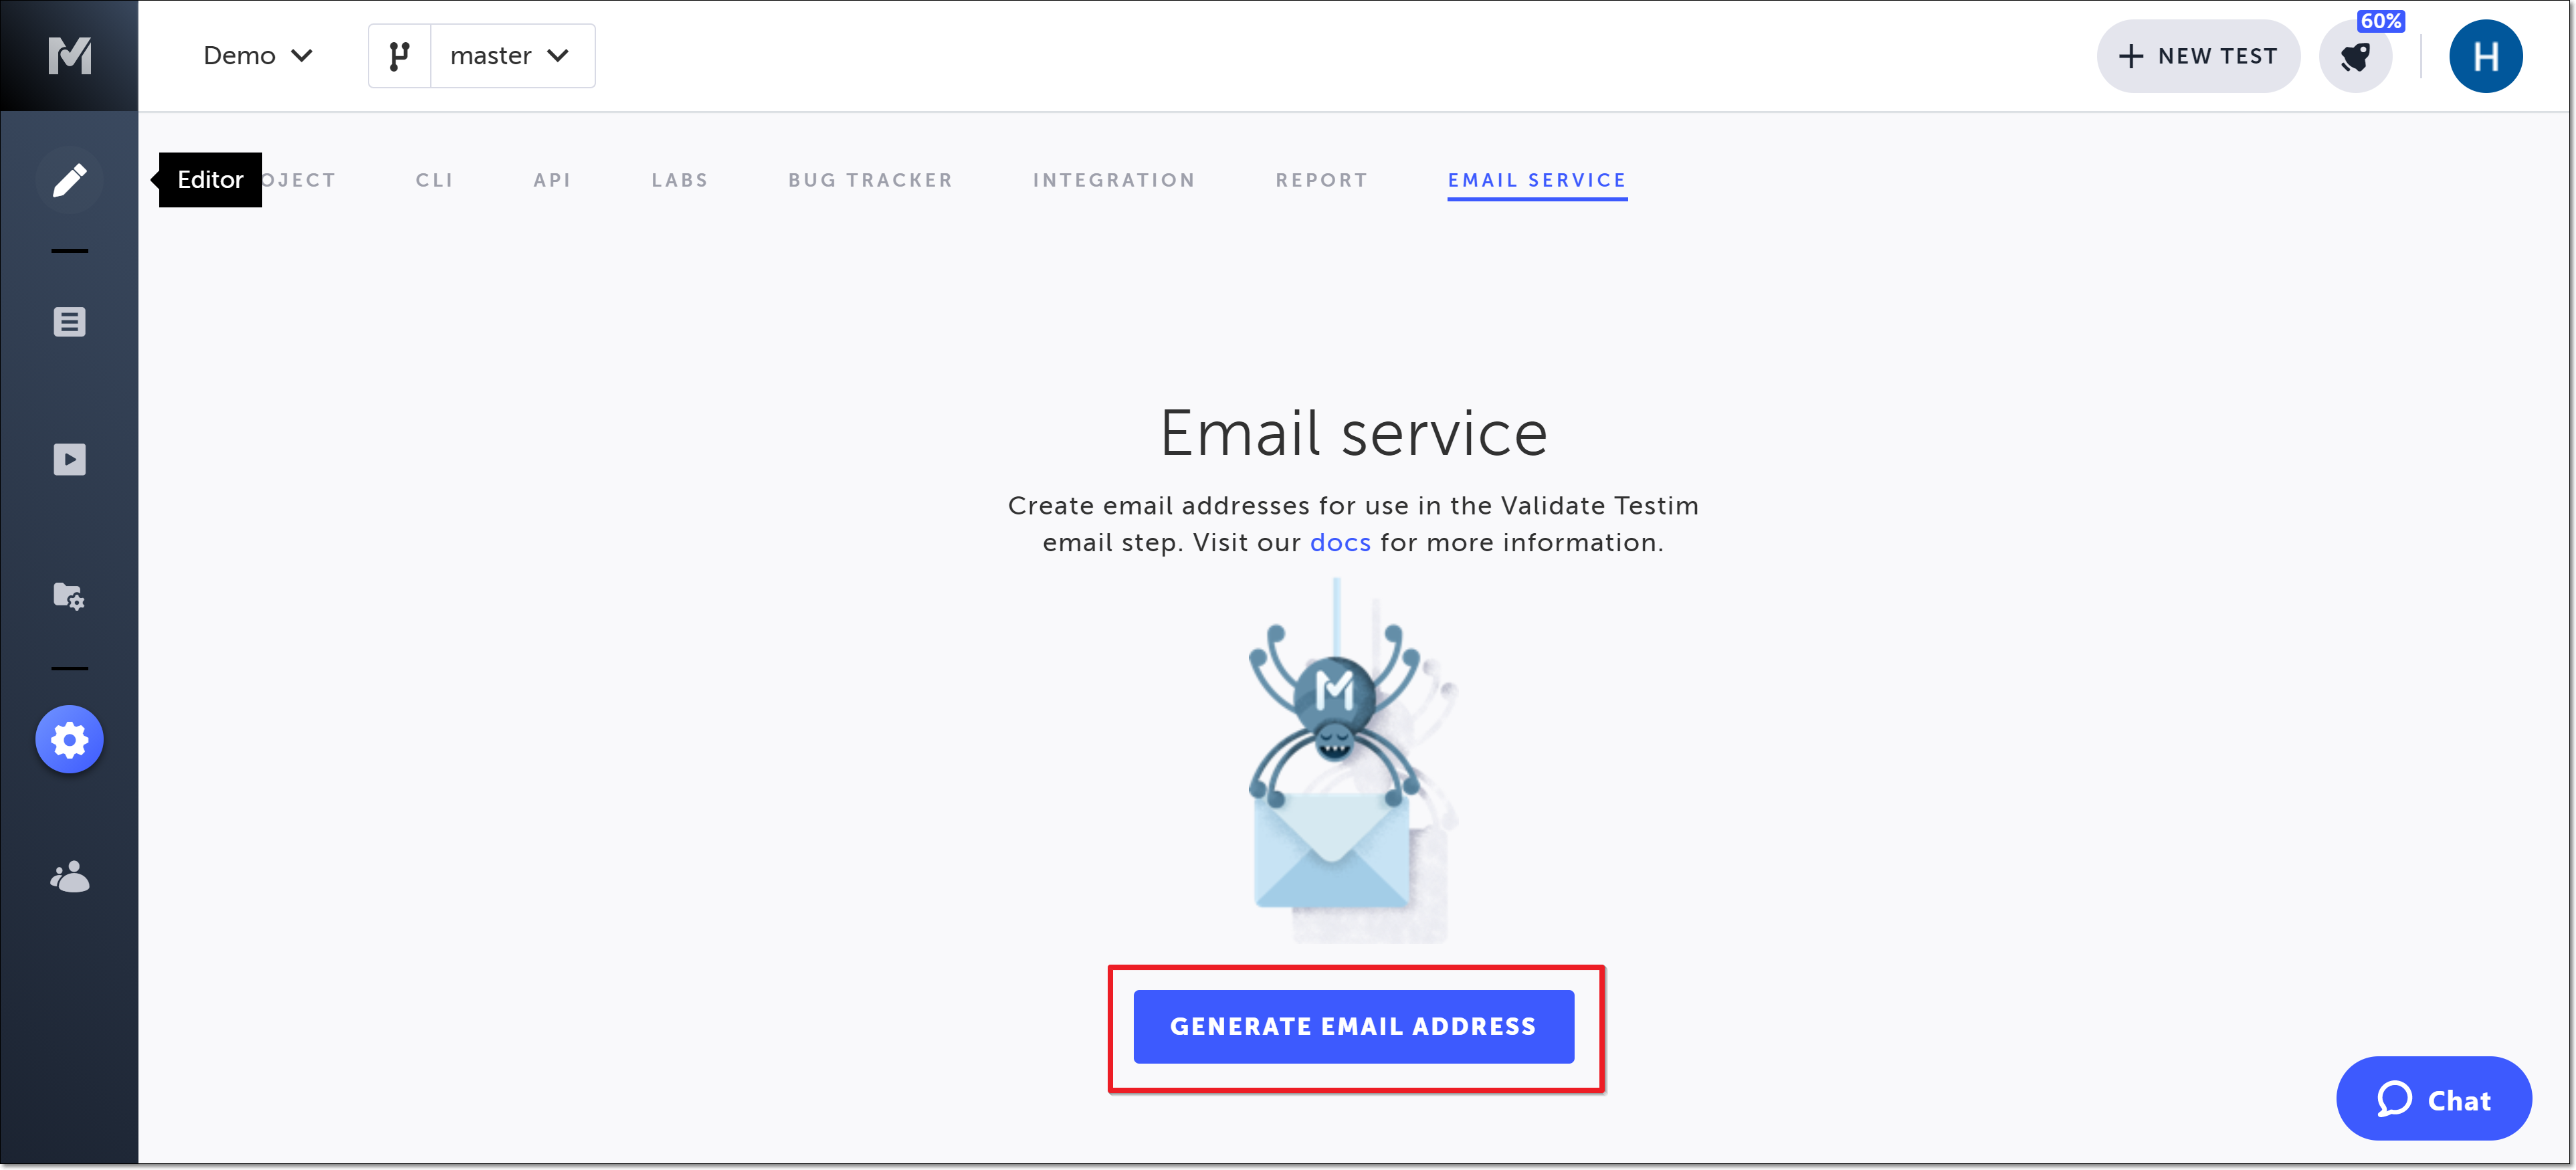
- Click the Generate Email Address button.
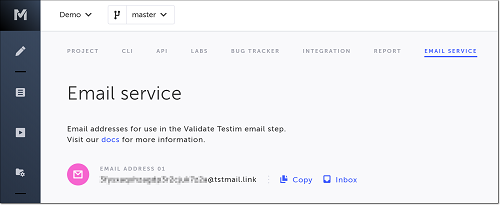
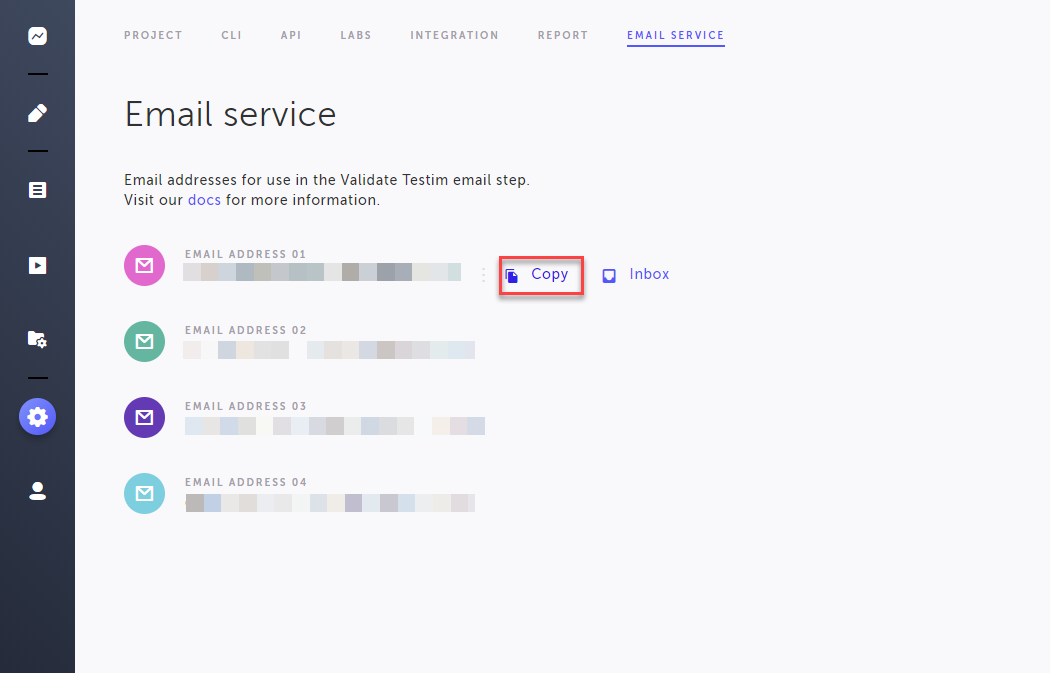
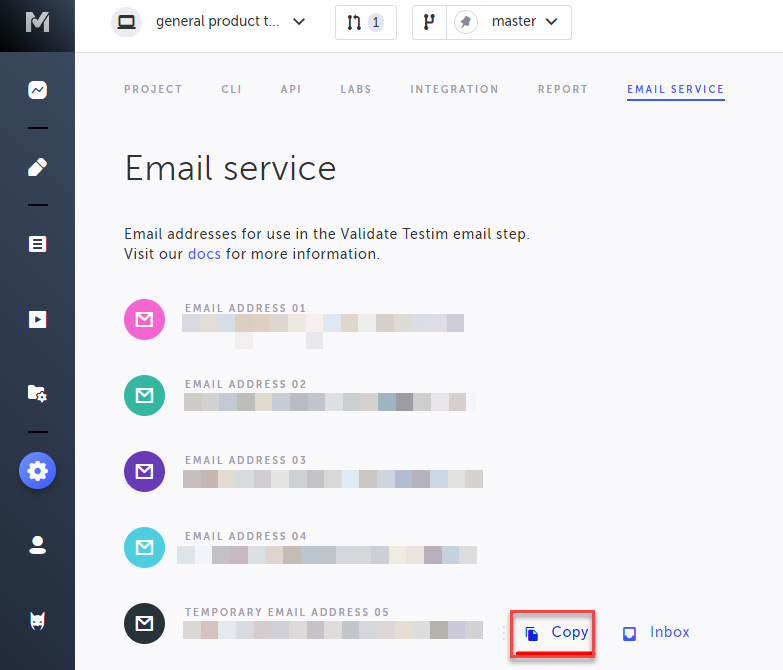
- A random email address is generated and shown on the page. Hover your mouse over the email address and click Copy, to copy the email address or Inbox to view the email's inbox.
Using the permanent email in the relevant steps of the test
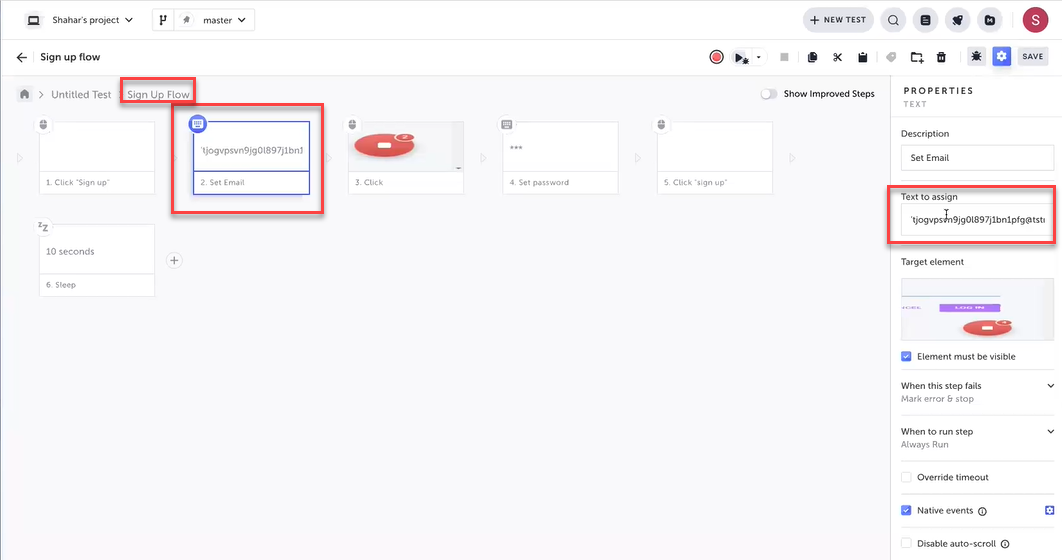
This email address can be used as an input in the test. For example, a test that validates the sign up process, in which the user enters an email and password and then receives an email with a link that should be clicked in order to confirm/validate the email. In this example, the permanent email address will be used in the sign up step, where the user enters the email address.
In the example below, the permanent email address was entered to the Text to assign field of the Set text step, where the user enters the email address into the email field.
Option B - Generating a temporary email address
The process assumes that you have an existing or new test that will include the Generate email address and the Validate email steps.
Adding the Generate Email Address step
In this step we will add the step that will generate the temporary email address and save the address as a variable to be used in other steps.
To generate a temporary email address:
- Hover over the (arrow symbol) where you want to add the step.

The action options are displayed.

- Click on the “M” (Testim predefined steps).
The Predefined steps menu opens.

- Click on Actions.
The Actions menu expands.

- Scroll down through the menu and select Generate email address.
Alternatively, you can use the search box at the top of the menu to search for Generate email address.
A “Generate email address” step is added in the Editor.
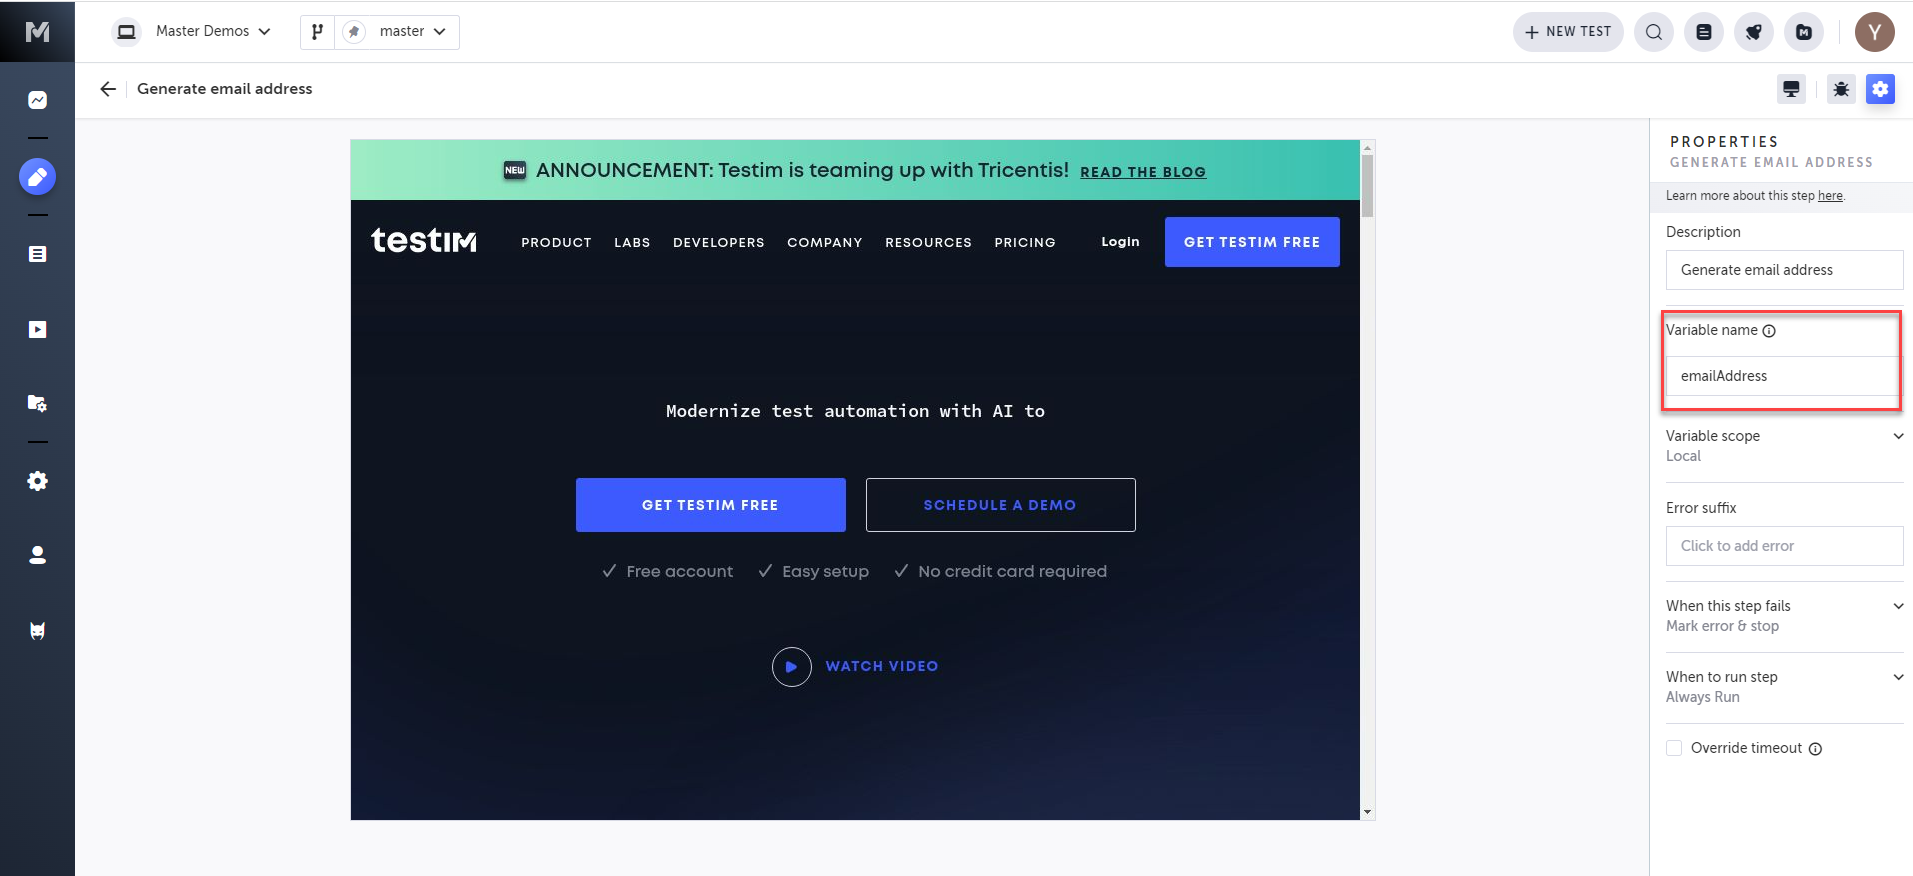
- Hover over the newly created step, and click on the Show Properties (:fa-cog:) icon.

The Properties panel opens on the right-hand side.

- In the Variable name field, enter name for the variable that will hold the temporary email address. For example, use the value
emailAddress. - In the Variable scope field, specify the scope in which the variable can be passed:
- Local: Allows you to pass the emailAddress parameter between steps in the same scope. This is the default.
- Test: Allows you to pass the emailAddress parameter between steps and groups in the same test.
- Suite: Allows you to pass the emailAddress parameter between tests in the same test suite.
- Set additional settings in the step and parameters as needed.
- Copy the parameter name in the variable name field. (e.g. the name
emailAddress)- This parameter will be used in the Email Validation step.
Sending emails to the appropriate Testim inbox in advance
At this point the permanent or temporary inboxes are empty from emails. To test that emails are being received in the new inbox, you may want to point the email service to send emails to the newly created inbox.
Finding the email address of the inbox
Permanent email address option
To find the permanent email address:
- Go to Settings > Email Service.
The permanent email addresses are displayed.
- Hover over the relevant email and click Copy.
Temporary email address option
In case of the temporary email address option, by using the Generate email address step, a new email address is generated with every run. You will configure the Generate email address step to save the temporary email address as a parameter. For example, in the following Generate email address step, the parameter the holds the temporary email address is called tempEmail. This parameter, which holds the temporary email address, can be used to send the email address to the email service, by for example, using an API step in Testim.

It is also possible to view and copy the temporary email address from the Email Service screen.
To find the temporary email address:
- Go to Settings > Email Service.
The temporary email addresses are marked with "Temporary" in the title.
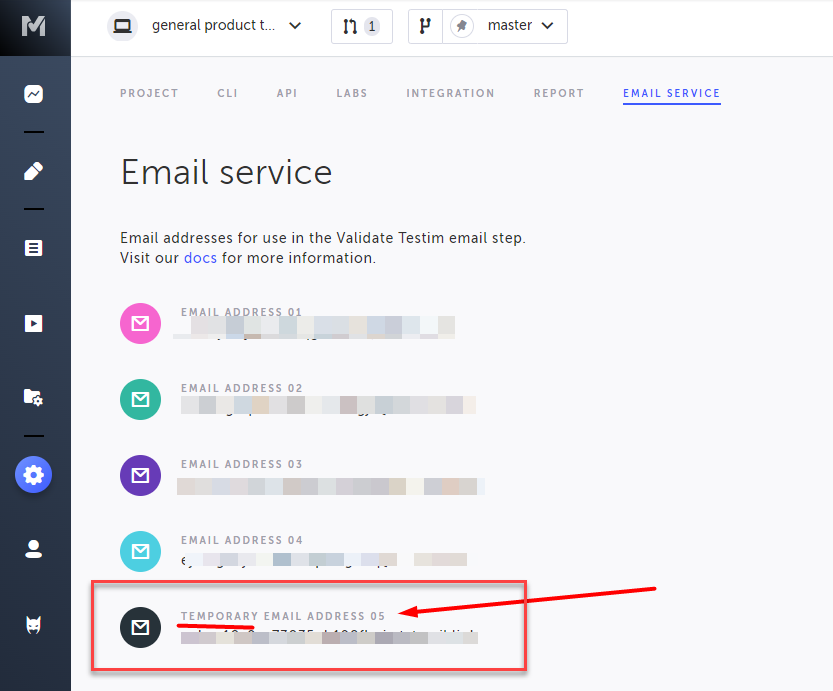
- Hover over the relevant email and click Copy.
Using a Run API Action step
The Run API Action step can be used to send the temporary/permanent email address information to an email service and to invoke the service to send an email to this email address.
The following test example includes a Generate email address step, which will generate a temporary email address and store this email address as a parameter called emailAddress.
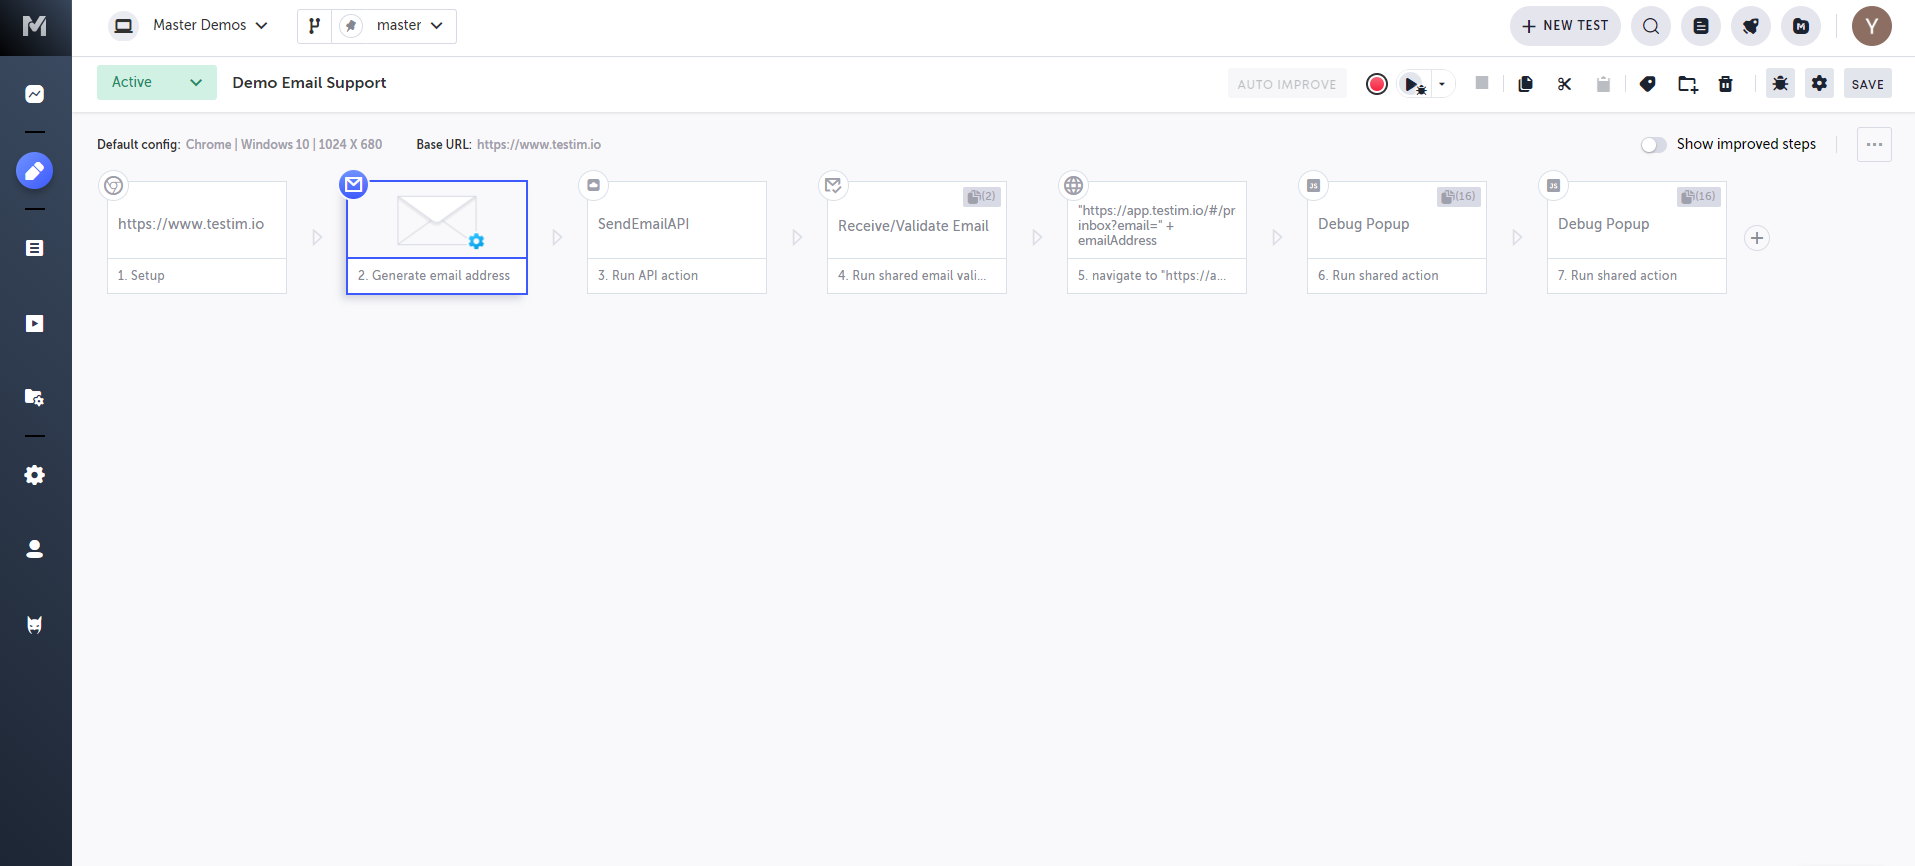
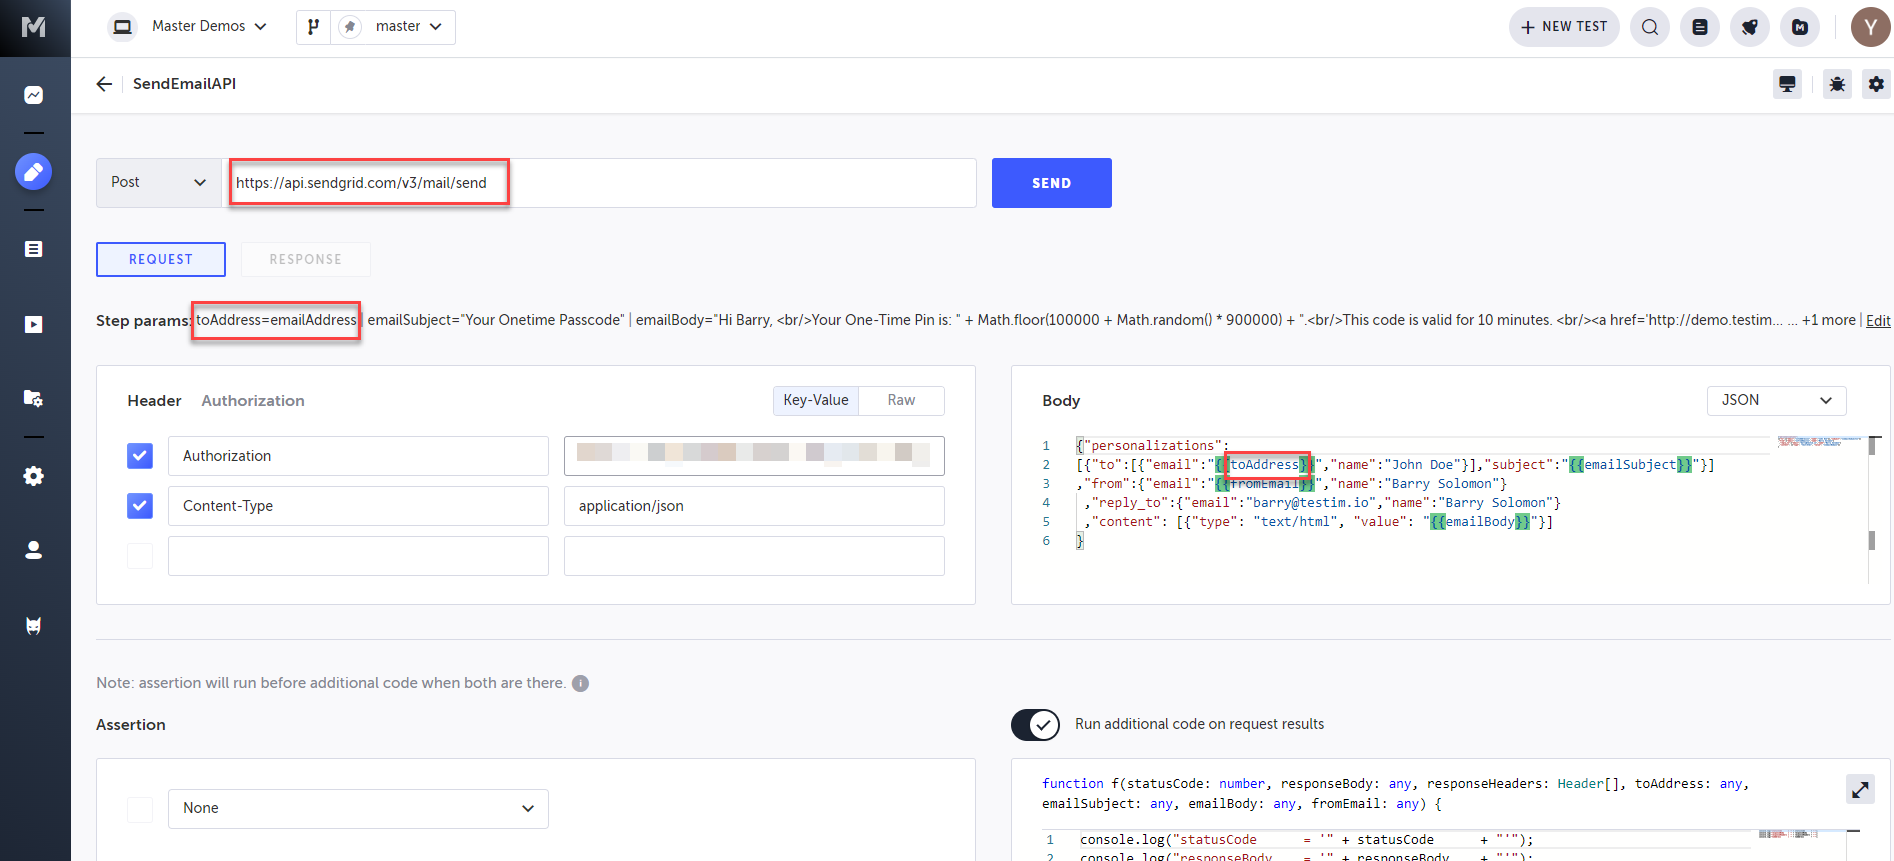
Following the Generate email address step, there is an Run API Action step. This step sends a POST API call to the email service and uses the parameter emailAddress that was defined in the Generate email address step as an input to populate the destination email address, which is defined in the toAddress parameter in the code.
Sending emails through any email service
You can also send emails to the permanent/temporary email addresses directly through the email services.
Creating a Validate Email Step
As part of this test we want to check that the email (e.g., signup confirmation) was sent to the permanent or temporary email, by adding a Validate email step.
There are two ways to configure the Validate email step:
- **Coded **- using a JavaScript code it is possible, for example, to check if the email inbox includes the relevant email and also the code can export the links from this email.
- Codeless- this involves configuring settings from the UI that enable the step to identify the relevant email based on a variety of possible conditions and export links or texts from the email.
Creating a Validation Email Step using the Coded Option
To create the validate email step:
- Hover over the (arrow symbol) where you want to add the step.

The action options are displayed.

- Click on the “M” (Testim predefined steps).
The Predefined steps menu opens.

- Click on Validations.
The Validations menu expands.

- Scroll down through the menu and select Validate email.
Alternatively, you can use the search box at the top of the menu to search for Validate email.
The Add Step window is shown.

-
In the Name the new step field, enter a (meaningful) name for this step.
-
If this is a shared step to be made available to reuse in this or other tests, keep the box next to Shared step selected (default), and choose a folder from the Select shared step folder list where you want this step stored. Otherwise, deselect the checkbox.
For more information about shared steps, see Groups. -
Click Create Step.
-
Click the Coded tab.
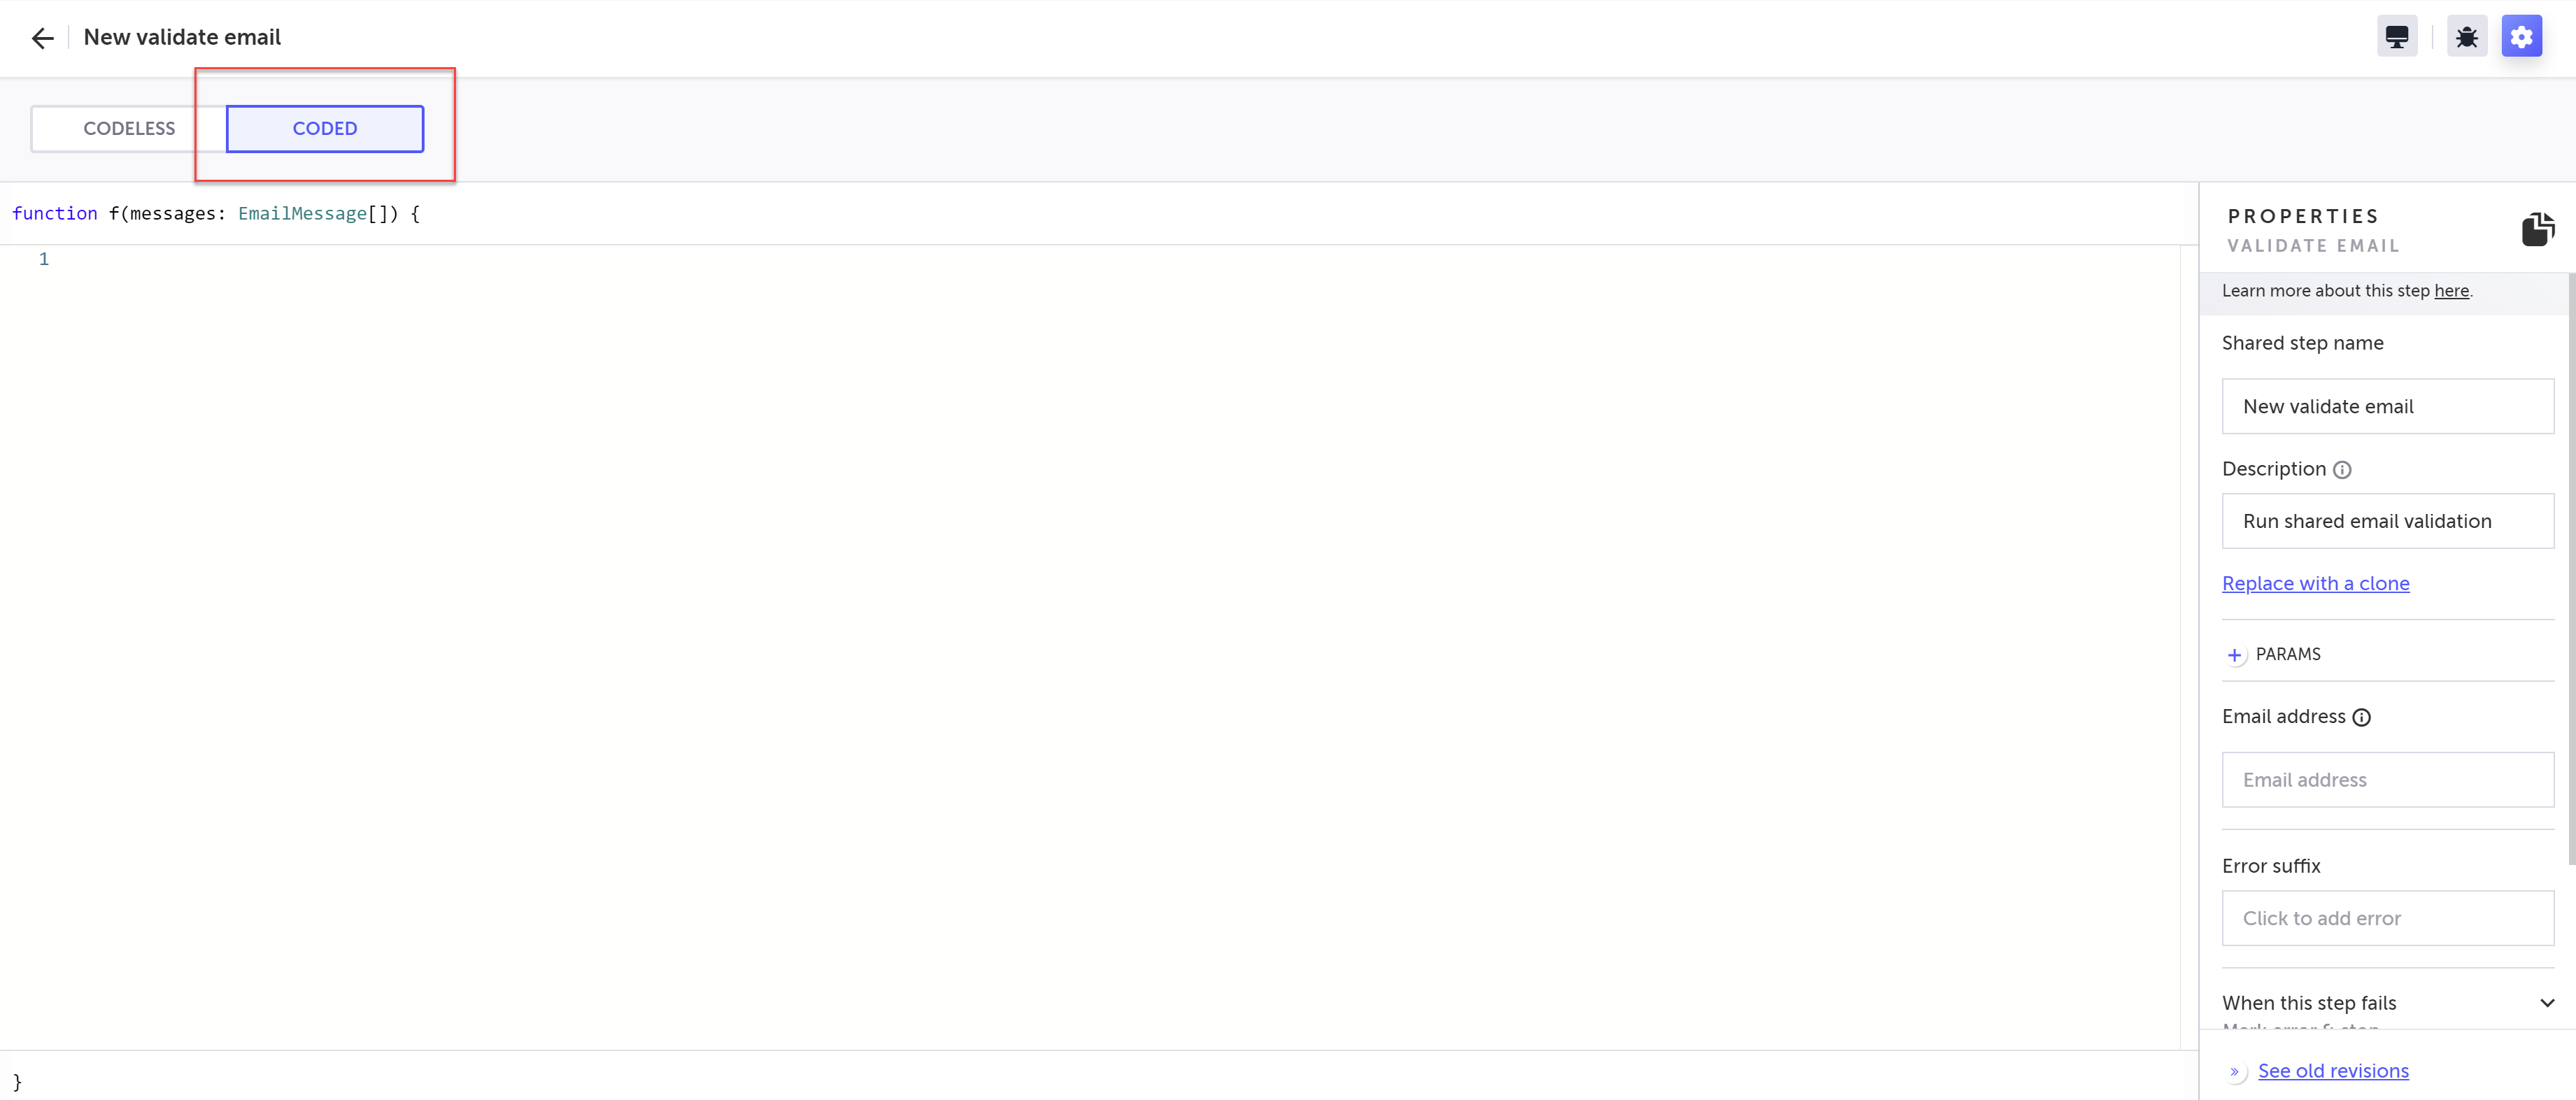
The function editor opens, and the Properties panel opens on the right-hand side. -
Do one of the following:
For the permanent email option - copy the permanent email address and paste it into the Email address field. This email address should be surrounded by single or double quotes.
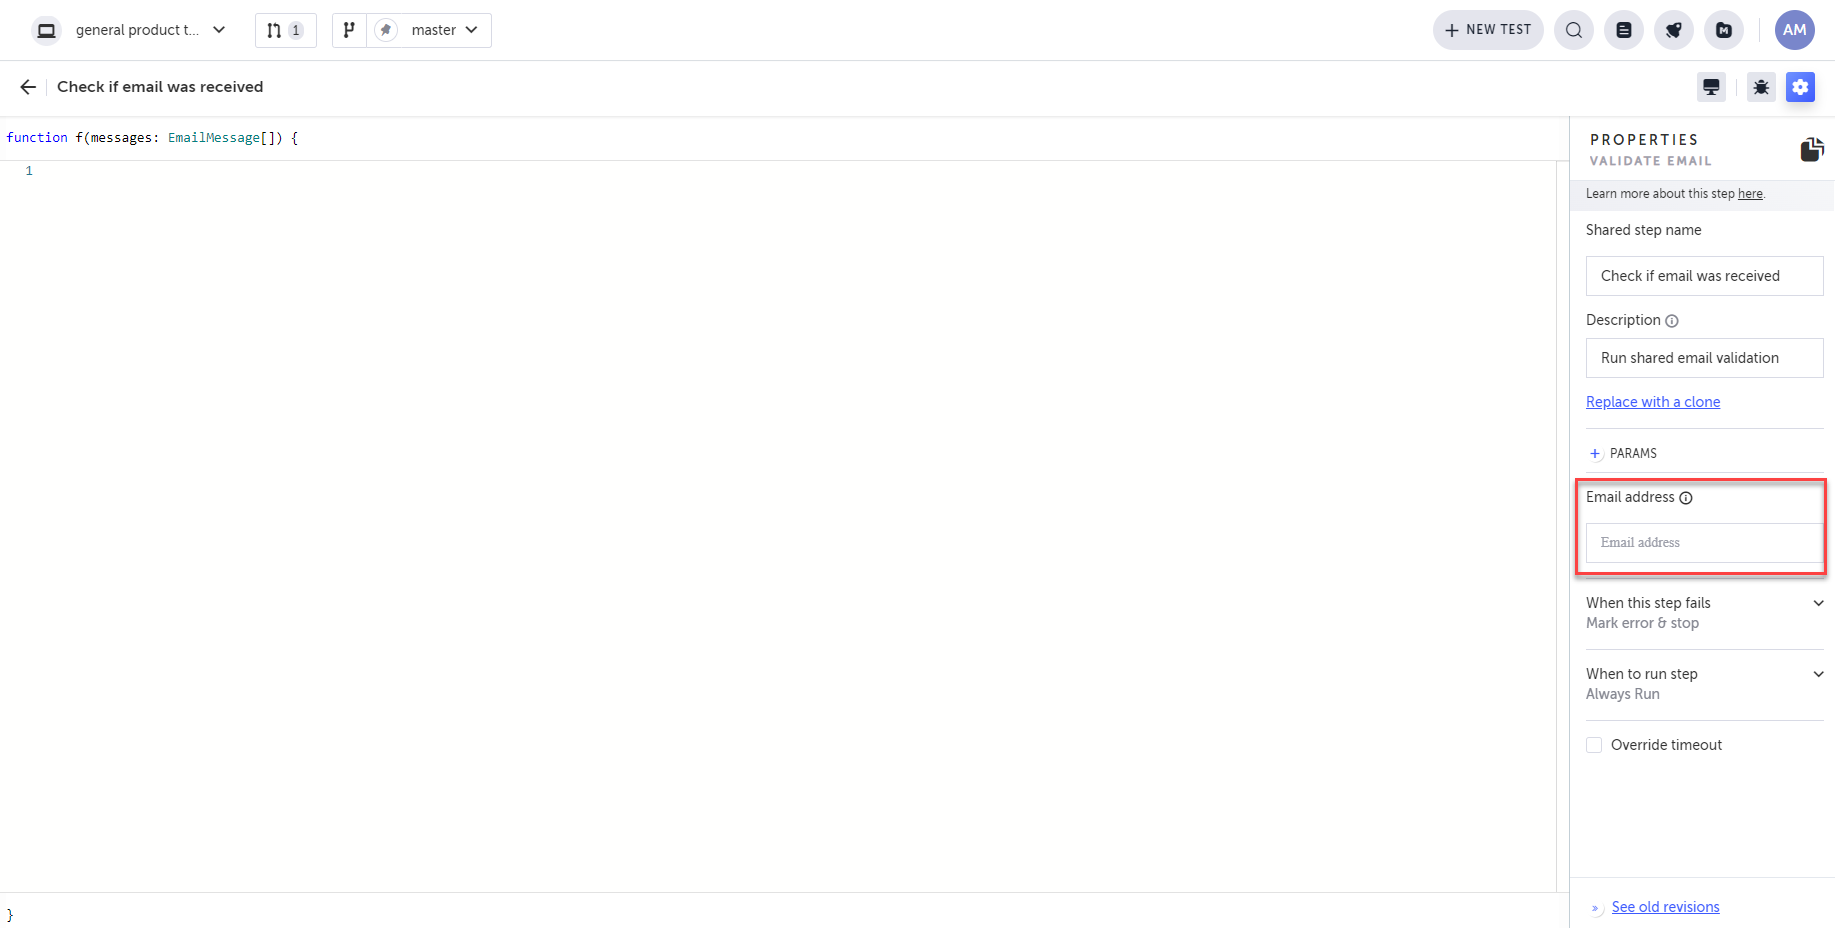
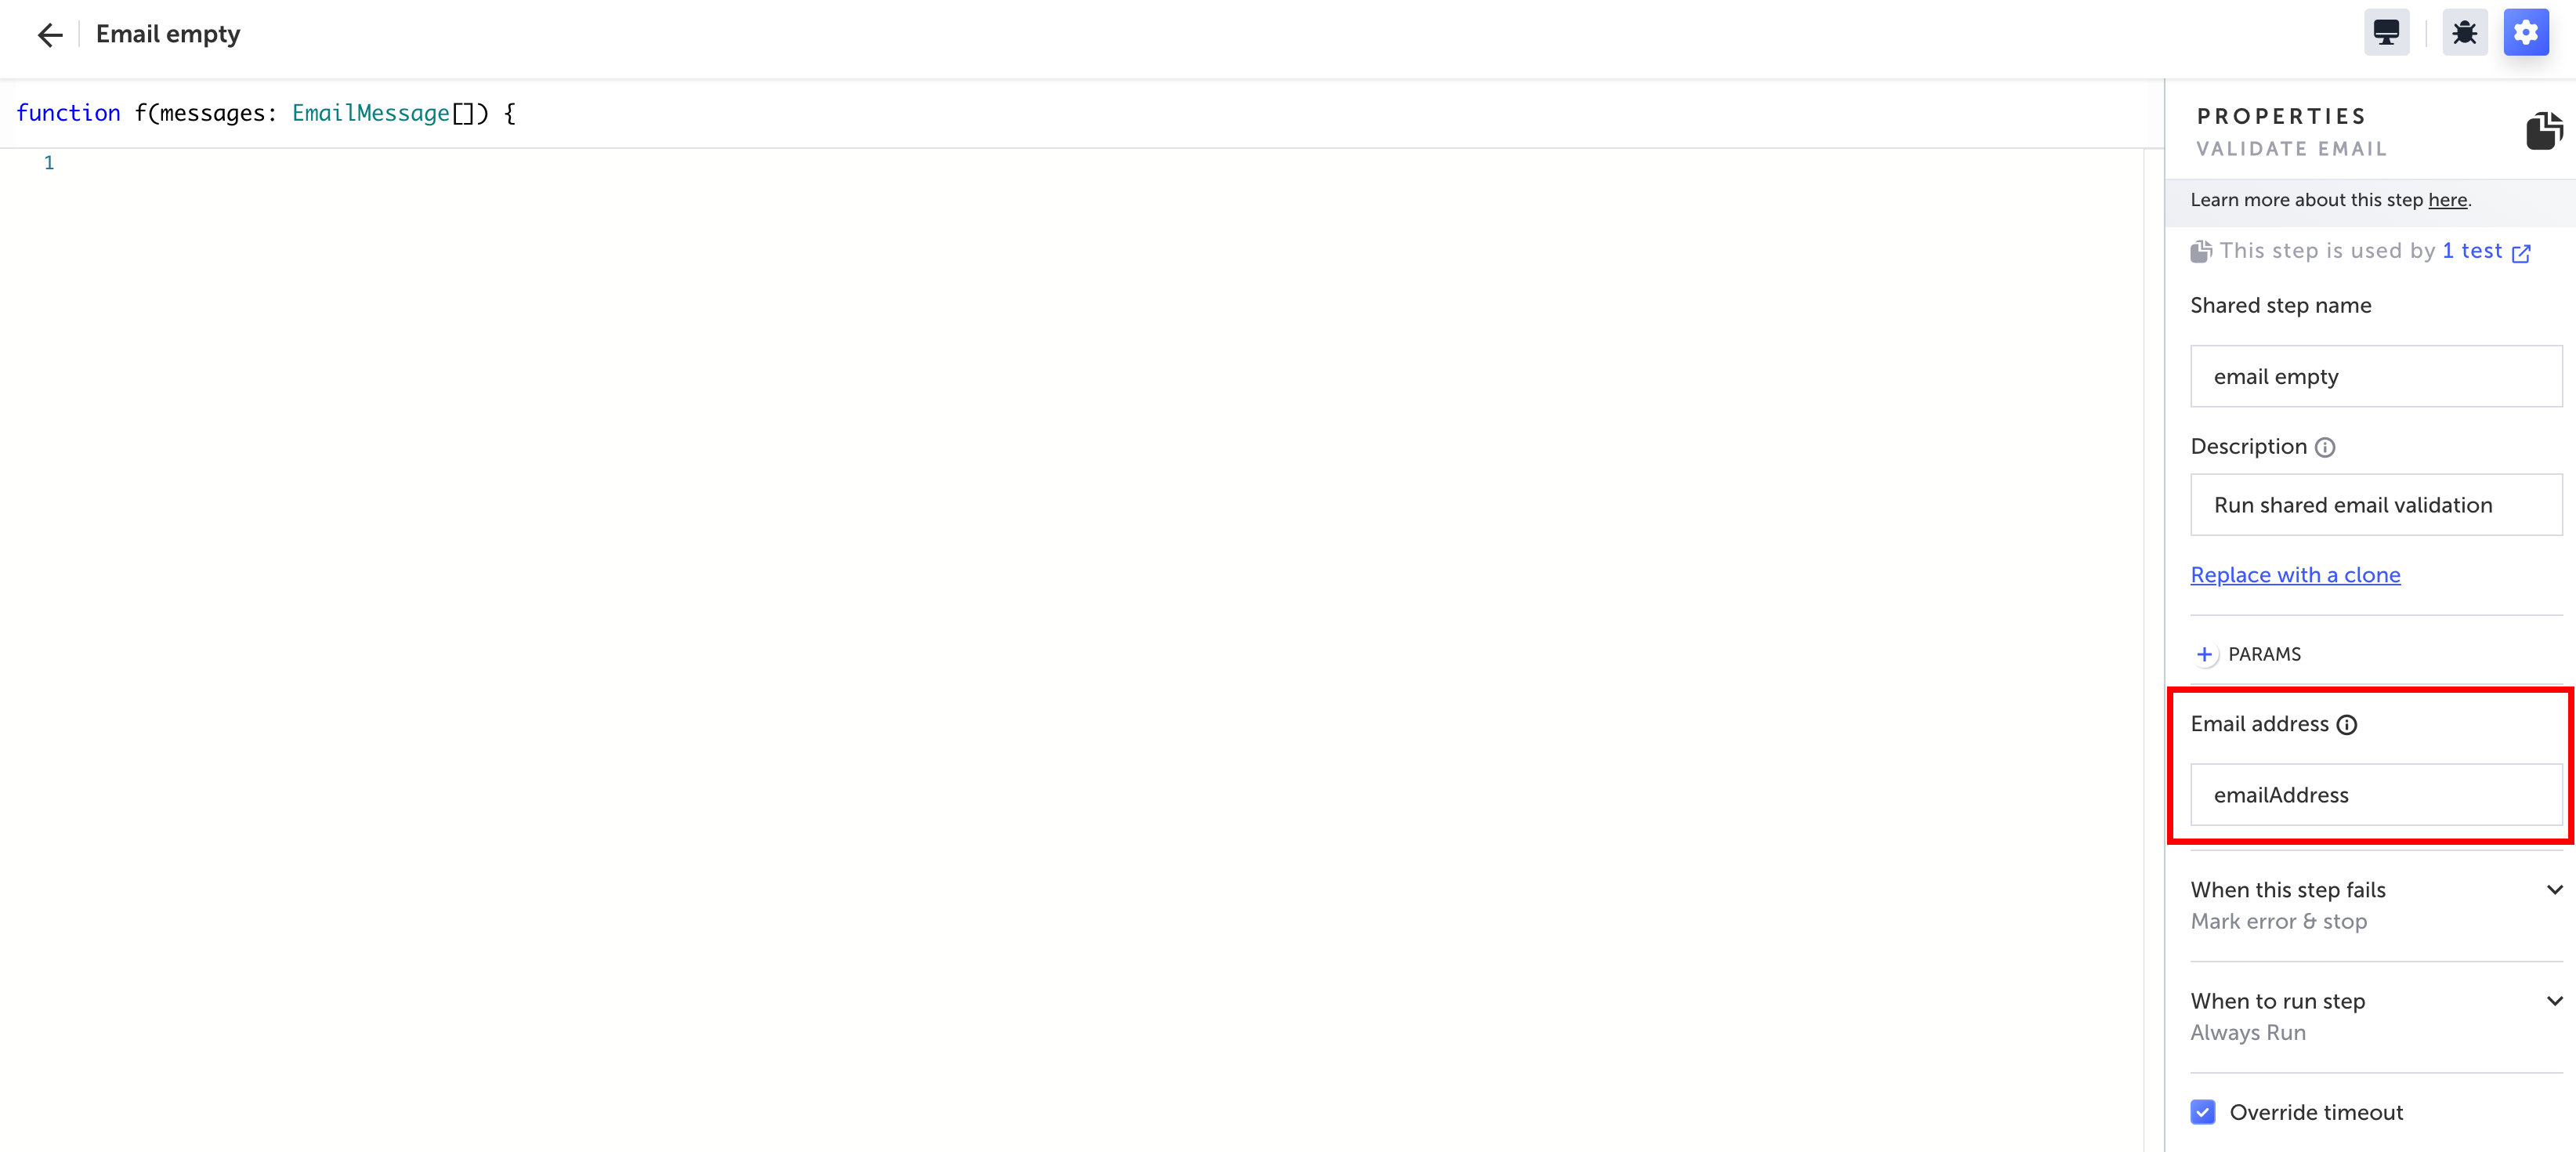
For the temporary email option -
Enter the name of the Variable name parameter, which you defined in the Generate email address step, into the Email address field.
The Email address field is mandatory.
- Set additional settings in the step and parameters as needed.
- In the function text box, type in the desired JavaScript code. If you have defined parameters, you can refer to those parameters in your JavaScript code. See the Email validation examples section below to learn about different ways to validate the email. The code will typically use value entered into the Email address field as a parameter in the code.
If you are using DOM selectors other than HTML parameters (e.g. jQuery), then empty arrays are truthy, so you need to use
$(<query>).lengthinstead of$(<query>).
- Click the back arrow to return to the main Editor window.
If you opened your AUT to define an HTML element as a parameter, click on the Toggle Breakpoint button to remove the breakpoint.
The step is created.
Coded email validation examples
Validate sign-up subject line
You can use the Validate email step to validate the contents of the subject line of an email generated by your app that was sent to a Testim-generated email address.

Example Code:
// Check if messages variable is falsy or if messages[0] is falsy
if (messages && messages[0] ){
  // If either condition is true, throw an error
  return messages[0].subject === "Thank you for signing up";
}
return false;
Validate links in body
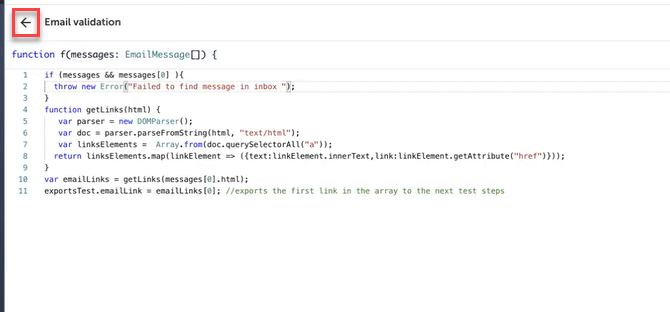
You can use the Validate email step to look for hyperlinks in the body of an email, and return the text component and link component of each link found.

Example Code:
if (!messages && !messages[0]){
  throw new Error("Failed to find message in inbox ");
}
// Define a function named getLinks which takes an HTML string as input
function getLinks(html) {
  // Create a DOMParser object to parse HTML strings
   var parser = new DOMParser();
  // Parse the HTML string into a DOM document
   var doc = parser.parseFromString(html, "text/html");
  // Find all anchor elements in the document
  var linksElements =  Array.from(doc.querySelectorAll("a"));
  // Map over the array of anchor elements and extract their text and href attributes
  return linksElements.map(linkElement => ({
// Return an object with text and link properties
    text:linkElement.innerText,
    link:linkElement.getAttribute("href")
  }));
}
// Call the getLinks function with the HTML content of the first message
var emailLinks = getLinks(messages[0].html);
//Exports the first link in the array to the next test steps
exportsTest.emailLink = emailLinks[0];
Creating a Validate Email Step using the Codeless Option
To create the validate email step:
- Hover over the (arrow symbol) where you want to add the step.
The action options are displayed.
- Click on the “M” (Testim predefined steps).
The Predefined steps menu opens.
- Click on Validations.
The Validations menu expands.
- Scroll down through the menu and select Validate email.
Alternatively, you can use the search box at the top of the menu to search for Validate email.
The Add Step window is shown.
-
In the Name the new step field, enter a (meaningful) name for this step.
-
If this is a shared step to be made available to reuse in this or other tests, keep the box next to Shared step selected (default), and choose a folder from the Select shared step folder list where you want this step stored. Otherwise, deselect the checkbox.
For more information about shared steps, see Groups. -
Click Create Step.
-
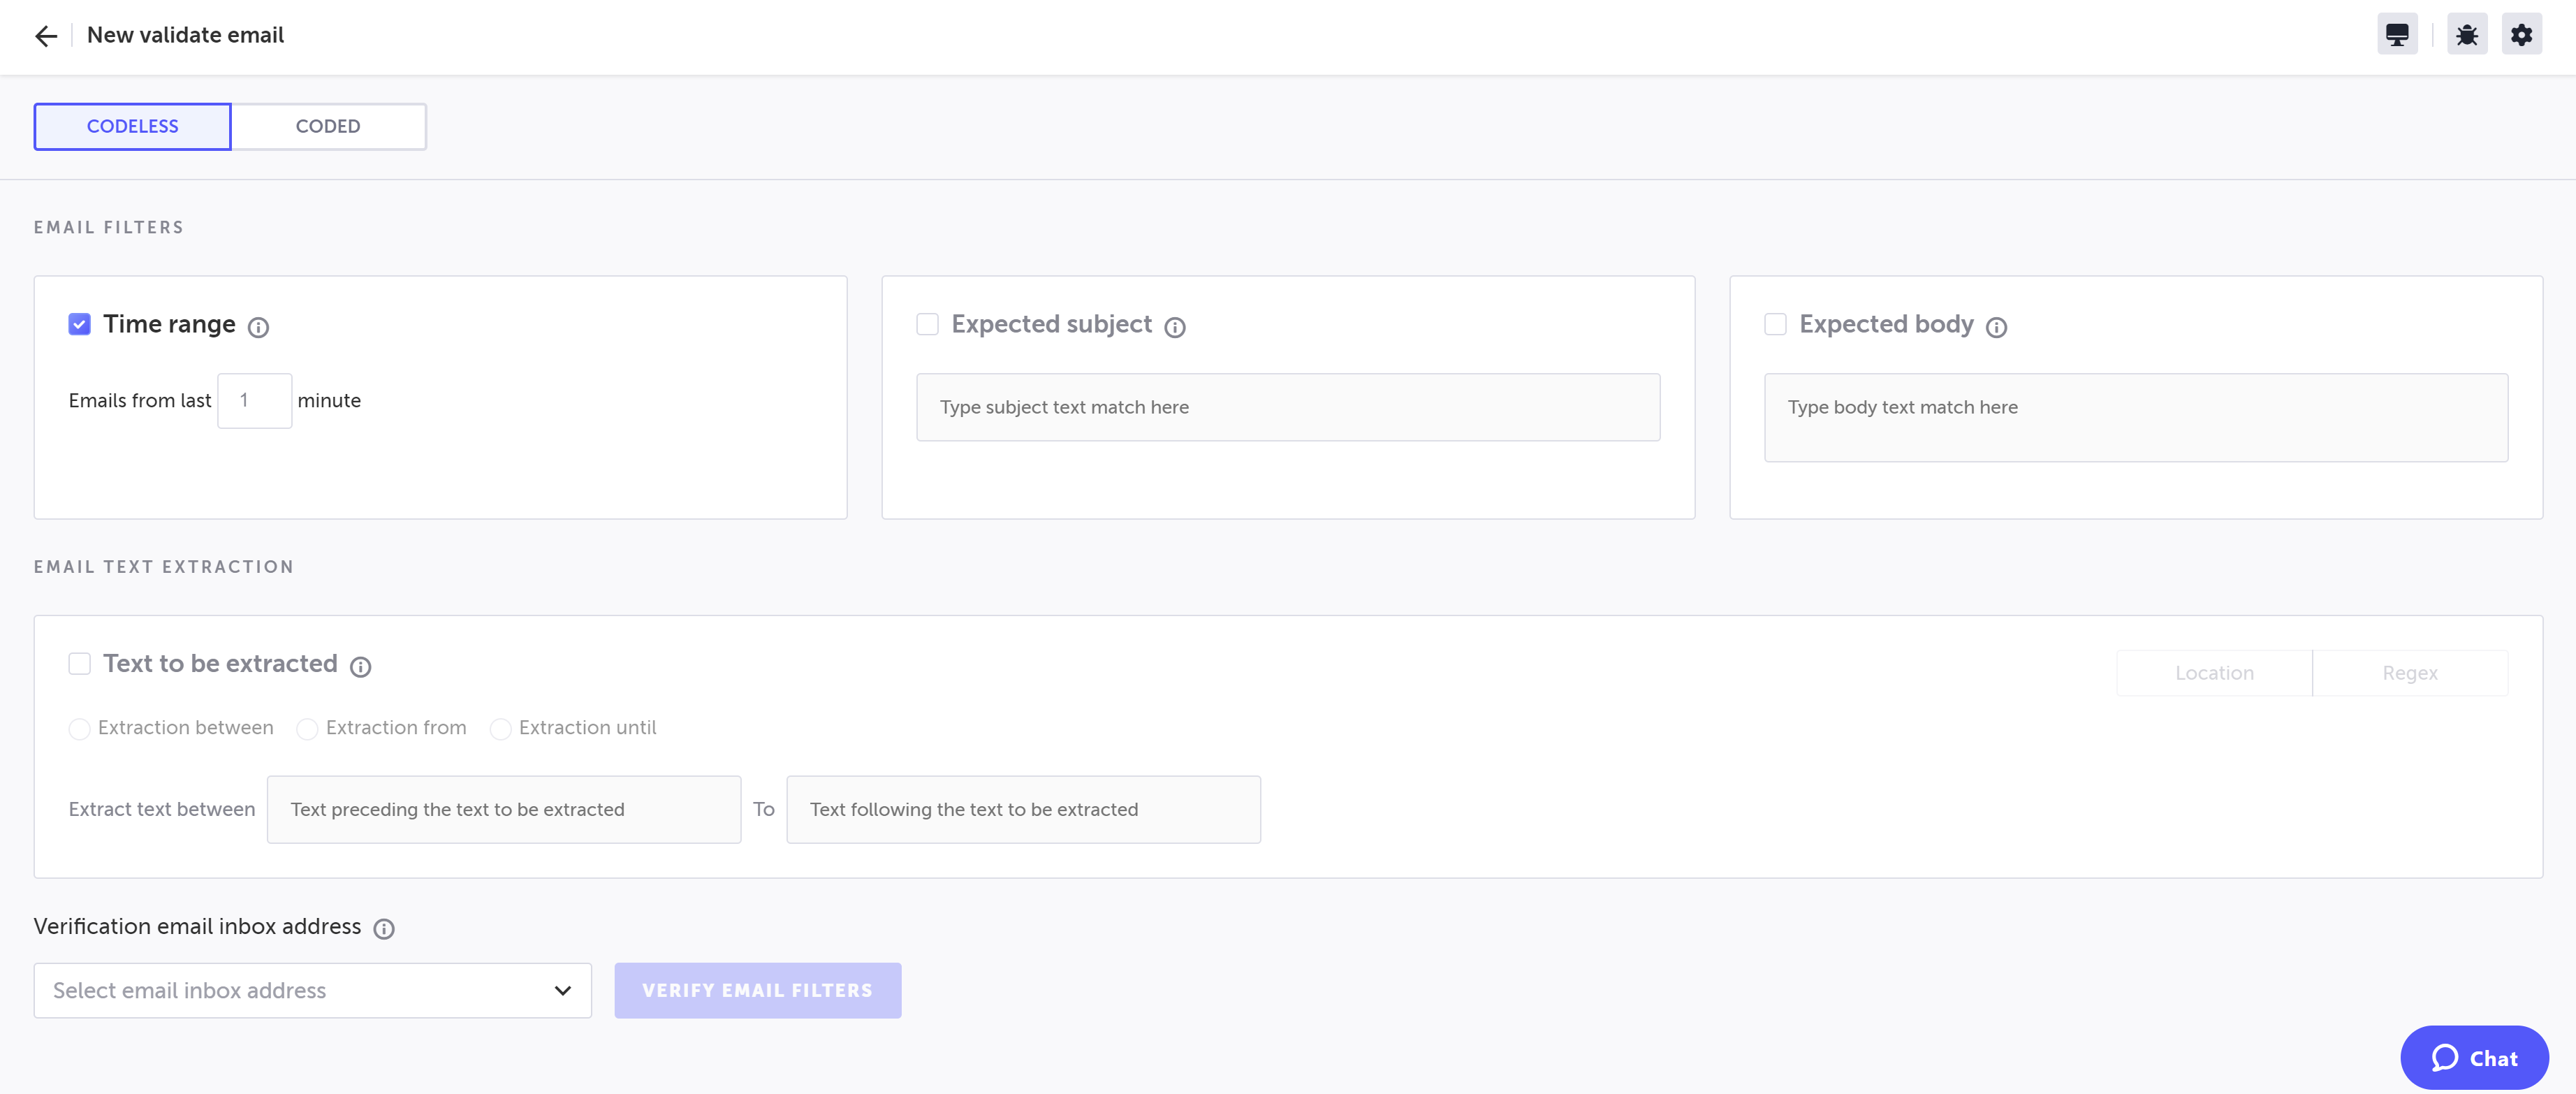
Under Email Filters, specify the conditions to identifying the email in the inbox by selecting the checkboxes of the condition types that you want to enable. Emails that match all of these conditions (i.e., AND condition) will be validated and the step will pass, if non of emails in the inbox matches these conditions, the step will fail. All conditions are optional, but at least one condition should be active:
- Time range - specify the time range in minutes of the emails received in the inbox. For example, enter 30 to scan the email that were received in the last 30 minutes.
- Expected subject - type the text or part of the text that should be in the subject of the email to match. This can be a partial match. The text field may contain parameters that are within scope, such as
{{param1}}for instance. - Expected body - type the text or part of the text that should be in the body of the email to match. This can be a partial match. The text field may contain parameters that are within scope, such as
{{param1}}for instance.
-
Under Email text extraction, specify what should be optionally extracted from the body of the emails that were matched by the email filters, this can be either texts from the email or links from the email. For example, if the email contains a code, similar to SMS code, you can use this feature to extract this code. The extracted texts and links will appear in the step result after its execution. All links are extracted automatically regardless of the extraction settings:
-
Select the checkbox to enable.
-
Select one of the following:
- Location- select this option if you want to configure conditions for extraction based on the location of the extracted texts.
- Regex - select this option if you want to enter a regular expression as the condition that will define which texts will be extracted from the email.
Entries in this section are case sensitive.
-
If you have selected the **Location **option, select one of the following:
-
Extraction between - select to extract the text/links that is between the text in the first field and the text in the second field. Type the strings in the first and second fields to define the beginning (after which the text will be extracted) and the end (before which the text will be extracted).
-
Extraction from - select to extract the text/links that is from the text in the field until the end of the email. Type the strings in the field to define the beginning (after which the text will be extracted).
-
Extraction until - select to extract the text/links that is from the beginning of the email until the text in the field. Type the strings in the first field to define the end (before which the text will be extracted).
The text fields may contain parameters that are within scope, such as
{{param1}}for instance.
-
-
If you have selected the Regex option, enter the regex condition for text extraction in the filed. To see usage examples of regex conditions, click here.
-
-
If you want to verify the email filter and the extraction:
- Under Verification email inbox address section, click the field and select one of the permanent email addresses.
- Click Verify Email Filters.
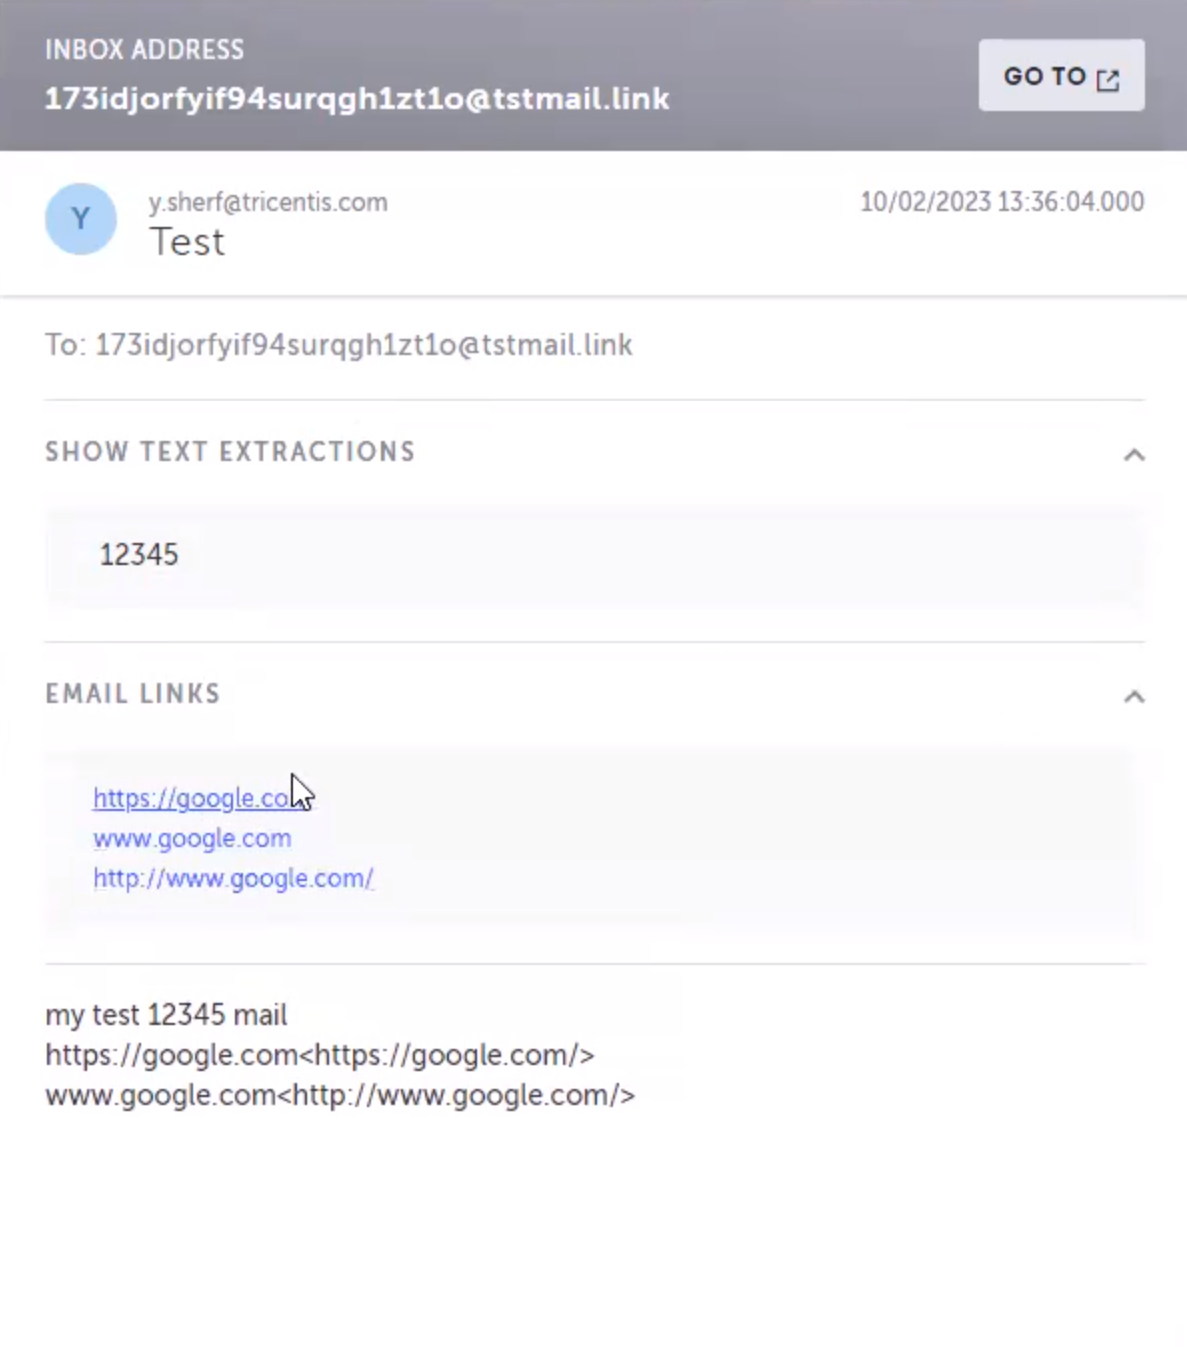
When looking at test run, after drilling down the step, the following pane is displayed on the right. The pane displays information about emails that were captured in the specified inbox, including information about the sender, the extracted texts, and the links that were captured.
-
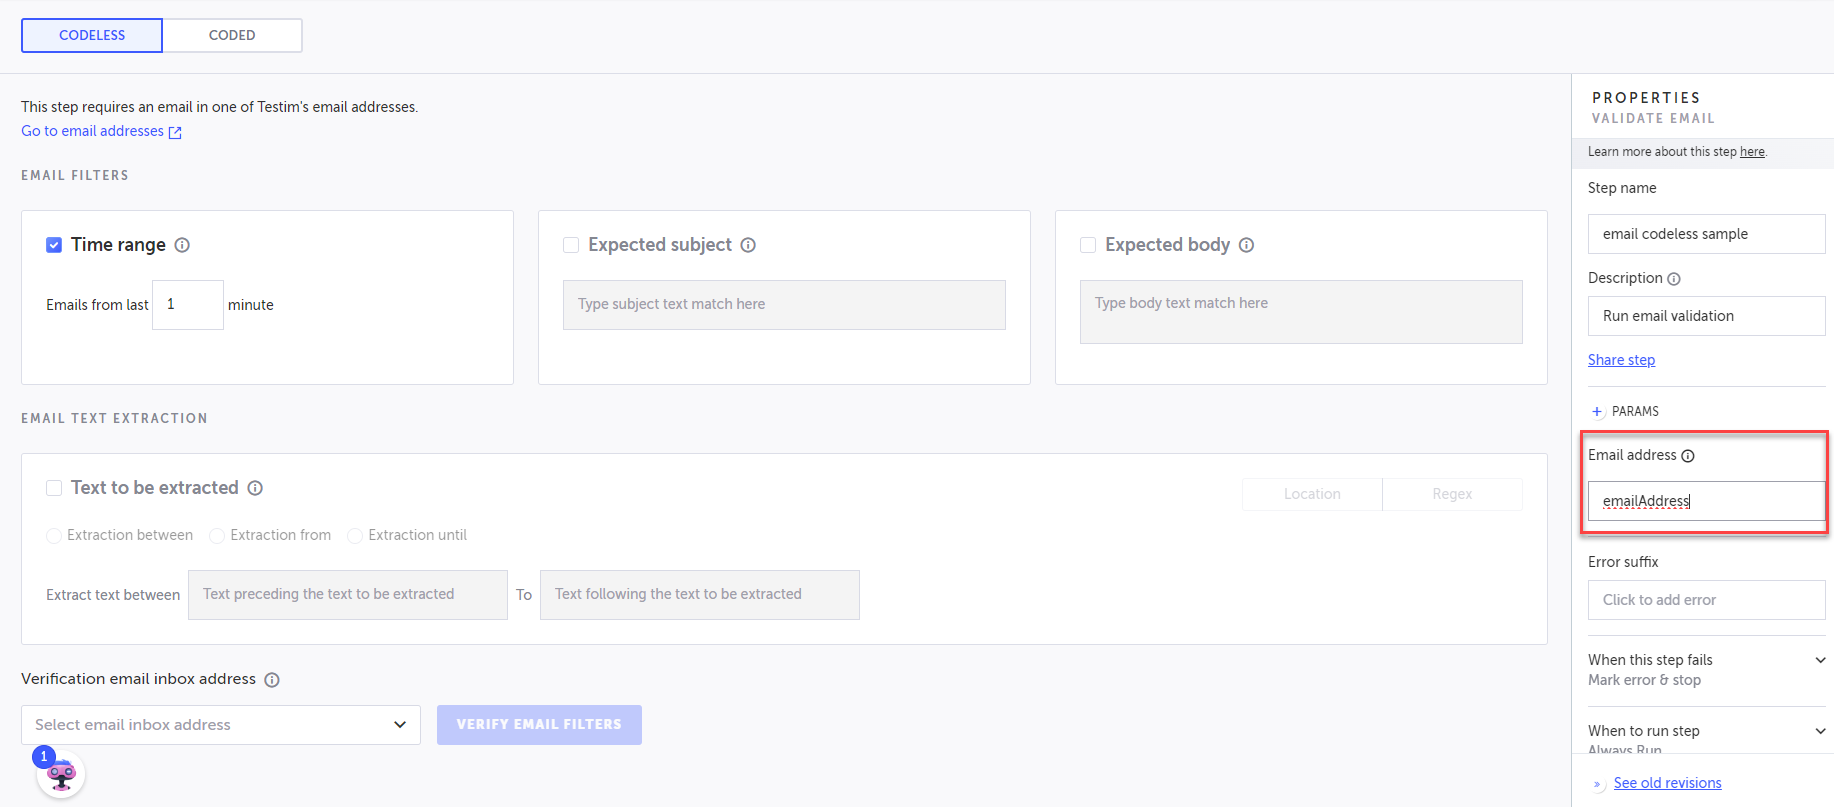
Do one of the following:
For the permanent email option - copy the permanent email address and paste it into the Email address field. This email address should be surrounded by single or double quotes.

For the temporary email option -
Enter the name of the Variable name parameter, which you defined in the Generate email address step, into the Email address field.
-
Set additional settings in the step and parameters as needed.
-
Close the pane, click back to view the test, and click Save to save the changes.
-
Set additional settings in the step and parameters as needed.
The step is created.
Export parameters
After the step is created, it provides three export parameter that can be used in other steps that are located after the email validation step:
emailData- includes all the parameters in the filtered emailemailExtractedText- includes the optional extracted textemailExtractedLinks- includes the optional array of extracted links.
emailExtractedLinksis an array; to access an entry within the array, useemailExtractedLinks[n], where0represents the first entry.
Updated 6 months ago