
Secrets Manager
Sometimes sensitive information, such as admin credentials for a production environment, a phone number, or an ID number is used in testing. In such cases, you don't want the secret information to be exposed in version history or stored in plain text.
Testim features a Secrets Manager that allows you to centrally manage sensitive values. Structured secrets are encrypted using AES-256 with customer-managed keys. Test artifacts are encrypted at rest using AES-256 via AWS default server-side encryption (SSE-S3). A secret can be assigned to a step and reused across tests, including as a Shared step.
It's important to note that during the test execution, Testim uses HTTPS (TLS) to encrypt values in transit. However, secrets are hidden only when the field type is password. That means secrets appear as asterisks in screenshots only when they're in a password field.
As a general practice, we recommend adhering to the best practice of avoiding testing on a production environment with sensitive data. Instead, it is advisable to utilize dedicated environments with non-sensitive information. However, if this is necessary, we recommend using the Secrets Manager feature.
Secrets Manager
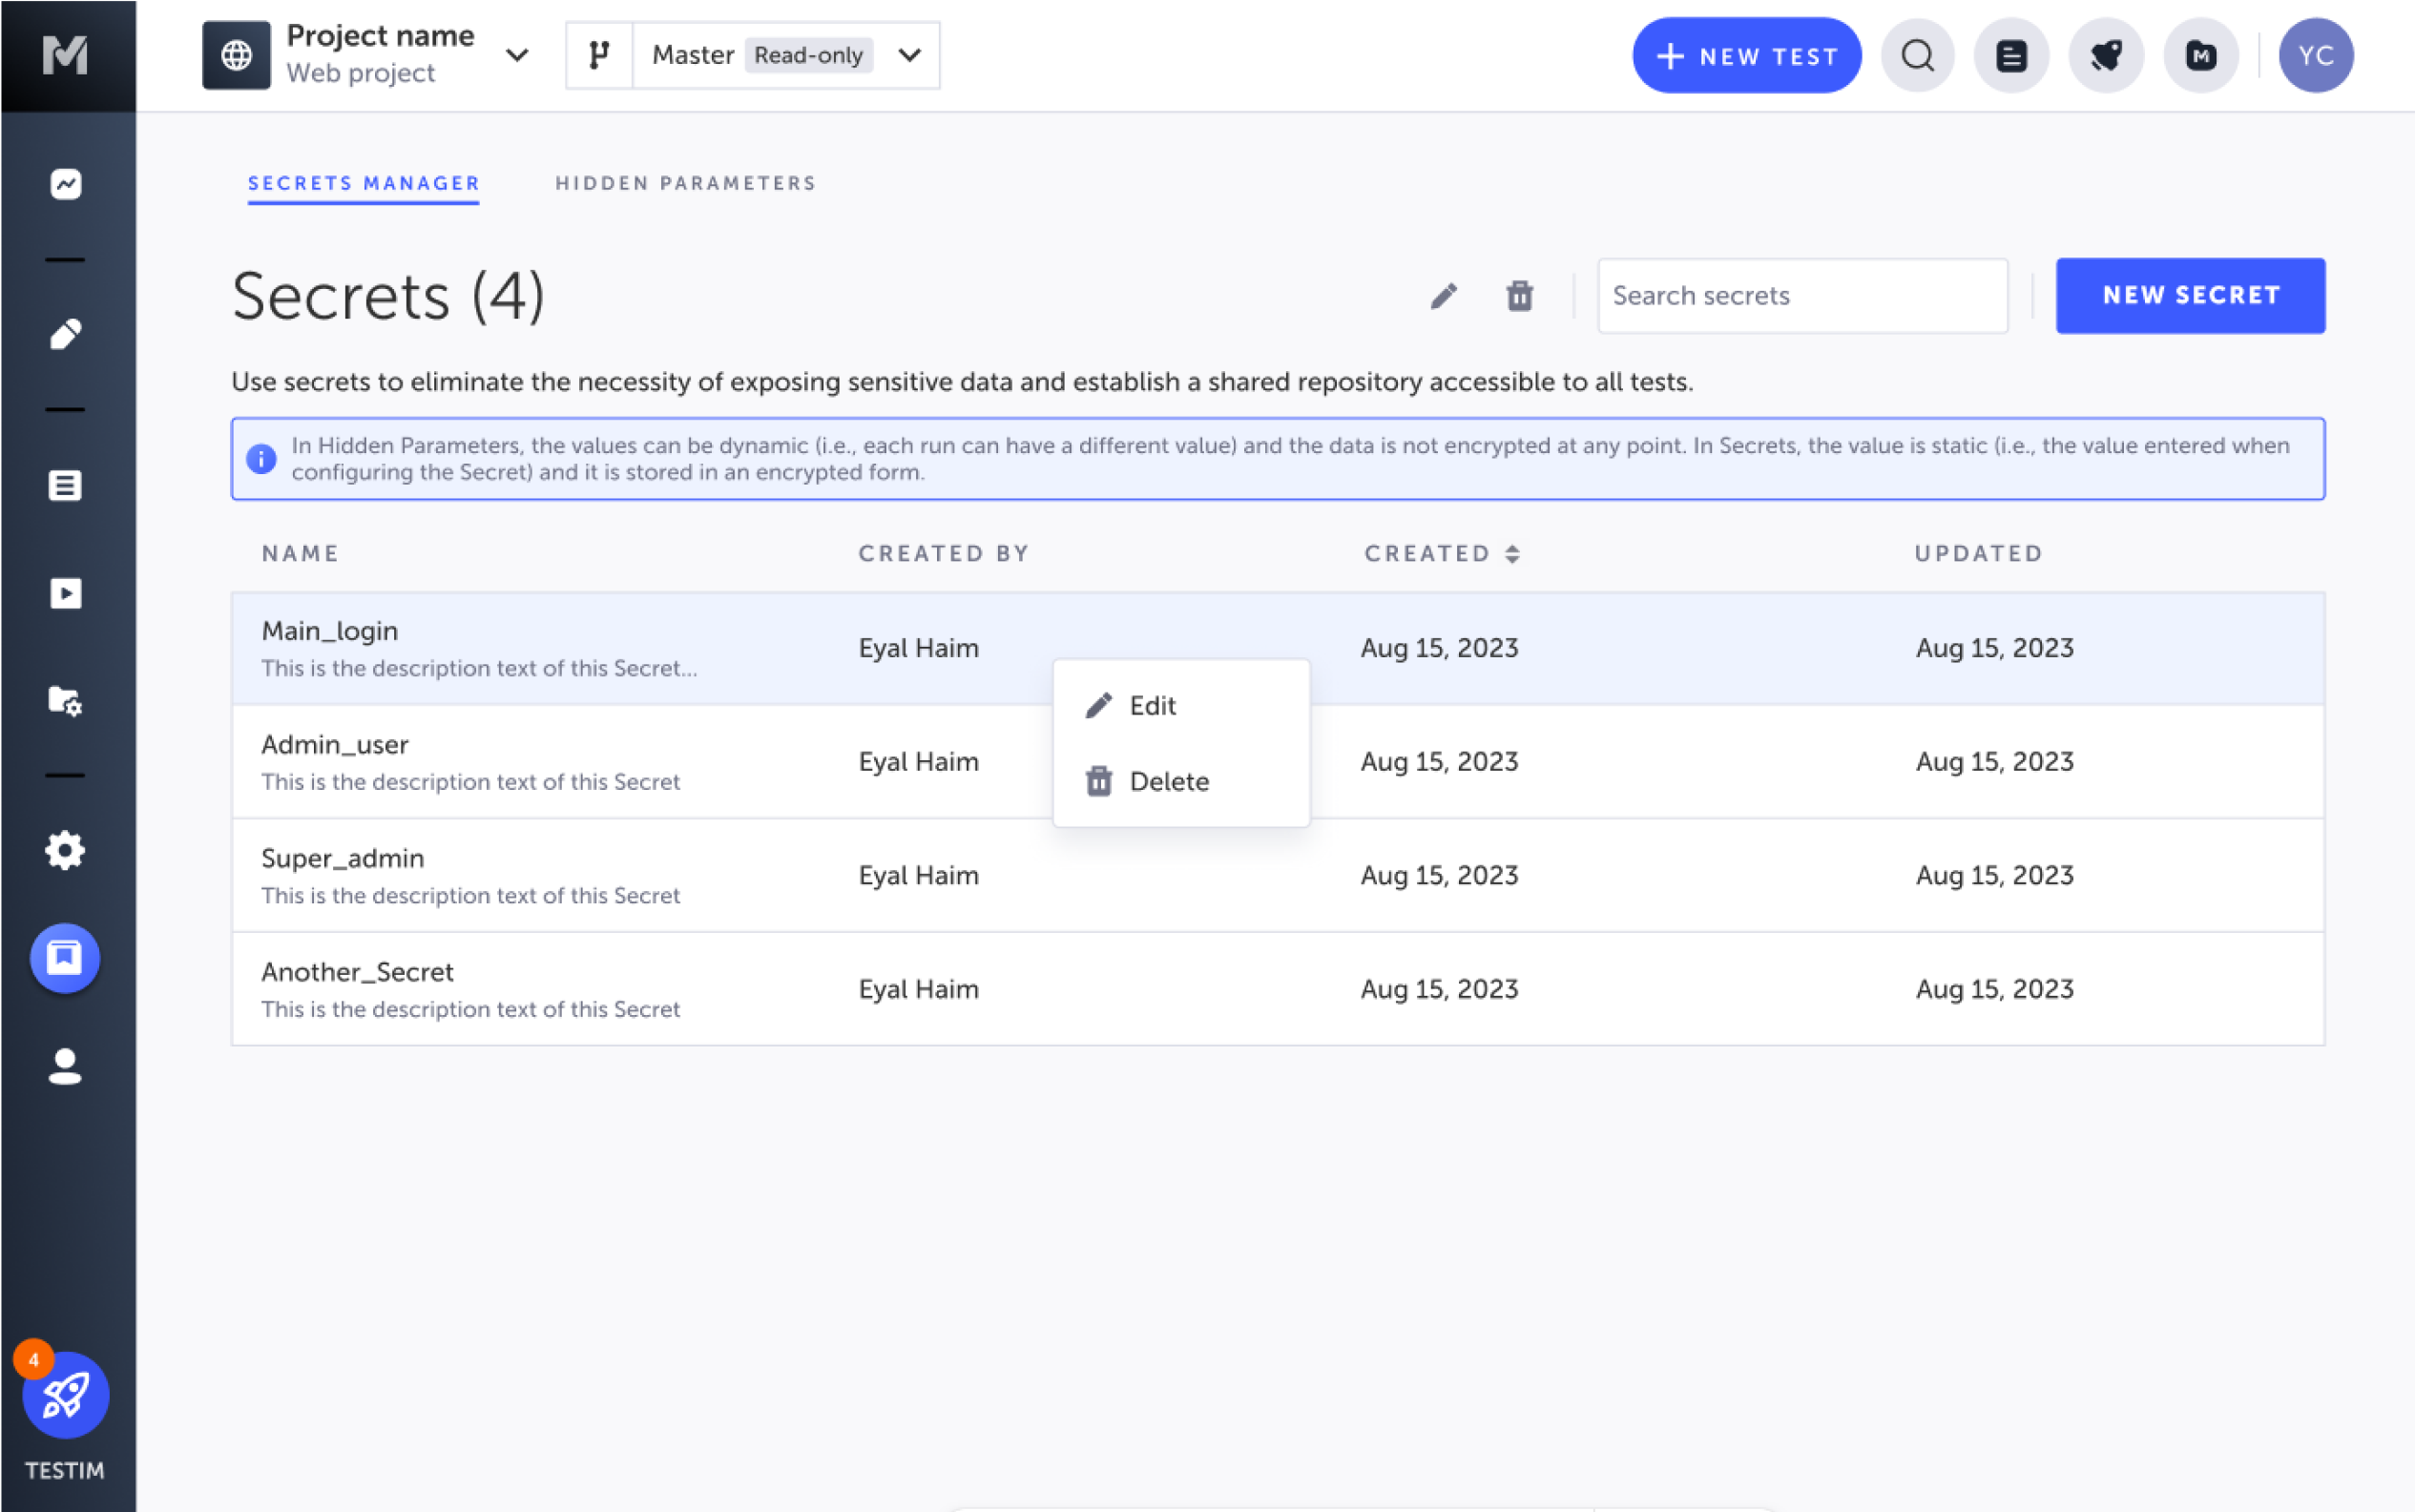
To access the Secrets Manager, select Resources from the main menu. Here you can see and manage all your secrets. You can also see:
- The user who created the secrets.
- When they were created.
- When they were last updated.
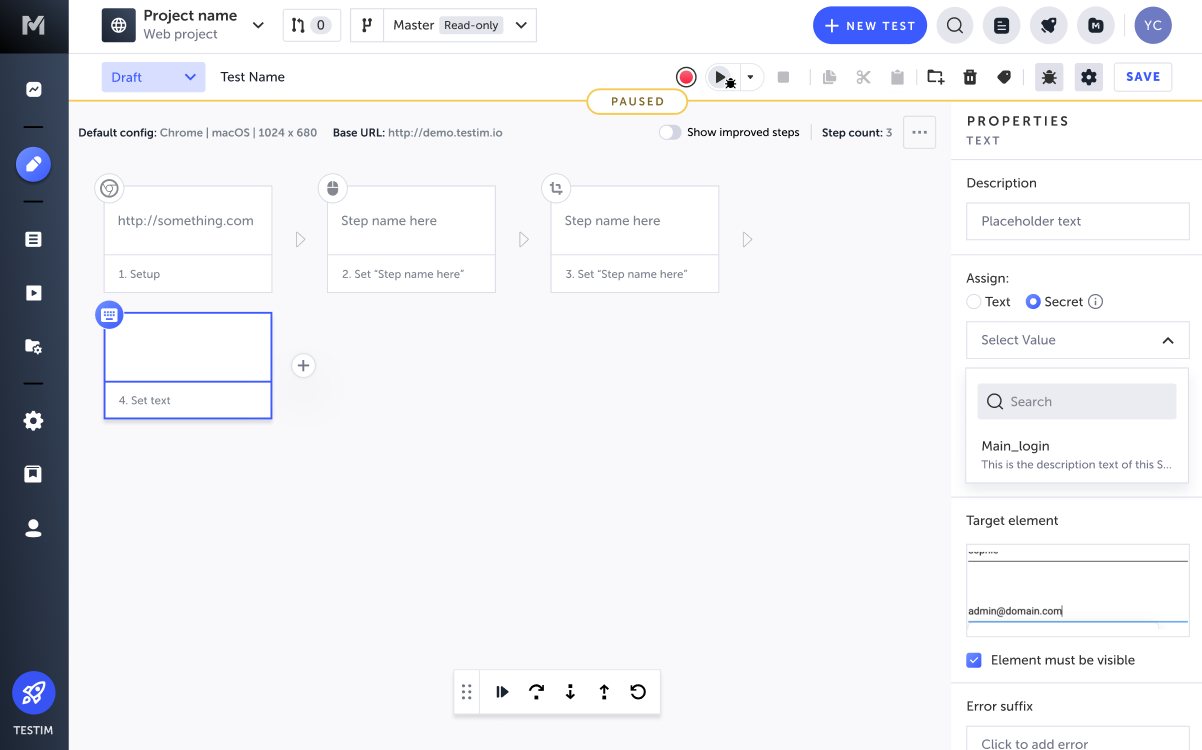
You can also access the secrets manager from the test editor. Select the test with the secret, select the step that uses the secret, select Properties, then select Go to secrets manager.
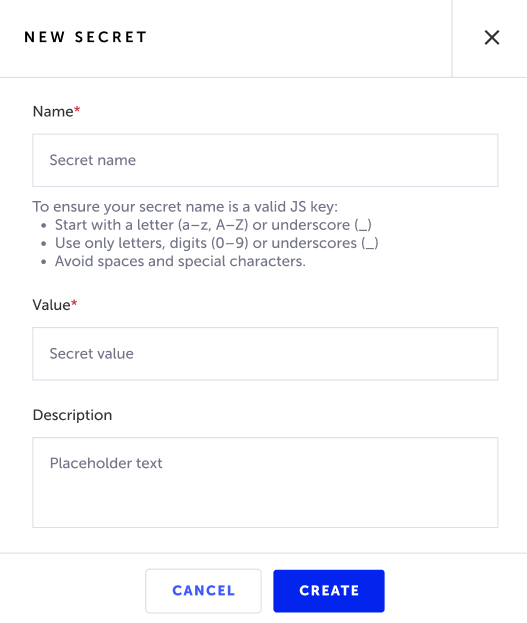
Create a Secret
Note that the Secrets Manager is now accessible under a new tab called Resources, where you'll find the Secrets Manager and Hidden Parameters section.
To create a new secret, follow these steps:
-
Go to Resources > Secrets Manager.
-
Click New Secret.
-
In the Name field, enter a name for the secret. Make sure you follow the correct syntax described below.
-
In the Value field, enter the value that is being kept secret (e.g. phone number, password, etc.).
-
In the Description field, optionally enter a description for the secret.
-
Click Create.
Edit or Delete a Secret
To edit or delete a Secret, follow these steps:
- Open the Secrets Manager by selecting Resources from the side menu.
- Right-click on the secret you want to edit and select Edit. To delete the secret, select Delete instead.
If your secret is used in tests, you have to delete it from there first.
If you delete a secret, it affects any tests using that secret. This includes steps, test data, and CLI usage.
Update or remove secrets from associated tests before you delete secrets.
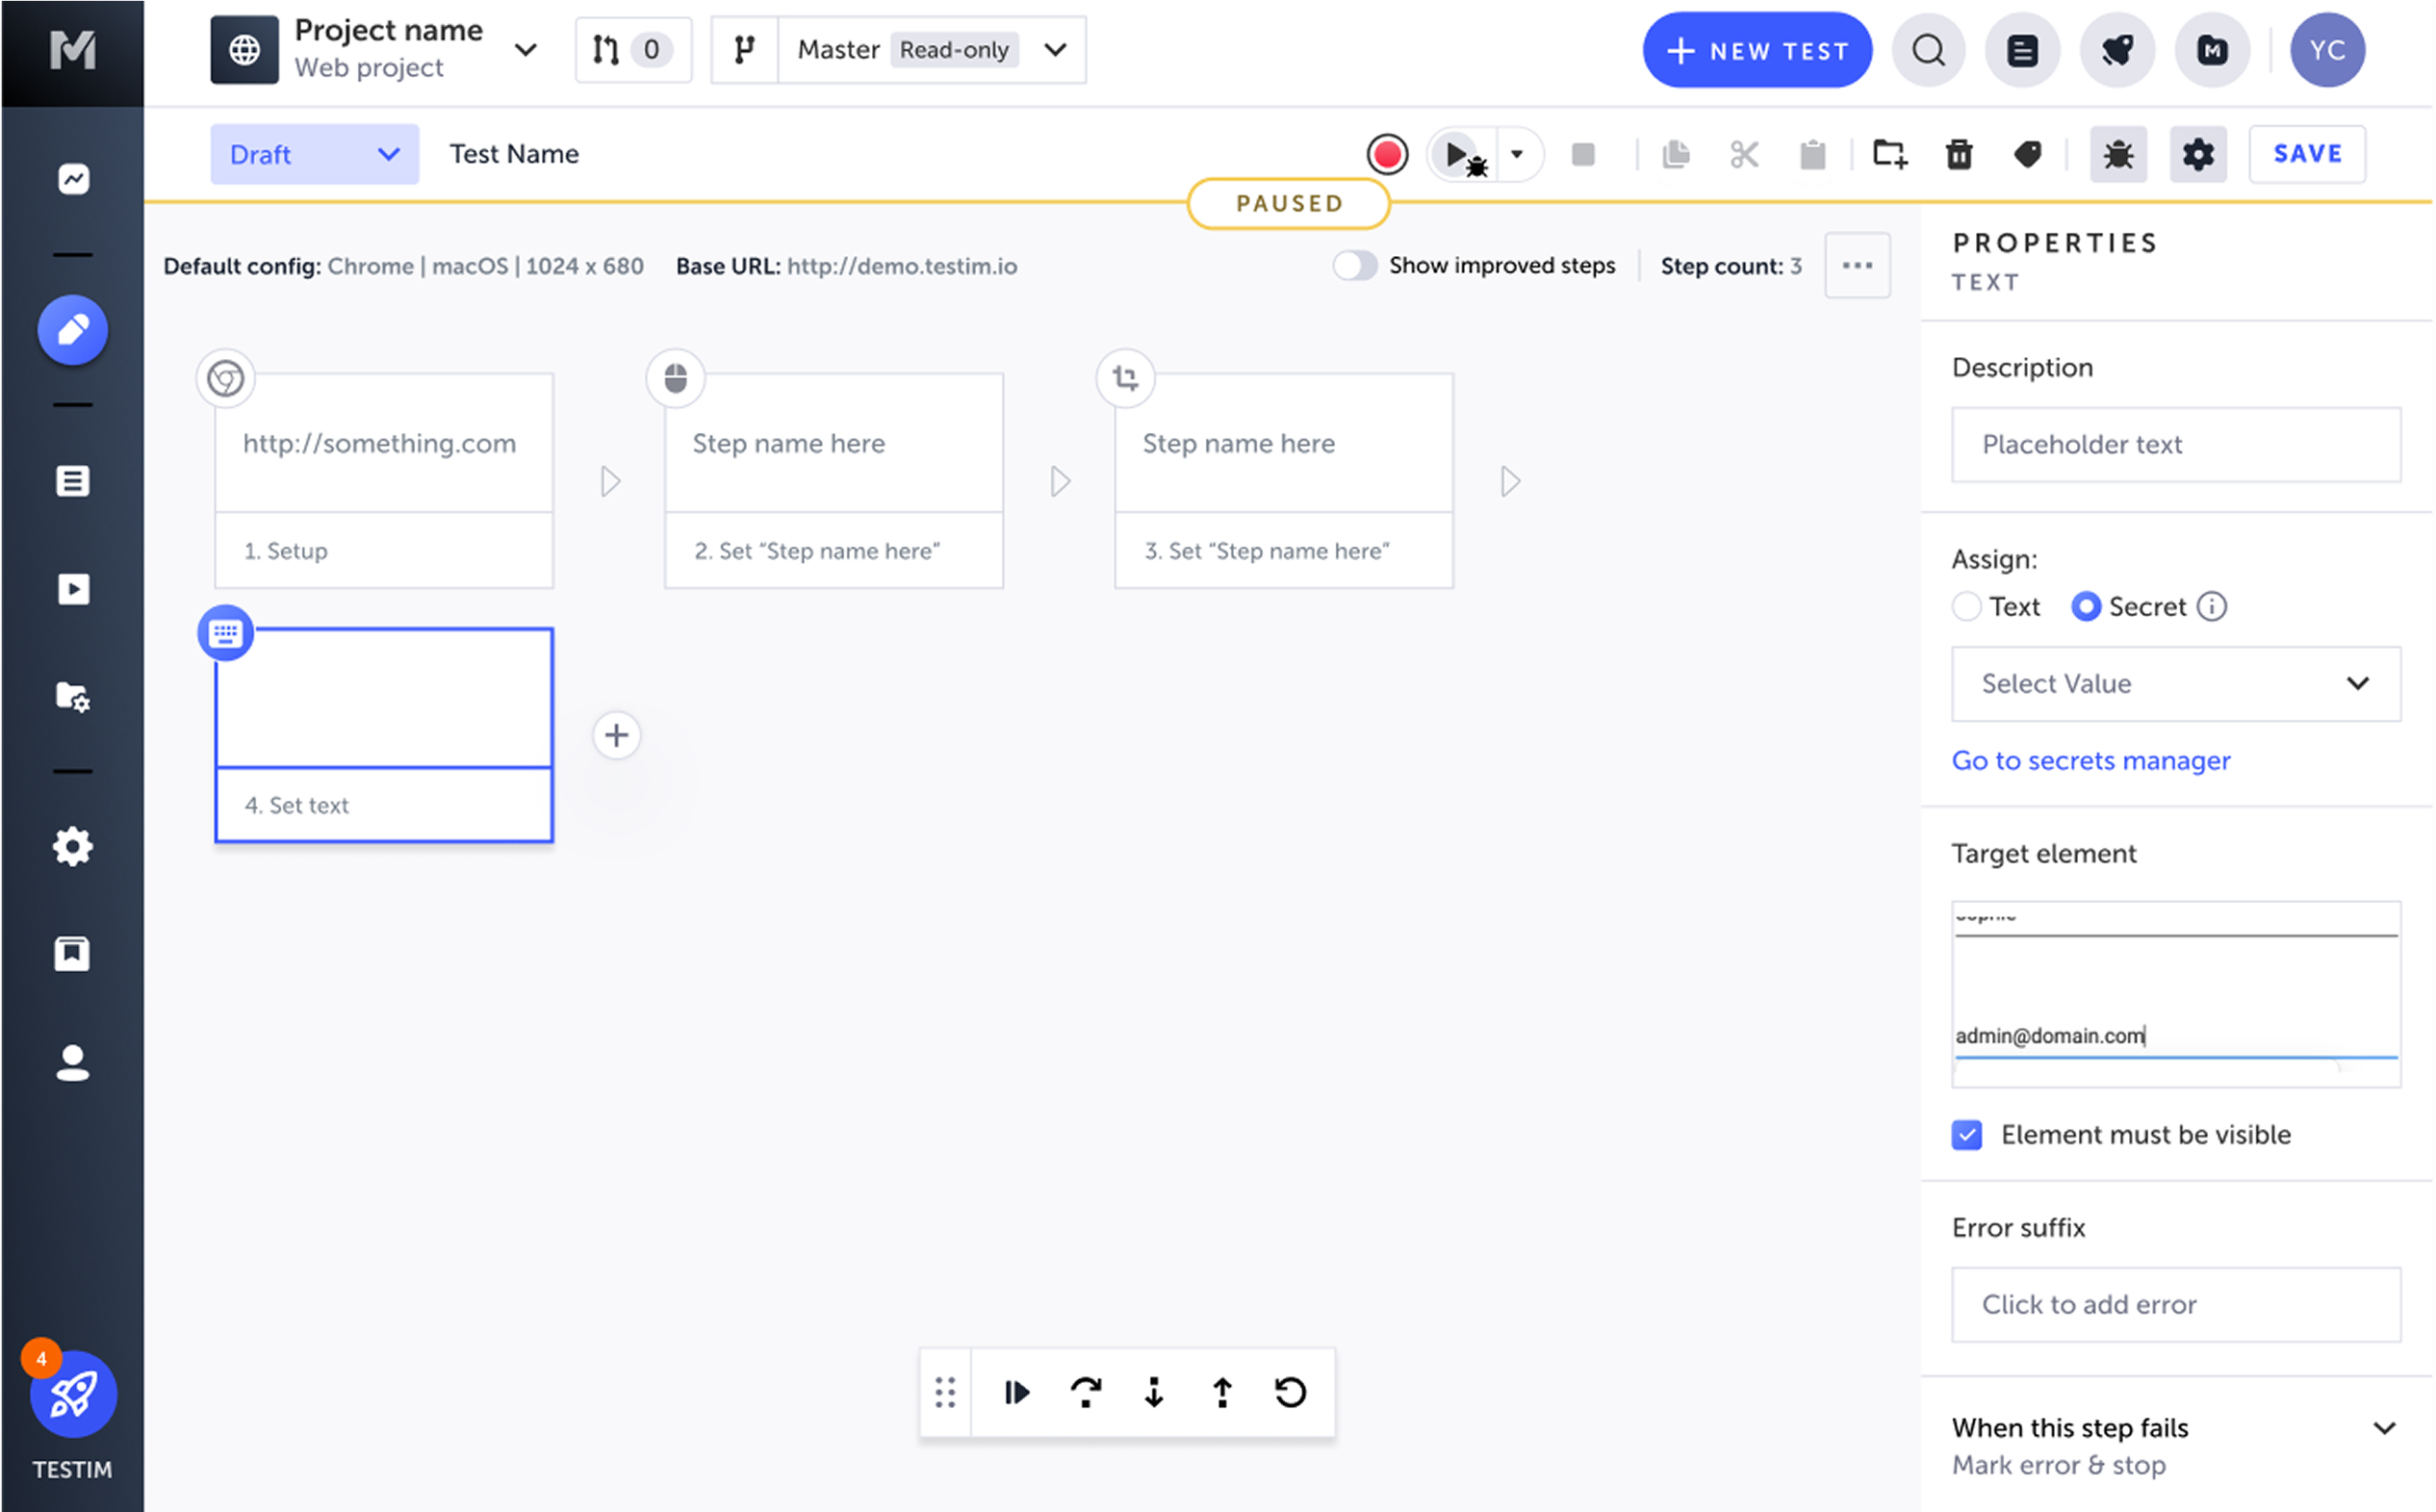
Use Secrets in Tests
When recording a test, you can enter text into a field in the AUT, which creates a Set Text step. In the Set Text step properties instead of entering a value that will be entered into the field, you can assign one of the previously created secrets.
To add a secret to a test, follow these steps:
- Open the test editor and select the step you want to add the secret to.
- Select the Show Properties button on the Set Text step.
The step's Properties pane is displayed. - Under Assign, select the Secret option.
- Select the secret you want to use from the list.
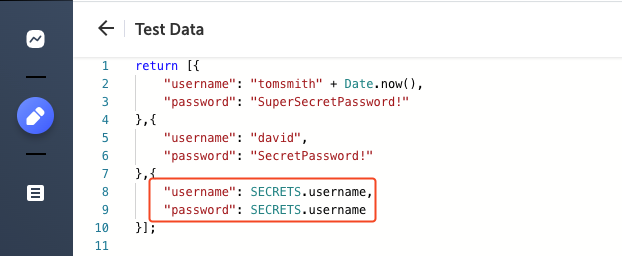
Test Data
You can also use secrets as part of your Test Data by referencing them in data-driven steps. Simply configure predefined secret parameter in the test data editor so that these secrets are used when the test is run:
parameterName: SECRETS.parameterValue.<value>
Example:
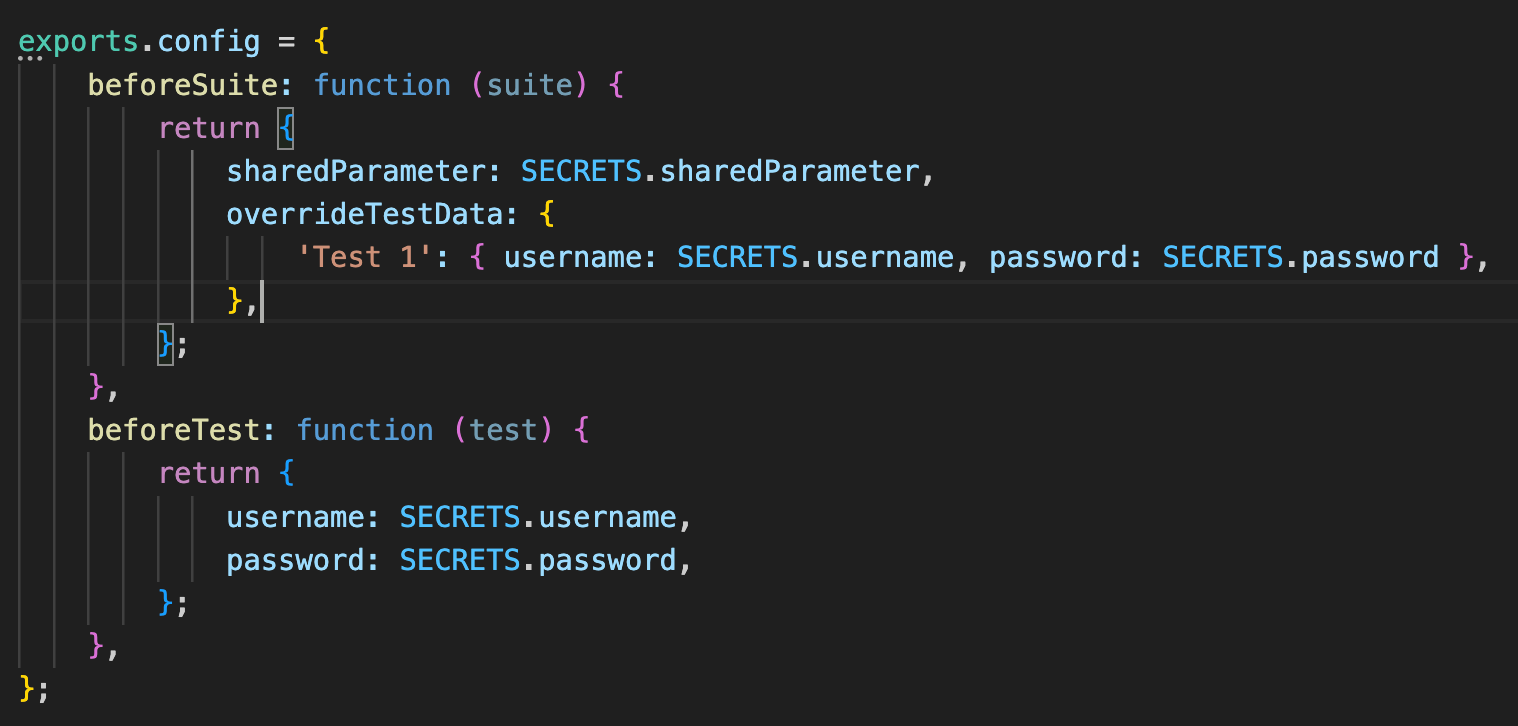
Add Secrets to Config File
The configuration file is a common JS containing all the required parameters to run your test and/or test suite. It includes run hooks which can be used to setup the application backend and define parameters before/after a single test or all tests. The configuration file needs to export all properties in a JSON named config. The definition of secrets in the Config File will follow the same overriding rules as any other parameter.
Secrets syntax
Secrets must include the following syntax:
SECRETS.<keyName><keyName>- replace this with the name of the Secret, as configured in the Name field.
For example:
Add Secrets to Param File
Using a JSON Parameters File, you can pass parameters to test runs. This method allows you to define dynamic values inside your test which vary by your test environment. For example, you can set different login credentials (username and password) when you test locally and when testing in your CI. The JSON Parameters File, which defines parameters, is created and then when running the test you can add an argument to the command that calls the JSON Parameters Files. The CLI command will pass the parameters to the tests that are included in the run.
Secrets syntax
Secrets must include the following syntax:
SECRETS.<keyName><keyName>- replace this with the name of the Secret, as configured in the Name field.
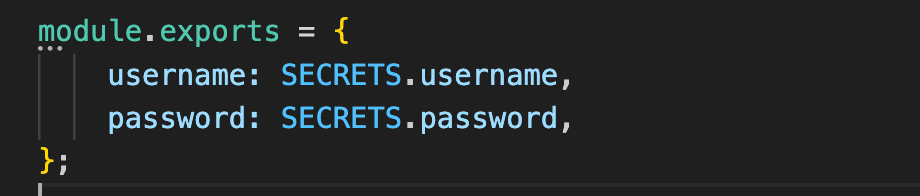
Making the Param File compatible with Secrets
Currently, Param files are defined in JSON file format, however this type of static file does not support using Secrets.
To make the Param File compatible with Secrets:
- Rename the file with a
.JSextension (instead of.json). For example -<file name>.js - Add
module.exports=as the first line:module.exports = { username: SECRETS.<keyName>, password: SECRETS.<keyName>, }
For example:
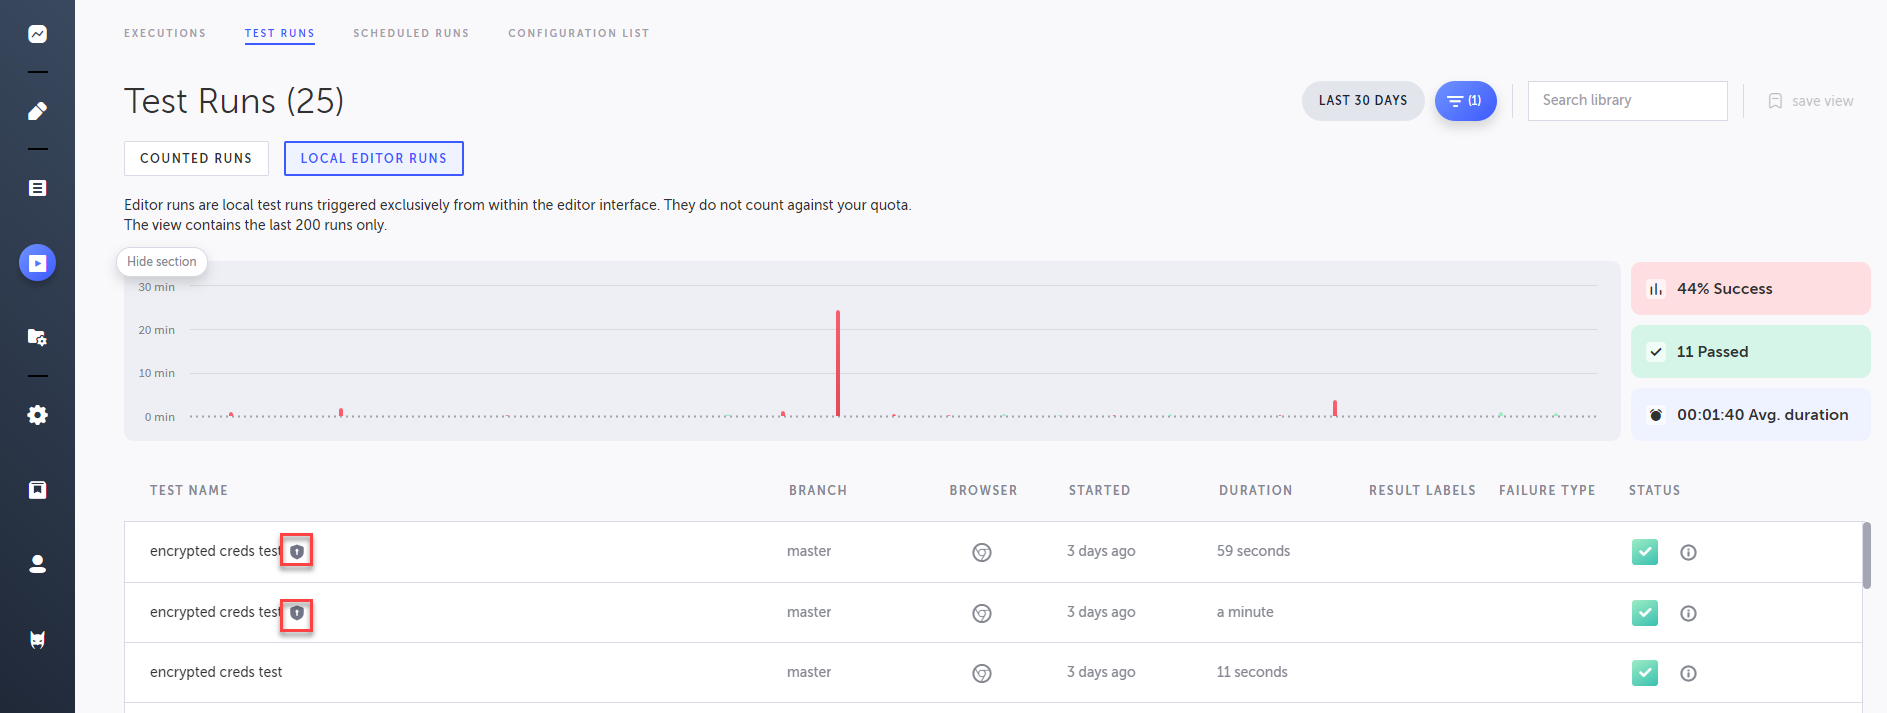
View Test runs with Secrets
Test runs with Secrets are marked with an icon (see below).
Updated 6 months ago