
Mocking network traffic using a HAR file
The mock network responses can be based on a HAR file. The HAR file is a JSON-formatted archive file format for logging of a web browser's interaction with a site. All the HTTP calls and responses are recorded in this file. Each request is processed by its order in the HAR file. Multiple instances of the same call can result in different responses. For example, the first call may return X, while the second call may return Y. Testim will automatically use the relevant data in the HAR file as the test run is being executed. There are two options for creating a HAR file:
- Option 1 – Using Testim to create the HAR file – in this option you will have to create your test <add link> and then run it once (with the "Include full network in HAR" setting). When running the test in Testim, a HAR file is created. Testim will use this HAR file to create mock network responses in subsequent runs of the same test. When running the test again, for which you want the mock network responses, you will need to specify that you want to use the HAR file that was recorded by Testim.
- Option 2 – Creating your own HAR – using Chrome dev tools you can create your own HAR file and save it in a location that is accessible via URL. When running the test, for which you want the mock network responses, you will need to specify that you want to use your own HAR file and its location.
Tests that include a login processIf your test includes a login process, which involves passing credentials to a server, it may not work properly when running the test on the mock network, as the login request will be timed out. To solve this issue, you should enable Pass-through Authentication when sending the login request. To do so, you will have to add a mapping file with the login request and the enabled Pass-through authentication property. For detailed instructions see Uploading the mapping file.
Option 1 - Using Testim to create the HAR file
To create a HAR file in Testim:
- After saving your test (See How to Record a Test), click the Properties (:fa-cog:) icon. The Test Properties pane is displayed:

- In Mock Network property, click the arrow to open menu options.
- Click Record New HAR. The test will run locally and the HAR file will be created automatically.

- When the process finishes, click Save.

Option 2 - Creating your own custom HAR file
To create your own HAR file:
- Open Google Chrome.
- In Chrome, go to the webpage that you want to use in your test.
- Select the Chrome menu > More Tools > Developer Tools
- Select the Networks tab.
- Within the Networks tab, select Preserve log option.

- Record the log by selecting the red circle at the top left of the Networks tab.
- Refresh the page and allow Chrome to record browser-website interaction.
- Once the page is loaded, select the Console tab and right-click in the console box. A menu is displayed.
- Select Save as and name the file.

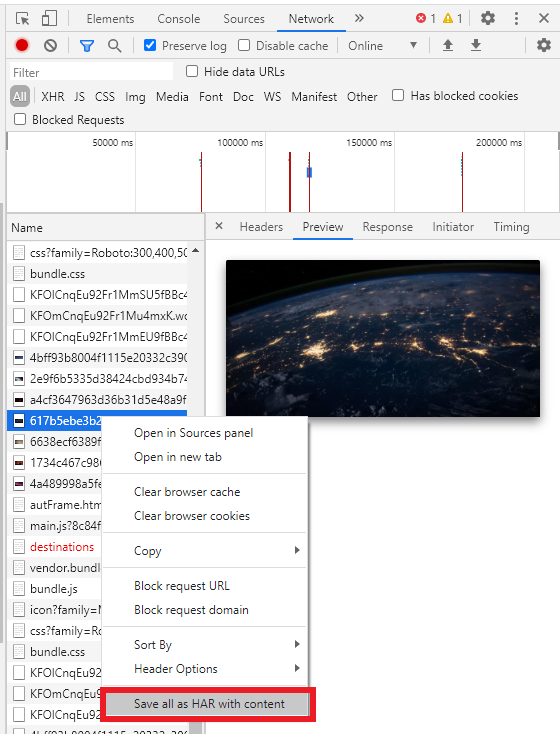
- Go back to the Networks tab and right click on any item in the Name column.
- Select "Save HAR with content".
The log and HAR file will be saved.
Uploading your custom HAR file.
To upload your custom HAR file:
- In the Test Properties pane, click Upload Custom HAR.

- Locate the custom HAR file that you saved and click Open to upload it.
Running your test using the HAR file
To run your test using the HAR file:
- In the Testim Visual Editor, go to the Test List screen and click a test for which you have recorded anew HAR or uploaded a custom HAR.
- In the Test Editor screen, a Mock Network icon will be displayed next to the Play button, indicating that the Mock network is available.

- Click the Play button to run the test using the mock network.
- Click Save.
Updated 6 months ago