
Test results
Understand what happens during the test run
After a test is run, you can view the test results on the Editor screen. Overall test run information is shown as well as detailed information about each step that was run.
Viewing Overall Test Results
On the test level, the test result displays the following information:
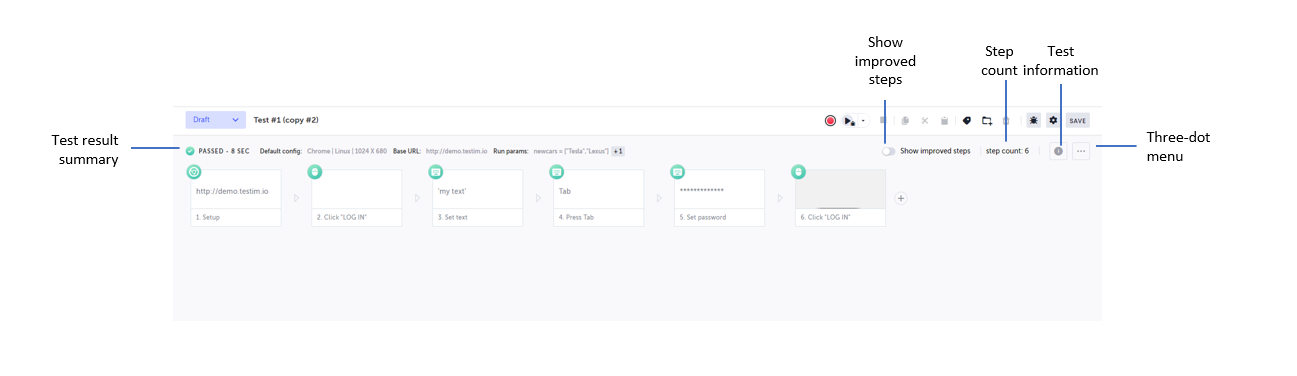
- Test result summary - The test result summary includes the following information:
- Indication of whether the test passed or failed
- The test run duration
- Run configuration information (the test’s base URL, target device, application name).
- Test information - click the i icon to view the test information. The test information includes the following information:
- Ext. version - the version of the Testim extension software.
- Source - whether the test was run locally or remotely.
- Run mode - the framework used in the run (e.g., Appium)
- Grid name - the grid used in the run.
- Run config. - the test configurations used during this test run. For more information, see Configuration Library - Web and Configuration Library - Mobile.
- Zoom level - the Zoom level that was used in the test run.
- OS - the operating system used in the test run.
- Browser - the browser and the browser version used in the test run.
- Date (UTC) - the date in UTC in which the test was executed.
- Time - the time in UTC in which the test was executed.
- Three-dot menu - click to access to open the following menu:
- View console log - displays the console logs for the test run. For more information, see Console Logs.
- View network log - displays the network logs for the test run. For more information, see Network Logs.
- View test history - displays the Test runs screen, while filtering to the selected test.
- View execution - displays the Execution Runs Screen, while filtering to the selected test.
- Generate PDF run report - generates a detailed PDF report of the test run results. See ?? for more details.
- Show improved steps - toggle to display steps with automatically improved locators. For more information, see Locators: Auto Improve .
- Step count - the step counter is a live counter that counts the total number of test steps. It counts steps and groups (including inner groups), however it does not count hooks. The counter is updated dynamically when you add or remove steps.
If a test included visual validations, see Visual Validation Test Results.
Viewing Step Results
During the test run, Testim updates each step with its results, including it's status (passed, of failed), a detailed error message if it failed, how long did it take, and a screenshot of the screen at that specific state. The same thing happens both when you run your test locally in your browser, and when you run it in your CI using the CLI tool.

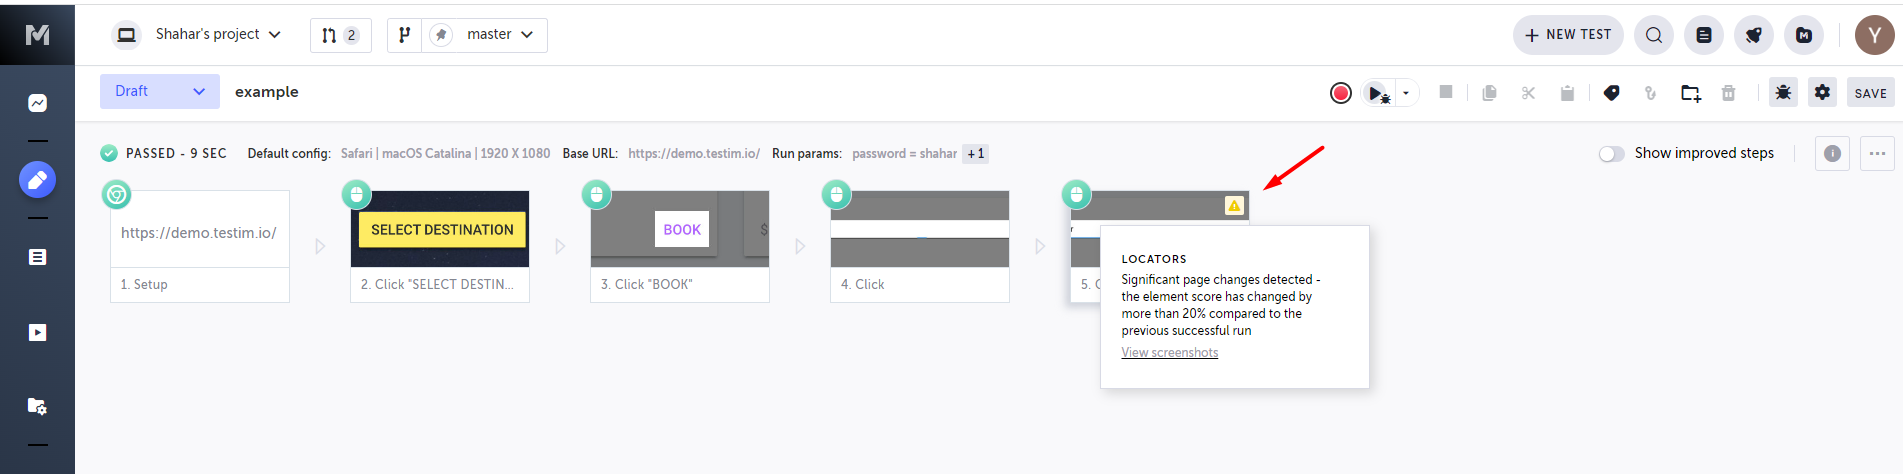
Hover over the warning icons at the top of the steps to get more insights such as console logs errors and warnings , network errors, or significant page change warnings. A page change warning is indicated on a test run when the confidence level of the Smart Locator for that element varies by more than 20% as compared to the recorded test. This could be an indication that the underlying code has changed and the user should "Improve" or "Reassign" the Smart Locator for that element.
You can open view the result of each step by double-click it:

Or by opening the Properties panel when the step is selected:

In order to see the screenshot of the step, your can either click on the screenshot icon on the step:
Or the screenshot icon when the step is opened:

Both will open the Screenshot tab of the Step Details screen. Here you can compare the original screenshot taken when the step was created with the screenshot from the recent test run.

If a test included visual validations, see Visual Validation Test Results.
In order to view Network Logs or Console for this step, click on the Network Logs or Console Logs tabs. For more information, see Network Logs and Console Logs.

NoteBy default, Testim retains the test results for 30 days.
Updated 6 months ago