
Salesforce Flows
Salesforce StepThis is a Salesforce step.
The Flow Builder in Salesforce is the declarative interface used to build individual flows. Flow Builder can be used to build code-like logic without using a programming language. The result can be a series of screens with fields that can be accessed by a specific URL or be embedded in an existing Salesforce screen, such as a pane in the Account screen.
The Flow screen completion step can be used to test that Salesforce Flow works properly, by imputing values into the some or all of the fields in each Flow screen. You will need to add a Flow screen completion step for each screen in the flow. When the test is executed, the system will automatically move to the next screen in the flow and execute the next Flow screen completion step. In the last Flow screen completion step, the flow is submitted. The use of this step assumes that the Flow has already been created using the Flow Builder.
Before adding the step
Before adding the Salesforce Flows step, you will need to add the following:
- If the Salesforce Flow is accessed by URL, add a Navigation Step before the Salesforce Flow step.
- If the Salesforce Flow is embedded in an Salesforce object that was created using Testim, the Salesforce Flow step can be located immediately after the step that was used to create the Salesforce object (e.g., immediately after the Create step).
Creating a Flow Screen Completion Step
To add a Flow Screen Completion step:
-
In the editor, add a step by clicking the + button.
-
Under the Salesforce steps tab, click Flow operations and select Flow screen completion step.
The Flow screen completion step is added and the following Object properties is displayed.
-
Click the Select Flow drop-down menu and select the desired Screen Flow. The list displays all the Unmanaged Screen Flows that were created.
-
Click the Select Screen drop-down menu and select the desired screen. The list displays all the screens that are part of the selected Flow.
The list of fields for this screen is displayed.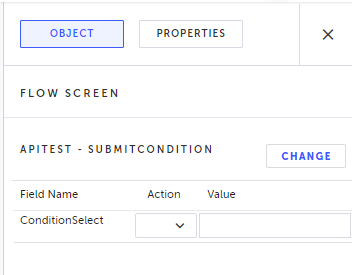
-
For each field that you want to input a value to, under Action select one of the following options:
- Input - inputs the specified value into the field. If the field is not editable this action will not be listed. The action requires entering a value, as described below.
- Ignore - this action performs no action on the field. The action does not require entering a value.
- Reset - resets the value in the field to a "no entry" state. Note that if the field is empty, it will try to enter an empty string to the field, however if you select the Reset option, it will not try to enter an empty string.
Under Value, enter the value of the field. If the field is a "pick list" (drop down menu), select the relevant option.
-
The Value field has two modes, to switch between the modes click the filed and the click the sign to alternate between T and {JS}:
T. Text mode. The value is treated as a literal string.
{JS}. JavaScript mode. The value is evaluated as a JavaScript expression. The field will evaluate JavaScript variables and functions.Unsupported fieldsIn some cases the field are not supported (e.g., some custom fields, etc.). In this case, the field will appear as disabled with a "Not yet supported" notice. Nevertheless, you can still include this field in your test by adding a step using the Recorder, as described in Record tests with Salesforce. Make sure that the recorded step is as added to the place in the test where the field is displayed (this is where you will add a Breakpoint and record).
-
Click Save to save the step.
-
If the Flow includes multiple screens, add a Flow screen completion step for each screen, by following steps 1-7 above.
Final screen of the flowThe final screen of the flow may not have any fields, but rather a button to submit the flow. In this case adding the Flow screen completion step will display a message that the screen has no fields to complete and that the step will submit the flow (e.g., the test will automatically click the "Finish" button).
-
Click Save when done.
Updated 6 months ago