
Editing Target Element Properties (Mobile)
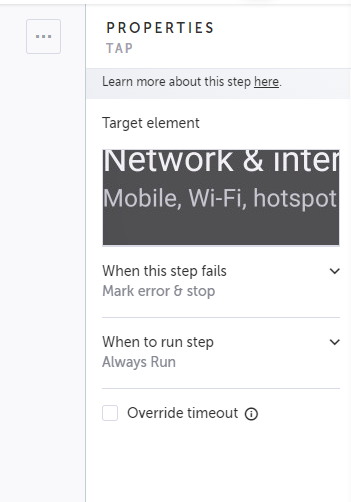
The target element is the element that was selected in the AUT (application under test) as the main element for the step. The target element is editable. The element itself appears as a thumbnail image in the Properties panel.
The following options are shown when hovering over the thumbnail: Highlight, Reassign, and View locators.
- Highlight – Clicking on Highlight opens the AUT with the target element momentarily highlighted in pink. This can be helpful because it allows you to visually confirm in the AUT what the target element is.
- Reassign – This option allows you to replace your target element with a different target element from your AUT. In this case, the system removes and overrides all the locators for the target element of a step. This option is relevant when you want to select a completely different element as the target. For example, your target element was a blue button that says "login", but now this button doesn’t exist anymore. In this case you will need to use the Reassign feature to select a new target element. See Reassigning the target element.
- View locators – When an element is selected during a recording (click, hover, enter, etc.), Testim's algorithm analyzes a wide variety of attributes associated with the element. These attributes are known as Locators. When the test is run, the system uses the locators to locate the target element. To do so, the system uses machine learning mode (default) or Vision Locate to determine a confidence level that the target element is indeed the same as the original one, although some of its attributes may have changed. This way, if the element was changed but is still functioning, Testim's Locators will find it and keep the test from failing. To learn more about viewing Locators, see Viewing Locators.
Highlight Target Element
Before making changes to a target element, you can highlight the element in the AUT browser to visually confirm which element is the current target element.
To highlight the target element:
- Hover over the step for which you want to highlight the target element and click the Show Properties button.
The Properties panel opens on the right-hand side.
- Hover over the target element thumbnail and click the Highlight link.
The highlight is displayed for a few seconds only.

Reassigning the Target Element
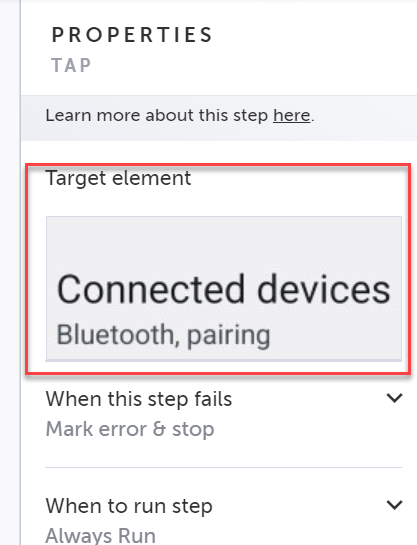
This option allows you to replace your target element with a different target element from your AUT. In this case, the system removes and overrides all the locators for the target element of a step. This option is relevant when you want to select a completely different element as the target. For example, your target element was a blue button that says "login", but now this button doesn’t exist anymore. In this case you will need to use the Reassign feature to select a new target element.
To reassign the target element in a “click” step:
- Hover over the step you want to reassign and click the Show Properties button.
The Properties panel opens on the right-hand side.

- Hover over the Target element thumbnail and click the Reassign link.
- Click the desired element. Try to choose text elements and avoid outer frames, images and icons for better stability.
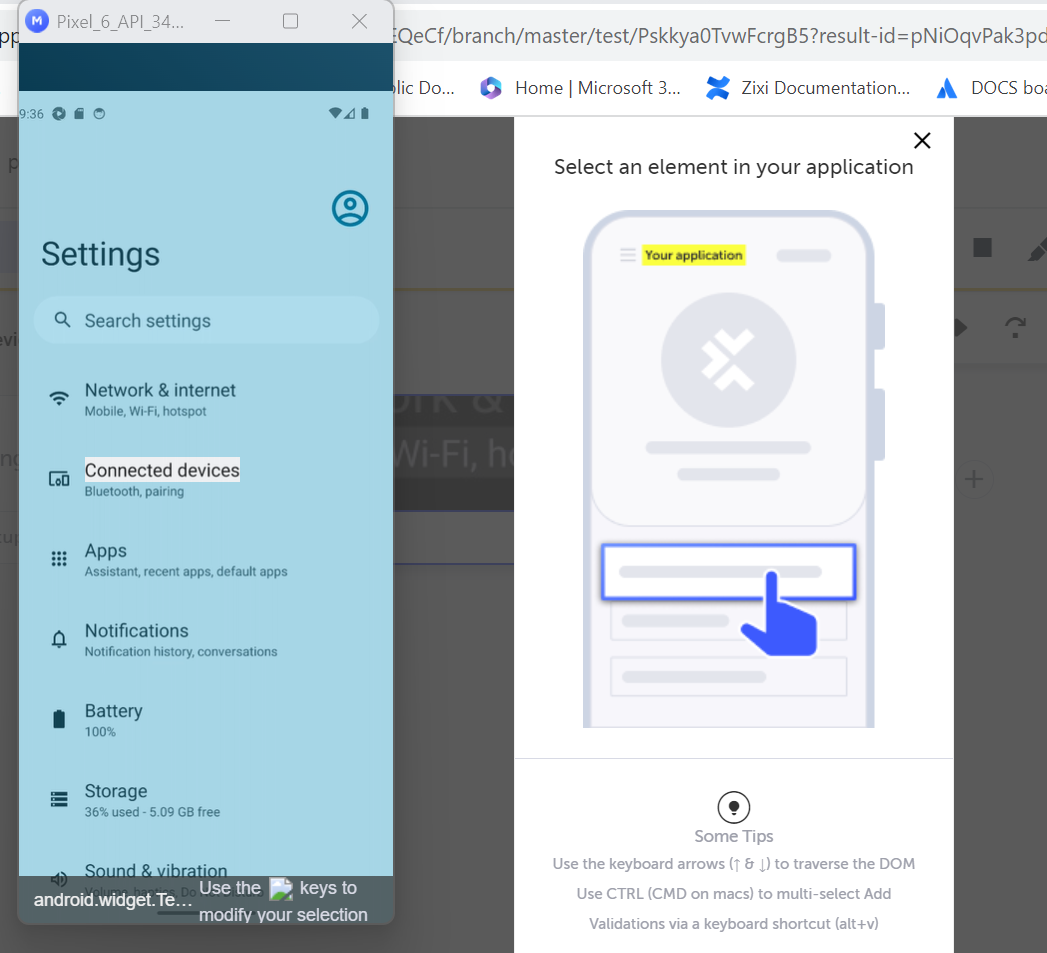
The preview of the reassigned target element will appear in the Properties pane.
Viewing Locators
The Locators are how Testim uniquely identifies each element on the screen and determines if the element still exists or not. Testim inspects the entire DOM, considering a wide variety of attributes that are related to the target element (e.g. text, id, class, etc.). These attributes are called locators. Some of these locators are part of the DOM (i.e., include aspects of the target element itself as well as parent elements), while others, such as indexOnlyXpath are pre-calculated attributes.
You can view the attributes used to locate the target element on the Locators panel. You can also visually identify the target element and its parent elements.
Enabling/Disabling Locators
You can select/de-select different locators or edit the content. Sometimes, an application will behave in an unexpected way, and manually selecting specific attributes to identify the element can be advantageous to improving stability. However, we recommend consulting with Testim Support before making such changes.
In some cases a locator may produce a false positive or false negative result. If you want the system to disregard it, you can simply select or deselect its related checkbox. After doing so, click Save and run the test again.
Editing Locators
Editing locators is a sensitive process that requires advanced knowledge of the DOM structure. Before editing consider reassigning the target element. If you are unsure of the consequences, please consult support. In any case using the ML mode (see below) does not require fine-tuning of the locators at all.
It is possible to edit the locators. The editing of the locators includes defining the conditions to match the target element. For example, in a text locator you can enter a different text string than the one captured in the the recording. If system finds this text in an element during the text execution, it will be considered as match, i.e., that the target element was found. The value can include specific matching conditions, for example, equals, contains, starts with, etc. It is also possible to define the value as a parameter or part of the value as a parameter. For more information on how to use parameters, see Parameters. The value can be optionally evaluated as an expression. In this mode you can add additional conditions within the value itself.
To edit the locator:
- In the View Locators panel, click Edit on the desired Locator.
The Edit Selector dialog is displayed.
- In the Match If field, select one of the following conditions:
- Equals - the locator will be considered as matching only if the target element is exactly as the value/expression result in the Value field below.
- Contains - the locator will be considered as matching only if the target element at least contains the value/expression result in the Value field below.
- StartsWith - the locator will be considered as matching only if the target element starts with the value/expression result in the Value field below.
- EndsWith - the locator will be considered as matching only if the target element ends with the value/expression result in the Value field below
- In the Value field, do one of the following:
- To use a regular value, enter the value that needs to be matched with the target element. The regular value can be or include a parameter. For more information on how to use parameters, see Parameters.
- To use an expression, enter the expression that needs to be matched with the target element and select the Evaluate as an expression checkbox. So for example, assume we have a variable called “number” with a value of 5: if “evaluate as expression” is selected and the value is “number” for the ‘text’ field, the system will try to locate the text ‘5’. If it’s not selected, the system will try to locate the text ‘number’
- Click OK.
Machine learning mode
Machine learning mode is the default mode, meaning that all the attributes in the Locators panel were automatically checked when the test step was recorded.
Viewing the locators in the Machine learning mode
Machine learning mode doesn't require any user intervention, no editing of the target element, and so on Instead, it'd make it easy to use and add unprecedented stability to the tests. Should you need to make changes, select your desired attribute(s) from the Locators panel and select Edit to modify the selectors. This is particularly important for dynamically changing elements because neither Machine learning mode or Vision Locate would be able to retrieve those elements.
The list includes locators that are based on the DOM (top of the list) and locators that are calculated by the system to provide more context.
If you make changes to the locators, Testim will use Vision Locate and Fallback Locators.
Setting the Threshold level in Machine learning mode and Vision Locate
Testim offers the ability to manually fine tune the algorithm’s threshold to your preferences through the UI as follows:
- High threshold – only when the confidence score is really high, it will determine that it found the target element.
- Medium threshold – when the confidence score is medium, it will determine that it found the target element
- Low threshold – even if the confidence score is low, it will determine that it found the target element.
To set the threshold level:
- In the View Locators panel, under the Threshold level, click the drop-down menu.
- Select the relevant Treshold level.
- Click Save.
- Rerun the test.
Vision Locate Fallback
Instead of relying on the element's metadata, this method analyzes a screenshot of the screen using a custom-trained vision model. The model detects all potentially interactive elements and, based on visual features, determines which element on the screen matches best.
This approach is very useful for dynamic or non-standard UIs where traditional DOM-based locators may be unreliable. Like Machine Learning mode, it requires no user intervention or editing, making it highly robust and easy to use, even in visually complex applications.
Updated 6 months ago